Many people dream of growing fresh vegetables, herbs, or flowers at home, but the idea of creating a garden often feels more complicated than it needs to be. Between poor soil, limited space, and endless online tutorials showing expensive setups, it’s easy to assume gardening requires a major investment of time and money.
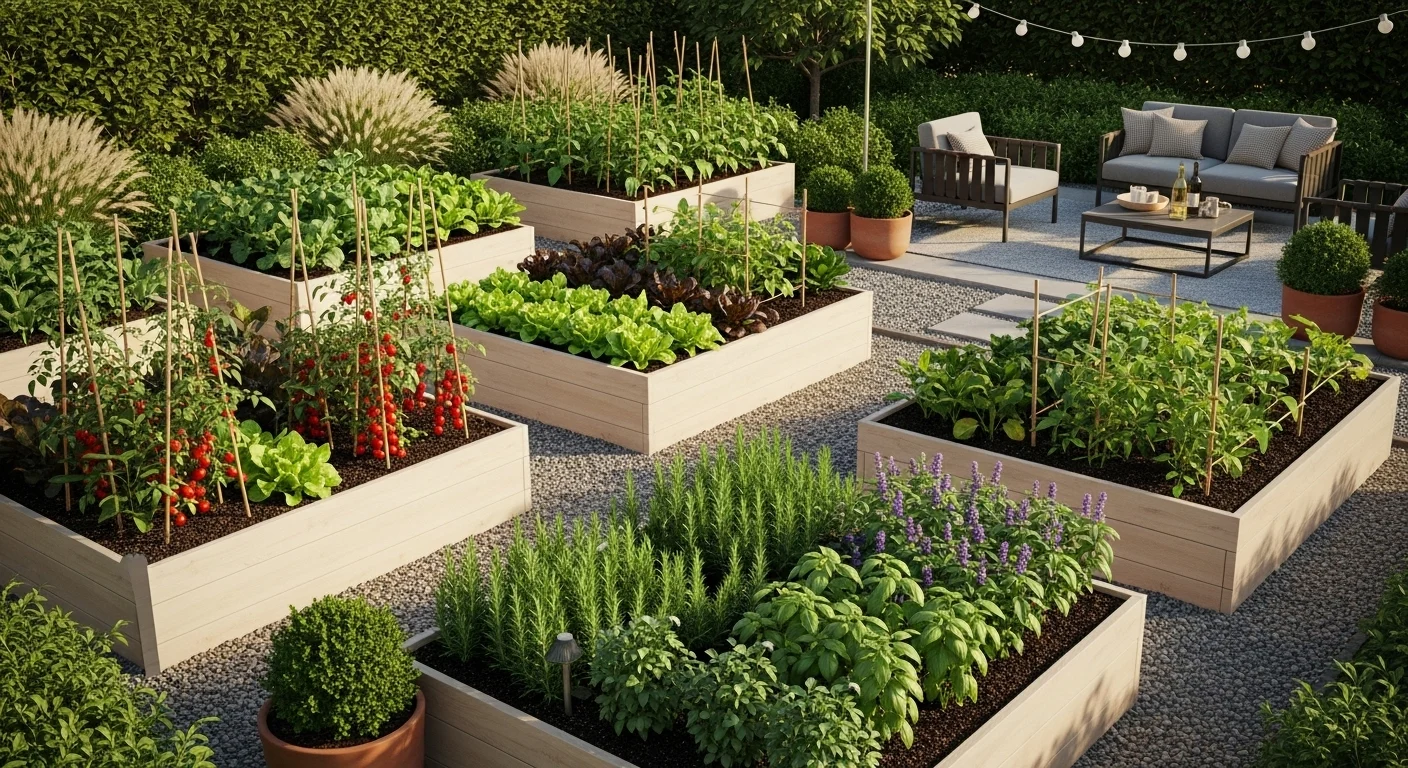
The reality is much simpler. A raised garden bed is one of the easiest and most practical ways to start gardening, especially for beginners. It gives you control over soil quality, improves drainage, reduces weeds, and makes maintenance easier. Better yet, you can build a functional raised bed in a single weekend using basic materials and simple tools.
One common mistake people make is overcomplicating the project. They spend weeks researching elaborate designs when a straightforward wooden raised bed often performs just as well. The goal isn’t to build a showpiece—it’s to create a productive growing space that works.
In this guide, you’ll learn exactly how to plan, build, fill, and maintain a simple raised garden bed. We’ll cover everything from choosing the right location to selecting materials, avoiding common mistakes, and making smart decisions that save both time and money. By the end of the weekend, you’ll have a finished raised bed ready for planting and years of productive gardening ahead.
1. Start With the Right Location
The success of your raised garden bed depends more on location than most people realize. Even the best-built garden bed won’t perform well if it’s placed in the wrong spot.
Most vegetables and herbs require at least six to eight hours of direct sunlight each day. Before buying materials, spend a day observing how sunlight moves across your yard. Areas that look sunny in the morning may be heavily shaded by afternoon.
Raised beds work especially well in backyards with poor soil, uneven terrain, or drainage issues. They’re also useful in smaller spaces where you want a clearly defined growing area.
Avoid placing beds directly under large trees. Tree roots compete for water and nutrients, while overhead branches reduce sunlight and drop leaves throughout the growing season.
Think about convenience as well. A garden located near your house is more likely to receive regular attention than one hidden in a far corner of the yard. Daily watering, harvesting, and maintenance become much easier when the bed is accessible.
A practical rule: if reaching the garden feels inconvenient, gardening itself will eventually feel inconvenient.
2. Choose a Manageable Bed Size
One of the biggest beginner mistakes is building a raised bed that’s too large. Bigger may seem better, but oversized beds quickly become difficult to maintain.
A common and highly effective size is 4 feet wide by 8 feet long. The four-foot width allows you to reach the center from either side without stepping into the soil. This keeps soil loose and healthy.
For smaller yards, a 4×4 or 3×6 bed works perfectly well. The goal is accessibility rather than maximum square footage.
Length can vary depending on available space, but keeping dimensions manageable makes planting, watering, and harvesting easier.
Height matters too. Most simple raised beds are 10 to 12 inches tall, which provides enough soil depth for vegetables, herbs, and flowers.
Think about your future workload. A moderately sized bed is easier to weed, water, and maintain than an oversized garden that becomes overwhelming halfway through the season.
Many experienced gardeners eventually recommend starting smaller and expanding later. It’s easier to add another bed than to regret building one that’s too large.
3. Select Affordable and Durable Materials
The material you choose affects both the appearance and lifespan of your raised bed. Fortunately, you don’t need premium materials to build something functional.
Untreated cedar is often considered the gold standard because it naturally resists rot and insects. However, cedar can be expensive depending on your location.
Pressure-treated lumber has improved significantly over the years and is commonly used in garden construction. Modern treated lumber is generally considered safe for vegetable gardening, though some gardeners still prefer untreated wood.
Pine is another budget-friendly option. While it won’t last as long as cedar, it can provide several productive years when properly maintained.
Avoid railroad ties, reclaimed industrial wood, or unknown materials that may contain harmful chemicals.
When budgeting, remember that soil often costs more than the lumber itself. Spending slightly less on wood can free up funds for quality soil and compost.
A simple wooden rectangle built from basic boards often performs just as well as expensive decorative kits while costing significantly less.
4. Gather Basic Tools Before You Begin
Weekend projects run smoothly when everything is ready before construction begins. Few things are more frustrating than stopping halfway through a build because you’re missing a tool.
Fortunately, raised garden beds require only a handful of common tools. Most homeowners already own many of them.
Typical tools include a drill, tape measure, saw, work gloves, carpenter’s square, level, and safety glasses.
If you don’t own a saw, many home improvement stores can cut lumber to size before you take it home.
Organizing tools beforehand saves considerable time and reduces mistakes during construction.
Keep screws, measuring tools, and hardware in one location to avoid constant searching during assembly.
The actual construction process is surprisingly straightforward. Much of the weekend effort goes into preparation rather than complex building techniques.
Being organized from the start helps transform what could feel like a large project into a simple afternoon task.
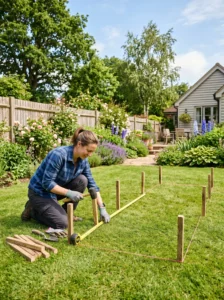
5. Create a Simple Design Plan
You don’t need architectural drawings to build a raised garden bed. However, having a basic plan prevents costly mistakes.
Sketch the dimensions on paper before purchasing materials. Include board lengths, corner locations, and overall bed placement.
This simple exercise helps estimate lumber, soil, and hardware requirements more accurately.
Many beginners underestimate soil volume. A quick calculation beforehand prevents last-minute trips to the garden center.
The best raised-bed designs are often the simplest. Complex shapes may look interesting but create wasted planting space and complicate construction.
Stick with rectangles or squares whenever possible.
A straightforward plan also helps maintain a realistic budget. Once dimensions are finalized, you can accurately estimate total project costs before spending money.
The goal isn’t perfection. It’s creating a clear roadmap that makes construction efficient and stress-free.
6. Prepare the Ground Properly
Even though raised beds sit above existing soil, ground preparation still matters.
Start by removing grass, weeds, rocks, and debris from the chosen area. A clean foundation prevents future problems.
Level ground creates better stability and helps distribute water evenly throughout the bed.
If the area slopes significantly, minor grading may be necessary before installation.
Many gardeners place cardboard beneath the bed before filling it. Cardboard suppresses weeds naturally and eventually decomposes into the soil.
Avoid using plastic sheeting under the bed. While it blocks weeds, it also interferes with drainage and soil health.
Taking an extra hour to prepare the site often saves many hours of maintenance later.
A stable, weed-free foundation contributes to healthier plants and easier gardening throughout the season.
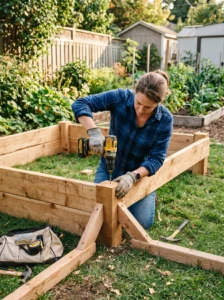
7. Build the Frame Carefully
The frame forms the backbone of your raised garden bed, so accuracy matters.
Measure twice before cutting lumber. Small measurement errors can create frustrating alignment problems during assembly.
Use exterior-grade screws rather than nails whenever possible. Screws provide stronger connections and better long-term durability.
Check corners with a carpenter’s square to ensure they’re perfectly aligned.
If the bed is particularly long, consider adding internal supports to prevent boards from bowing outward once soil is added.
Work slowly during assembly. Most mistakes occur when rushing through measurements or fastening.
The good news is that raised-bed construction is forgiving. Small cosmetic imperfections rarely affect functionality.
Once assembled, place the frame in position and verify it’s level before filling.
A solid frame creates the foundation for years of successful gardening.
8. Improve Drainage From the Start
Good drainage is one reason raised beds perform so well compared to traditional gardens.
Because soil sits above ground level, excess water naturally drains away more efficiently.
However, drainage can still become an issue if the bed is placed in a consistently wet area.
Avoid lining the bottom with impermeable materials. Water must be able to move freely through the soil profile.
Mixing compost into the soil improves structure and enhances drainage while retaining enough moisture for healthy plant growth.
If your property has heavy clay soil, raised beds provide an especially valuable solution.
Healthy roots require both water and oxygen. Proper drainage helps provide both.
Gardeners often notice stronger growth and fewer disease problems when drainage issues are addressed early rather than after planting.
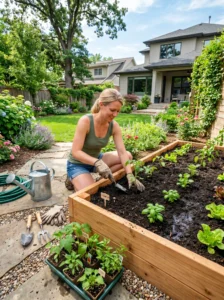
9. Fill the Bed With Quality Soil
The soil inside your raised bed determines how well your plants perform.
Many beginners try to save money by filling beds entirely with inexpensive topsoil. Unfortunately, poor soil often leads to disappointing results.
A balanced mix typically includes topsoil, compost, and organic matter.
Compost provides nutrients, improves moisture retention, and supports beneficial soil organisms.
Quality soil creates a productive growing environment from day one.
Remember that plants spend their entire lives in this soil. Investing in good soil often provides better returns than investing in expensive gardening gadgets.
As the soil settles over time, additional compost can be added each season.
Healthy soil creates healthier plants, stronger harvests, and fewer gardening frustrations overall.
10. Install Weed Protection Wisely
Nobody enjoys spending weekends pulling weeds.
Fortunately, raised beds naturally reduce weed pressure compared to traditional gardens.
A cardboard layer beneath the bed helps block existing weeds while allowing natural decomposition.
After planting, organic mulch such as straw, shredded leaves, or untreated wood chips can further suppress weeds.
Mulch also conserves moisture and regulates soil temperature.
Avoid overly thick mulch layers that may prevent water from reaching plant roots.
Consistent weed prevention is easier than weed removal.
A few preventive steps during setup can significantly reduce maintenance throughout the growing season.
11. Plan Plant Spacing Before Planting
One common gardening mistake is planting too much in too little space.
Young seedlings often appear tiny, making it tempting to place them closer together than recommended.
However, crowded plants compete for sunlight, water, and nutrients.
Proper spacing improves airflow and reduces disease risk.
Raised beds often support intensive planting methods, but even intensive gardening requires careful planning.
Read seed packets and plant labels carefully before planting.
A thoughtfully planned bed not only looks better but also produces higher yields.
Good spacing creates healthier plants and makes harvesting significantly easier.
12. Add Easy Irrigation Solutions
Watering becomes much easier when irrigation is considered early.
Many gardeners begin with a simple garden hose and watering wand, which works perfectly for small beds.
For greater convenience, soaker hoses or drip irrigation systems provide consistent moisture while reducing water waste.
These systems are especially useful during hot summer weather.
Avoid overhead watering whenever possible, as wet foliage can encourage disease.
Consistent soil moisture supports healthier root development and more productive plants.
A simple irrigation solution saves time and helps maintain plant health during busy weeks.
Your future self will appreciate not dragging hoses around every evening.
13. Protect Your Bed From Pests
Every garden eventually attracts unwanted visitors.
Common pests include rabbits, insects, squirrels, and birds depending on your location.
Simple physical barriers are often the most effective solution.
Wire mesh, lightweight netting, or temporary fencing can protect young plants without requiring chemicals.
Regular inspection helps catch problems before they become severe.
Healthy soil and proper plant spacing also contribute to natural pest resistance.
Prevention usually requires far less effort than dealing with a major infestation later.
A few protective measures can save an entire season’s harvest.
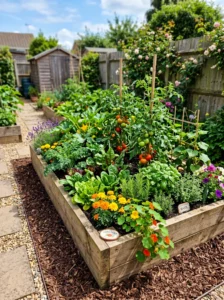
14. Finish With Mulch and Edging
The final details make a raised bed look polished and professional.
Mulch improves moisture retention, reduces weeds, and creates a cleaner appearance.
Surrounding the bed with gravel, wood chips, or stepping stones creates easier access and reduces muddy pathways.
These finishing touches also simplify maintenance and harvesting.
A tidy garden often encourages more frequent use and attention.
The difference between a temporary project and a permanent garden often comes down to these small finishing details.
A well-finished raised bed feels intentional and inviting.
15. Create a Long-Term Maintenance Routine
The best raised garden beds aren’t necessarily the most expensive. They’re the ones that receive consistent care.
Seasonal maintenance is relatively simple. Add compost annually, inspect boards for damage, refresh mulch, and monitor soil levels.
Wooden beds naturally age over time, but regular inspections help identify small problems before they become expensive repairs.
Cleaning tools and removing plant debris at season’s end also improves garden health.
Most maintenance tasks require only a few minutes each week.
A raised bed that receives steady attention often remains productive for many years.
Consistency matters far more than perfection in gardening.
Comparison Table
| Type | Best Use | Material | Style/Vibe | Difficulty Level |
|---|---|---|---|---|
| Basic Rectangle Bed | Vegetables and herbs | Pine Lumber | Simple and practical | Easy |
| Cedar Raised Bed | Long-term gardening | Cedar Wood | Natural and premium | Easy |
| Square Raised Bed | Small yards | Pine or Cedar | Compact and organized | Easy |
| Deep Raised Bed | Root vegetables | Wood Boards | Functional | Moderate |
| Multi-Bed Layout | Large gardens | Mixed Lumber | Productive and structured | Moderate |
Buying Guide: How to Choose the Right Raised Garden Bed
Choosing the right raised garden bed starts with understanding your available space. Bigger isn’t always better. A bed that’s too wide becomes difficult to reach, while one that’s too long may require more maintenance than expected. For most homeowners, a width of four feet provides an ideal balance between growing space and accessibility.
Material selection is another important decision. Cedar offers excellent durability and natural rot resistance but comes at a higher price point. Pine is significantly more affordable and works well for beginners, although it may need replacement sooner. Consider your long-term gardening plans before investing in premium materials.
Depth matters depending on what you plan to grow. Herbs, lettuce, and flowers perform well in shallower beds, while root crops like carrots benefit from additional soil depth. Most general-purpose gardens function perfectly with 10 to 12 inches of soil.
Budget should include more than lumber alone. Soil, compost, screws, mulch, and irrigation supplies often account for a significant portion of project costs. Many first-time builders underestimate these expenses.
Maintenance requirements should also influence your decision. Natural wood looks attractive but may eventually weather and require repairs. Higher-quality materials generally last longer and reduce future maintenance.
A common mistake is focusing entirely on appearance while ignoring functionality. Fancy designs may look impressive initially but can complicate planting and maintenance. Simplicity often provides the best long-term results.
Ultimately, choose a raised bed that fits your space, budget, and gardening goals rather than following trends. Practical decisions usually create the most enjoyable gardening experience.
Conclusion
Building a simple raised garden bed in one weekend is one of the most achievable home gardening projects available. With basic tools, affordable materials, and thoughtful planning, you can create a productive growing space without needing professional skills or a large budget.
The most important decisions happen before construction begins. Choosing the right location, selecting practical dimensions, investing in quality soil, and planning for drainage all contribute to long-term success. Once those fundamentals are in place, the actual building process becomes surprisingly straightforward.
Raised beds offer numerous benefits, including improved soil quality, easier maintenance, better drainage, and greater control over growing conditions. They’re particularly valuable for beginners who want a manageable way to start gardening.
Remember that gardening is an ongoing process rather than a one-time project. Regular maintenance, seasonal compost additions, and simple preventive care help keep your raised bed productive for years.
You don’t need a massive backyard or expensive setup to grow healthy plants. A well-built raised garden bed provides a practical, efficient, and rewarding foundation for your gardening journey. Start simple, focus on the basics, and allow your garden to grow alongside your experience.
FAQs
1. What is the best wood for a raised garden bed?
Cedar is often considered the best option because it naturally resists rot and insects. Pine is a more affordable alternative that still performs well for several years when properly maintained.
2. How deep should a raised garden bed be?
Most vegetables grow well in beds that are 10–12 inches deep. Root crops like carrots and parsnips may benefit from deeper soil.
3. Can I place a raised bed directly on grass?
Yes. Remove existing grass or cover it with cardboard before filling the bed. This helps suppress weeds and improves long-term soil health.
4. How much soil do I need for a raised bed?
The amount depends on bed dimensions. Calculate length × width × depth to determine total volume before purchasing soil.
5. Do raised garden beds need drainage holes?
No. Since the bed sits directly on the ground, water can naturally drain into the soil below.
6. How long does a wooden raised garden bed last?
Pine beds may last 5–10 years, while cedar beds can often last 10–20 years or longer depending on climate and maintenance.
7. Is building a raised bed cheaper than buying one?
In many cases, yes. Building your own raised bed often costs significantly less than purchasing a pre-made kit while allowing custom sizing.
8. What is the biggest mistake beginners make?
Overbuilding. Many people create beds that are too large, use poor-quality soil, or choose a location that doesn’t receive enough sunlight.