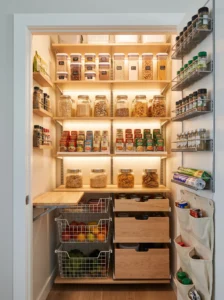
There’s a strange kind of guilt that comes from opening a closet stuffed with old coats, board games nobody plays anymore, and a vacuum cleaner that hasn’t seen carpet in years — while your kitchen counters are buried under cereal boxes and canned tomatoes because there’s simply nowhere else to put them. If that sounds familiar, you’re not alone. Most homes built before the open-concept kitchen boom just weren’t designed with real food storage in mind, and even newer builds often skimp on pantry space in favor of a bigger island or more cabinet doors that look nice but hold surprisingly little.
The good news is that a spare closet — even a small, awkward one under the stairs or in a hallway — has more potential than people give it credit for. Closets are already boxed-in, already have some kind of shelving bones, and are usually close enough to the kitchen to be genuinely useful. What they lack in charm, they make up for in raw storage volume once you stop treating them like a dumping ground and start treating them like a room with a job to do.
This guide walks through 23 practical, tested ways to convert that extra closet into a pantry that actually earns its space — from shelving choices and lighting to labeling systems and small details that make daily cooking easier. You’ll also find a comparison table of storage options, a buying guide to help you avoid wasting money on the wrong materials, and answers to the questions people ask most before starting this kind of project.
1. Start With an Actual Measurement, Not a Guess
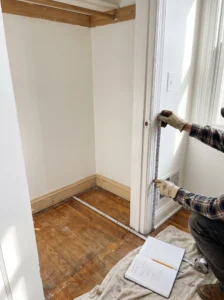
Before you buy a single shelf bracket, grab a tape measure and write down the closet’s height, width, and depth at multiple points — many older closets are slightly out of square, and what looks like 24 inches at the top can be 22 at the bottom. This single step prevents the single most common pantry mistake: ordering shelving units that either don’t fit or leave awkward gaps. It works best as the very first task, before any Pinterest board or shopping trip. Note the position of the light switch, any vents, and the door swing radius too, since these all eat into usable space. A lot of people skip this because it feels like busywork, but contractors and organizers measure twice for a reason — returns on custom-cut shelving are expensive and slow. Write the numbers on your phone so you have them while browsing in-store.
2. Rethink the Door Before You Rethink the Shelves
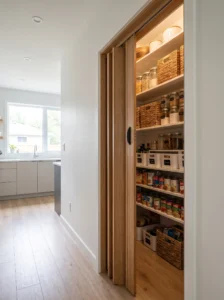
A standard swinging door on a narrow closet can eat up two feet of floor clearance every time you open it, which matters a lot in tight hallways or kitchens. Swapping it for a bifold door, a barn-style slider, or even a simple curtain on a tension rod solves this instantly and costs less than most people assume. This works especially well in galley kitchens where every inch of walking space counts. If you go with a curtain, choose a washable fabric since it’ll be near food and will pick up cooking odors over time. Removing the door entirely and adding an open frame with a valance is another option if you want the pantry to feel like part of the kitchen rather than a hidden closet. One homeowner I read about swapped a hinged door for bifold panels and said it was the first change that made the space feel intentional rather than repurposed.
3. Install Adjustable Wire Shelving as Your Foundation
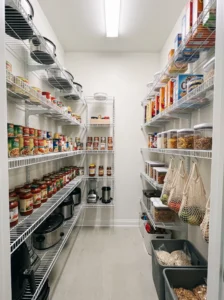
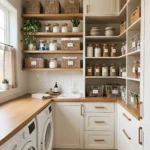
Wire shelving is the workhorse of closet conversions because it’s affordable, ventilated, and easy to reconfigure as your storage needs change. It works particularly well for canned goods, boxed items, and anything that benefits from airflow, like onions or potatoes in mesh bags. When installing, space shelves close enough together that you’re not wasting vertical air above shorter items — 10 to 12 inches apart is usually right for most pantry goods, with one taller gap reserved for cereal boxes or larger appliances. Choose a coated wire finish rather than bare metal, since it resists rust in a kitchen-adjacent environment far better. A common mistake is installing every shelf at even intervals without planning for what actually goes where, which leads to wasted space within the first month. Once shelves are adjustable, moving them to match the season — more shelf space for canning jars in fall, less for baking supplies in summer — becomes a five-minute job.
4. Add Pull-Out Drawers for Anything You Dig Through Often
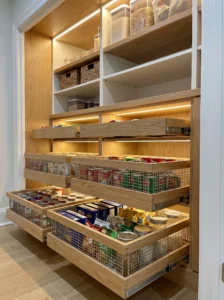
Fixed shelves force you to reach past the front row to find what’s behind it, which is exactly how forgotten cans end up expired at the back. Pull-out wire or wood drawers solve this by bringing the entire contents forward with one motion, and they work best on the lower shelves where bending and reaching are hardest on your back. Look for drawers rated to hold at least 35–50 pounds if you’re storing canned goods, since a loaded drawer is heavier than people expect. Install them at counter height or just below for the items you use daily — spices, oils, snacks — and reserve fixed upper shelves for bulk or backup stock. The main installation mistake is mounting slides without checking they’re level, which causes drawers to drift open or stick over time. Once you’ve used a pull-out drawer for something like canned beans or pasta, going back to a flat shelf feels like a step backward.
5. Mount a Door-Back Organizer for Spices and Small Jars
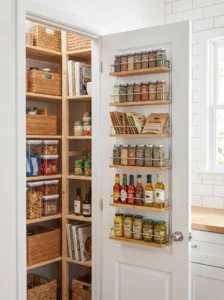
The back of the pantry door is dead space in almost every closet, and a wire or clear-pocket organizer turns it into genuinely useful storage without touching the main shelving. This works best for spice jars, small condiment bottles, seasoning packets, and anything flat enough not to interfere with the door closing. Measure your door’s clearance before buying — a 3-inch-deep rack is usually safe, but anything deeper can collide with shelving on tighter closets. Group spices alphabetically or by cuisine type so cooking doesn’t turn into a scavenger hunt, and keep the heaviest jars on the lower rows to keep the whole unit from feeling front-heavy. A mistake worth avoiding is overloading a cheap organizer meant for lightweight items with heavy glass jars, which stresses the mounting screws over time. Once this space is in use, it typically holds 20 to 40 items that would otherwise clutter your counter or a kitchen drawer.
6. Carve Out a Small Prep or Landing Shelf
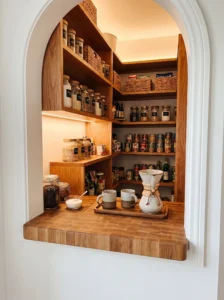
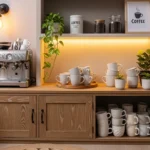
Even a 12-inch-deep shelf set at counter height gives you somewhere to set down groceries, prep ingredients, or stage a coffee station without walking back into the kitchen proper. This works best positioned just inside the pantry door, at a height between 34 and 38 inches, which matches most standard counters. Choose a durable surface like butcher block, laminate, or sealed plywood rather than raw wood, since spills are inevitable in this spot. Keep it clear of clutter by treating it as a working surface rather than extra storage — that’s the single biggest mistake people make, turning the one useful flat space back into another shelf. Adding a small mat or tray on top protects the surface and makes cleanup faster. Households that add this feature often say it’s where morning coffee, lunch assembly, or unpacking a grocery haul actually happens now, rather than crowding the main kitchen counter.
7. Add Under-Shelf Lighting So You Can Actually See What You Have
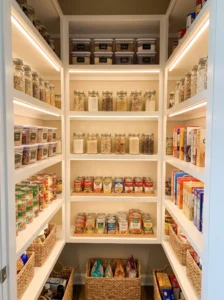
Closets almost never have enough ambient light, and a single overhead bulb creates shadows on lower shelves exactly where you need visibility most. Battery-powered LED puck lights or a slim adhesive LED strip mounted under each shelf solves this cheaply, without an electrician. This matters most in deep or windowless closets where daylight never reaches. Choose lights in the 3000K–4000K range, which reads as bright white without feeling clinical, and go with motion-activated or door-switch-triggered versions so you’re not fumbling for a button with your hands full. Avoid warm yellow bulbs, which make it harder to judge whether produce is starting to turn. A frequent oversight is mounting lights at the very back of a shelf where the item in front blocks the beam — mount them toward the front edge instead, angled slightly down. The difference between a dim pantry and a well-lit one shows up every single time you’re trying to find the cumin at 6 p.m.
8. Use Clear, Stackable Bins for Bulk and Loose Items
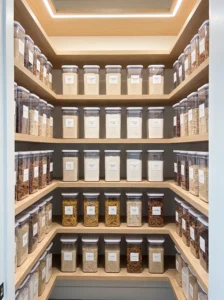
Bags of rice, flour, sugar, and snacks lose their shape fast and become an avalanche waiting to happen on an open shelf. Clear, uniform bins with snap lids fix this by keeping everything upright, stackable, and visible at a glance, which works especially well for baking staples and bulk-bought grains. Choose bins in one or two consistent sizes rather than a mismatched collection, since uniformity is what actually makes stacking safe and shelf space efficient. BPA-free polycarbonate or Tritan plastic holds up better than cheaper acrylic, which can crack under repeated stacking. Label the front-facing side, not the lid, since lids get swapped or misplaced surprisingly often. The biggest mistake here is buying bins before measuring your shelf depth, which leaves you with containers that either stick out past the shelf edge or leave several wasted inches behind them. Once bulk goods are decanted into bins, expiration dates tend to get missed less because everything is visible instead of buried in its original bag.
9. Install a Lazy Susan in Any Corner or Deep Shelf
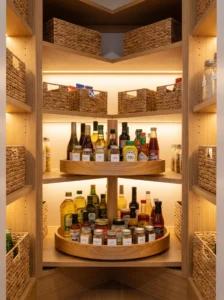
Corner space and extra-deep shelving are where jars and bottles disappear for months, and a rotating lazy Susan solves that by bringing everything within reach with a spin instead of a reach-and-search. This works best on the back shelf of a walk-in pantry or in any closet deeper than 16 inches. Choose a two-tier version if your shelf has the vertical clearance, since it roughly doubles the usable capacity of that single spot. Keep oils, vinegars, and condiments here rather than heavier canned goods, since a loaded lazy Susan spins more smoothly with lighter items. A common misstep is placing one on a shelf that’s too shallow, so half the turntable overhangs the edge and items slide off during rotation. Corner-adjacent lazy Susans tend to become the spot for the bottles used weekly but not daily — soy sauce, cooking wine, specialty vinegars — because spinning to find them beats digging.
10. Build a Consistent Labeling System From Day One
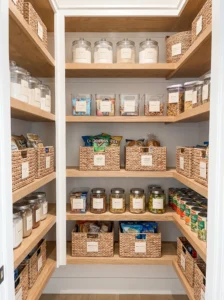
A pantry without labels slowly drifts back into chaos no matter how well it started, because everyone in the household puts things back slightly differently. A simple system — printed labels on bins, chalkboard tags on baskets, or even masking tape and a marker — keeps the whole space legible to anyone who opens the door, not just the person who organized it. This matters most in households with kids or multiple cooks, where consistency breaks down fastest. Use a matching label style throughout rather than mixing fonts and materials, since visual consistency is part of what makes a space feel calm rather than cluttered. Include the category rather than just the item where possible — “baking” instead of only “flour” — so new items have an obvious home. The mistake most people make is labeling once during setup and never updating it as contents change; revisit labels every few months. A properly labeled pantry cuts down on duplicate purchases too, since it’s obvious at a glance what you already have.
11. Zone the Pantry by Category, Not by Availability
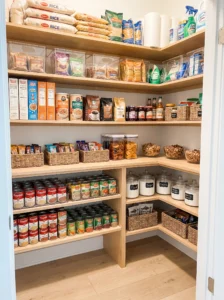
Random placement — put it wherever there’s a gap — is how pantries become disorganized within weeks. Zoning means deciding in advance that baking goes here, canned goods go there, snacks go on this shelf, and sticking to it. This works well in any pantry with more than three shelves, since zones give every item a predictable home. Put daily-use zones like snacks and breakfast items at eye level, bulk and backup stock up high, and heavier canned goods lower down for safety and easy lifting. Keep a small buffer zone empty in each category for new purchases, so nothing gets crammed in sideways. The most common zoning mistake is designing it around today’s groceries instead of your general habits, which falls apart the first time your shopping list changes. Once zones are set and everyone in the house knows them, putting groceries away becomes fast instead of a puzzle every time.
12. Add Tiered Shelf Risers for Small Jars and Cans
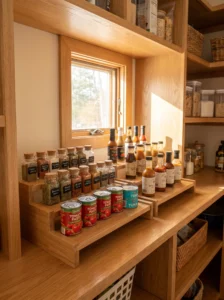
A flat shelf full of short items like spice jars or small cans wastes the air space above them, and tiered risers fix that by stepping items back so every row stays visible from the front. This works especially well for canned goods, spice jars, and small sauce bottles where stacking directly on top hides labels. Choose risers rated for the weight of what you’re storing — metal wire tiers handle heavier cans better than lightweight plastic ones. Position the riser toward the back of the shelf with an inch or two of flat space in front for taller items that don’t need the tier. A mistake to avoid is using a riser on a shelf that’s already shallow, since it can push the front row uncomfortably close to the shelf edge. Once installed, a single tiered riser can turn one wasted shelf into what feels like two, without any construction involved.
13. Install Hooks for Aprons, Bags, and Reusable Totes
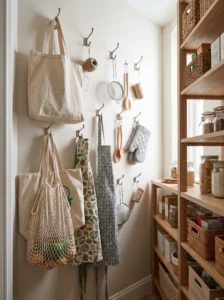
The inside wall or door of a pantry closet is often left blank, when it could easily hold hooks for aprons, oven mitts, reusable grocery totes, or even a broom and dustpan. This works best on any flat vertical surface that isn’t already taken up by shelving, particularly the side walls near the entrance. Choose adhesive hooks for lightweight items and screw-mounted hooks for anything heavier like a full tote bag, since adhesive versions can fail under sustained weight. Space hooks at staggered heights rather than a single row, which keeps bulkier items like totes from overlapping each other. A frequent oversight is hanging items so close to shelving that they knock cans over when swung, so leave a few inches of clearance. This small addition tends to solve the “where do the grocery bags even live” problem that otherwise ends up cluttering a kitchen drawer.
14. Repurpose an Old Bookshelf Instead of Buying New Units
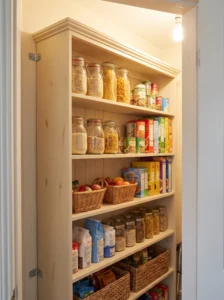
If you already own a bookshelf that’s not doing much, sliding it into a spare closet can save real money over buying custom shelving, provided the dimensions are close to your closet’s footprint. This works well for closets with enough width to fit a freestanding unit rather than needing built-in shelving. Sand and repaint it in a light, kitchen-friendly color to make it feel intentional rather than borrowed from another room, and consider adding a coat of food-safe sealant if the wood is untreated. Anchor it to the wall if there’s any risk of tipping, especially in homes with kids. A mistake worth avoiding is assuming any bookshelf will fit — measure the depth carefully, since bookshelves are often shallower than dedicated pantry units and won’t hold standard canned goods without items falling off the edge. This approach works particularly well for a starter pantry before committing to a full renovation.
15. Add a Small Chalkboard or Whiteboard for Running Inventory

A pantry that’s out of sight is easy to forget about until you’re standing in the grocery store trying to remember if you already have pasta. A small chalkboard or whiteboard mounted just inside the door lets anyone jot down what’s running low in real time. This works best positioned at a height where it’s easy to write on without ducking or reaching. Keep a marker or chalk tied or magnetically attached right next to it, since a board with no writing tool nearby gets ignored fast. Divide it loosely into categories — proteins, produce, staples — so the list stays organized rather than becoming a scattered scrawl. The most common failure point isn’t the board itself but forgetting to actually erase items once they’re repurchased, so make erasing part of the unpacking routine. Households that stick with this habit tend to report noticeably fewer duplicate purchases within the first month.
16. Use Open Baskets for Produce That Needs Airflow
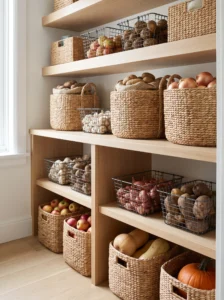
Not everything belongs in a sealed bin — potatoes, onions, and some fruits actually store better with airflow, and woven or wire baskets let that happen while still keeping things contained and off the shelf surface. This works best on a lower or mid-level shelf, away from direct light, which extends the life of light-sensitive produce like potatoes. Choose baskets with visible gaps rather than solid-sided ones, and keep onions and potatoes in separate baskets since they release gases that speed up each other’s spoilage when stored together. Size the basket to the amount you typically buy in one trip, since an oversized basket with a few lonely potatoes rolling around isn’t doing much for organization. A common mistake is placing these baskets directly under a light source, which can cause potatoes to sprout faster. Once produce has its own designated spot, it stops disappearing into the back of the crisper drawer and getting forgotten.
17. Add a Fold-Down Shelf or Table for Occasional Extra Space
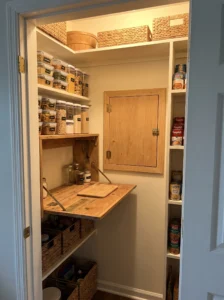
For baking days, canning season, or big grocery unloads, a fold-down shelf mounted to the side wall gives you extra surface area exactly when you need it, without permanently eating into walking space. This works particularly well in narrow closets where a fixed prep shelf would make the space too tight day-to-day. Choose a hinged bracket rated for at least 25 pounds if you plan to set mixing bowls or trays on it, and mount it at counter height for consistency with the rest of your kitchen. Keep the folded-down position flush against the wall so it doesn’t interfere with the door swing when not in use. The main mistake is under-sizing the bracket hardware, which leads to sagging over time under repeated use. This kind of flexible surface tends to earn its keep a few times a month rather than daily, but when it’s needed, there’s no good substitute.
18. Add a Wine or Bottle Rack If the Space Allows
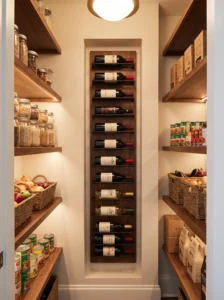
If your pantry closet has any leftover vertical space, a small wine or bottle rack keeps bottles horizontal and organized instead of standing upright and taking up more shelf footprint than needed. This works best mounted on a side wall or tucked into a corner gap too narrow for standard shelving. Choose a rack sized for the number of bottles you realistically keep on hand, since an oversized rack with mostly empty slots looks unfinished. Keep it away from any heat source like a nearby water heater closet, since consistent temperature matters even for casual wine storage. A mistake to avoid is mounting a rack too close to the floor, where bottles are more likely to get knocked during cleaning. This addition works well for households that entertain occasionally and want bottles handy without cluttering the counter.
19. Use Removable Adhesive Strips for Lightweight Accessories
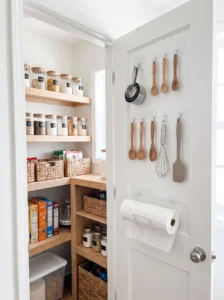
Not every addition needs drilling, and adhesive strips rated for a few pounds are enough to hang measuring cups, small utensils, or a roll of trash bags without committing to permanent hardware. This works well for renters or anyone who wants to test a layout before finalizing it. Choose strips rated specifically for the surface material — painted drywall holds differently than a wood door panel — and always follow the cure time before hanging anything, since rushing this step is the most common cause of failure. Keep the total weight per strip well under its rated limit, since kitchen environments tend to run warmer and humidity can weaken adhesive over time. A frequent mistake is using these for anything with real weight, like a cast iron pan, which will eventually pull free. Used within their limits, these strips are a low-commitment way to add function without a single screw.
20. Include a Small Trash or Compost Bin for Kitchen Scraps
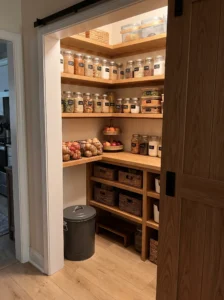
If your pantry sits between the kitchen and a back door, a small trash or compost bin tucked into the bottom corner saves steps during meal prep and food storage. This works best in pantries with enough floor clearance for a bin that won’t block the door or main walkway. Choose a bin with a tight-fitting or foot-pedal lid to control odor, and line it with compostable bags if you’re using it for food scraps specifically. Keep it away from direct contact with any food storage shelving to avoid cross-contamination concerns. A mistake worth avoiding is choosing a bin too large for the footprint, which then becomes an obstacle every time the door opens. This small addition tends to be one of the more surprising conveniences — most people don’t think to add it until they’re mid-recipe and realize how far the kitchen trash can actually is.
21. Paint the Interior in a Light, Reflective Color
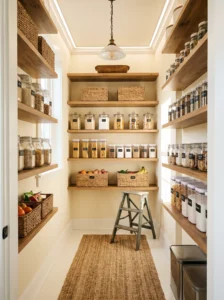
Closets are almost always painted the same dark or neutral shade as the hallway outside them, which makes an already dim space feel smaller and harder to see into. A coat of light paint — soft white, pale gray, or a warm cream — bounces available light around and makes the whole pantry easier to navigate even before you add task lighting. This works in every closet regardless of size, and it’s one of the cheapest upgrades on this list. Choose a semi-gloss or satin finish rather than flat, since it wipes clean more easily in a food-adjacent space and reflects light slightly better. Two coats are worth the extra hour, since one coat over a dark existing color usually shows through unevenly. A common shortcut people take — skipping primer over a dark wall — often means the new color looks patchy within a year. This step alone, done before any shelving goes in, makes every other addition look more finished.
22. Add Flooring or a Washable Mat for Easy Cleanup
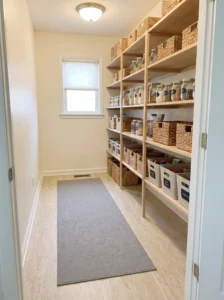
Spills happen in a pantry more often than people expect — a dropped jar, a leaking bag of flour, a forgotten drip from a grocery bag — and bare subfloor or old carpet makes cleanup harder than it needs to be. A washable vinyl mat or a small remnant of peel-and-stick flooring gives you a surface that wipes clean in seconds. This works in any closet where the existing flooring is worn, stained, or simply unfinished plywood. Choose a low-pile or completely flat material rather than anything textured, since texture traps crumbs and spilled grains. Measure the full footprint including under any freestanding shelving, since gaps around the edges will still stain over time. A mistake to avoid is choosing a light-colored mat without checking how it handles oil stains, which are common in a pantry environment. This upgrade is easy to underestimate until the first spill happens and cleanup takes thirty seconds instead of thirty minutes.
23. Add a Power Outlet for Small Appliances
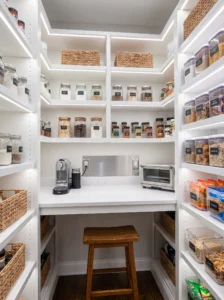
If the closet is deep enough and reasonably close to existing wiring, adding a single outlet opens up space for a small appliance like a slow cooker, air fryer, or coffee station that’s currently crowding the kitchen counter. This works best as a project done alongside other renovations, since it’s the one item on this list that typically needs an electrician rather than a weekend DIY approach. Choose an outlet with a cover if the appliance won’t be plugged in constantly, both for safety and appearance. Position it at a height that matches where the appliance will actually sit, usually on the prep shelf mentioned earlier, rather than down near the floor. A mistake to avoid is adding the outlet without checking local code requirements for closets near water lines or without proper ventilation for heat-generating appliances. Even one outlet can be the difference between a pantry that only stores food and one that quietly takes over tasks the kitchen counter used to handle.
Comparison Table: Pantry Storage Options at a Glance
| Type | Best Use | Material | Style/Vibe | Difficulty Level |
|---|---|---|---|---|
| Wire shelving | Canned goods, boxed items, general storage | Coated steel | Utilitarian, clean | Easy |
| Pull-out drawers | Frequently used items, lower shelves | Wood or coated wire | Functional, modern | Moderate |
| Clear stackable bins | Bulk grains, flour, sugar, snacks | BPA-free plastic | Streamlined, uniform | Easy |
| Door-back organizer | Spices, small jars, condiments | Wire or fabric pockets | Compact, tidy | Easy |
| Lazy Susan | Corners, oils, condiments | Plastic or bamboo | Practical, space-saving | Easy |
| Repurposed bookshelf | Freestanding pantries, budget setups | Solid wood or laminate | Homey, eclectic | Moderate |
How to Choose the Right Pantry Storage: A Buying Guide
Getting the sizing right starts with the measurements from step one — every bin, shelf, and drawer you buy should be chosen against your actual closet dimensions, not a general idea of what a pantry “should” hold. It’s easy to fall for a beautiful storage set online only to find it’s two inches too deep for your shelf, so keep your measurements handy while shopping, ideally saved as a note on your phone.
Materials matter more than most people initially think. Coated wire and solid wood both hold up well in a kitchen-adjacent environment, while raw particleboard tends to swell or sag if it’s ever exposed to spills or humidity. If your closet shares a wall with a bathroom or laundry area, lean toward moisture-resistant materials even if they cost a bit more upfront — the money saved on cheaper particleboard often gets spent again within a year on replacements.
Durability and maintenance go hand in hand. A shelf that’s easy to wipe down — smooth laminate, sealed wood, or coated metal — will get cleaned more often than one with a textured or unfinished surface, simply because it’s less of a chore. Think about how the space will actually be used day to day, not just how it looks freshly organized in a photo.
On budget, it helps to spend a little more on the pieces that get touched daily — pull-out drawers, the main shelving unit — and save money on accessories like baskets or decorative labels, which are easy to upgrade later without redoing the whole system. Buying the cheapest option across the board usually means replacing at least one component within the first year, which ends up costing more overall than choosing mid-range quality from the start.
The most expensive regret people report isn’t overspending — it’s under-planning. Buying shelving before deciding on zones, or ordering bins before measuring shelf depth, leads to returns, wasted trips, and mismatched pieces that never quite fit together. A slower, more deliberate approach almost always saves money in the long run.
Making the Space Work for You
Turning a spare closet into a pantry isn’t really about any single upgrade — it’s the combination of solid shelving, good lighting, smart zoning, and a labeling habit that actually sticks. Some of the ideas here, like a fresh coat of light paint or a set of stackable bins, take an afternoon and a modest budget. Others, like adding an outlet or building in pull-out drawers, are worth planning as a slightly bigger project if your closet and schedule allow for it.
The households that end up happiest with their converted pantry usually didn’t do everything on this list at once. They started with the basics — measuring, shelving, and lighting — then added the smaller touches, like a chalkboard inventory or a lazy Susan, once they understood how they actually moved through the space day to day. That kind of gradual approach also means you’re less likely to buy something you’ll regret.
Whatever combination you choose, the goal is the same: a space where you can see what you have, reach what you need, and put groceries away without a second thought. A closet that used to hide coats and clutter can become one of the most used rooms in the house, quietly making everyday cooking easier one shelf at a time.
Frequently Asked Questions
How much does it typically cost to convert a closet into a pantry?
Costs vary widely depending on how far you take it. A basic setup with wire shelving, bins, and paint can often be done for a modest amount, while adding pull-out drawers, custom lighting, or an electrical outlet raises the budget considerably. Starting with the essentials and adding extras over time keeps costs manageable.
What’s the best flooring for a pantry closet?
A washable vinyl or peel-and-stick option is usually the most practical choice, since it resists staining from spills and wipes clean quickly. Avoid carpet or unsealed wood, both of which absorb moisture and are harder to maintain in a food storage space.
How do I stop pests from getting into pantry food?
Store dry goods like flour, rice, and cereal in sealed, airtight containers rather than their original packaging, since pests can chew through cardboard and thin plastic bags. Regularly checking and rotating stock also helps catch any issues early before they spread.
Can I convert a closet into a pantry if it doesn’t have a light fixture?
Yes — battery-powered or adhesive LED lighting solves this without any electrical work. Motion-activated versions are especially convenient since you won’t need to search for a switch with your hands full of groceries.
How deep should pantry shelves be?
Somewhere between 12 and 16 inches works well for most kitchen items, giving enough depth for canned goods and boxes without creating so much depth that items get lost at the back. Deeper shelves benefit from pull-out drawers or lazy Susans to stay usable.
Is it worth adding an outlet to a pantry closet?
If you plan to store a slow cooker, coffee station, or other small appliance there, an outlet makes a real difference in daily convenience. For a pantry used purely for dry storage, it’s less essential and can be skipped to save on cost.
What’s the biggest mistake people make when organizing a pantry closet?
Buying storage products before measuring the space and planning zones. This leads to mismatched bins, shelving that doesn’t fit, and a system that falls apart within a few weeks because it wasn’t built around how the household actually uses the space.
How often should a pantry be reorganized?
A quick check every couple of months is usually enough to catch expired items and reset any zones that have drifted. A deeper reorganization once or twice a year, especially around big grocery shopping seasons, keeps the system working long term.