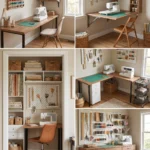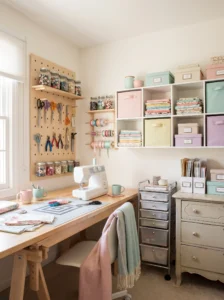
Open the door to almost any craft room and the scene looks familiar. A half-finished project sits on the table, ribbon is knotted in a drawer, paint tubes roll loose across a shelf, and a stack of supplies bought on sale hides somewhere nobody can find. The hobby isn’t the problem. The storage is. Craft supplies come in every shape imaginable, from tiny beads to bulky yarn to flat paper to sharp blades, and no single container handles all of them well.
Most organizing advice skips an obvious point: spending more rarely fixes it. People buy matching bins and label makers and still end up with chaos, because the system doesn’t match how they actually work. The cheapest solutions often hold up best because they grow out of habit. A jar on a shelf, a thrifted dresser, a pegboard cut to fit your wall. These cost little and adapt easily.
This list covers 14 craft room organization ideas that free up floor space without draining your wallet. Some suit a spare bedroom, others work in a closet or a corner of the dining room. You’ll find ways to store small items, paper, fabric, and tools, along with a few layout changes that cost nothing at all. Start with whichever idea solves your most irritating problem, then add others as the room settles.
1. A Pegboard Wall for Tools and Small Gear
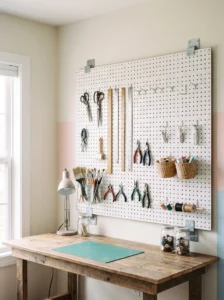
A pegboard turns a blank wall into storage you can read at a glance, which is why it shows up in so many craft rooms that actually function. Scissors, rulers, pliers, and spools hang in plain sight instead of buried in a drawer.
Mount it above your main worktable, where your hands already reach. Half-inch furring strips behind the board leave the gap hooks need, and screwing into studs matters if the board will hold heavy tools. A standard 2 by 4 foot panel covers a surprising amount of ground, and you can always add a second beside it later.
Paint it before hanging. A soft white or a muted color looks tidy, while raw brown board looks like a garage. Mix hooks with small baskets and shelves, since not everything hangs well.
The mistake is filling every hole on day one. Leave gaps. A crowded pegboard is just a drawer you can’t close, and you’ll notice the relief of finding tools quickly almost immediately.
2. Zone the Room by Activity
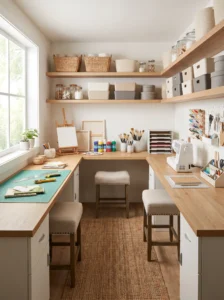
Before you buy anything, move things around. Most craft rooms are organized by container type, with all the boxes together and all the jars together, when they should be organized by what you do.
Set up one zone for cutting, another for painting, another for sewing or paper work. Each zone keeps its own tools and materials within arm’s reach, so you stop walking across the room to fetch scissors that live somewhere else. In a small room, a zone can be as little as a shelf and a section of table.
Put the busiest zone nearest the light and the door, and the messiest one, usually paint or glue, somewhere you can wipe down easily. Keep a clear surface between zones as breathing room.
This costs nothing, and it’s where I’d start for anyone overwhelmed. Rearranging for one weekend often shows you which storage you actually need, which saves you from buying the wrong bins first. Cleanup also shrinks, since each activity’s mess stays contained in one spot.
3. A Rolling Cart That Follows the Project
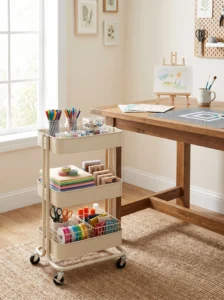
Craft work moves around. One day you’re at the table, the next you’re on the floor with a big canvas, and a rolling cart travels with you. Three tiers of shallow bins hold a whole project’s worth of supplies.
Choose a cart narrow enough to tuck beside a desk or slide into a closet, roughly 12 to 15 inches wide. Locking wheels matter, because a cart that drifts while you cut is a nuisance. Open mesh baskets let you see contents, while closed drawers hide the visual noise.
Load it by project, not by supply type. A card-making cart holds paper, stamps, and ink together, so you roll it out and start. When you finish, it rolls back, and the room looks tidy again in thirty seconds.
Resist overstuffing the bottom tier, since heavy loads make carts tip on uneven floors. The best part is flexibility. Once you have a cart or two, you can change your whole setup without moving a single piece of furniture.
4. Jars and Thrifted Containers for Tiny Things
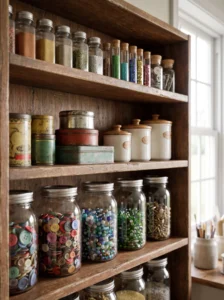
Beads, buttons, brads, and sequins vanish into drawers and turn into a single rattling pile. Clear jars fix that cheaply, since you can see everything without opening anything.
Collect jars from your own recycling: pasta sauce, jam, pickles. Wash them well, soak off labels, and you’ve got free storage. Thrift stores sell mismatched glass canisters and tins for small money, and mismatched can look charming on an open shelf.
Group by color or by type, depending on how you search. If you hunt for blue beads, sort by color. If you need all your buttons together, sort by kind. Pick one rule and stick with it.
Use metal lids if you plan to mount jars on a magnetic strip or under a shelf. Keep heavy jars on lower shelves and light ones higher.
A small habit that pays off: fill jars only two-thirds full. They’re easier to open, easier to pour from, and you can spot what’s running low before you’re mid-project and out of thread.
5. A Dowel Rack for Ribbon, Washi, and Spools
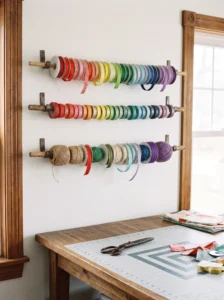
Ribbon is the classic craft room tangle. A simple wooden dowel mounted on the wall lets rolls spin freely and hang in order, which beats a drawer where everything knots together.
Mount a dowel or a curtain rod between two brackets, about 10 to 14 inches long for a small collection. Slide ribbon spools, washi tape, or twine onto it, and pull what you need straight off the roll. For bigger collections, stack two or three rods vertically.
Put it near your cutting area, within reach of your scissors. Sort by color so a quick glance finds what you want, and keep the widest ribbons at the top where they won’t snag thinner ones.
The price is almost nothing. A dowel from a hardware store and two brackets cost less than a single storage bin. Leave a few inches of space between rods so spools don’t bump against each other.
It also makes the wall look cheerful, since rows of colored ribbon read as decoration, not clutter.
6. Over-the-Door Organizers
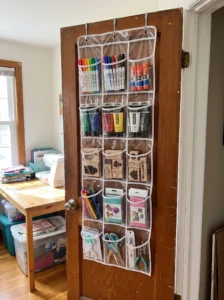
The back of a door is unused wall, and a clear pocket organizer turns it into dozens of small compartments. It’s one of the cheapest ways to add storage without touching your floor.
Pick one with clear pockets so you can see what’s inside. Stamps, markers, paint tubes, glue sticks, and pens fit neatly, while bulky items strain the pockets. Check the weight limit before loading, since a full organizer on a hollow door can bend the hinges or pull the hooks loose over time.
Close the door to test it, and make sure the hooks don’t prevent the door from latching. A door that won’t shut properly defeats the point.
Use it for the things you grab often but don’t need on the table. Tools you reach for daily belong closer. This is a good home for seasonal items, small kits, and the supplies that otherwise float in a drawer.
Shared craft rooms benefit most, since each person can claim a few rows of pockets.
7. Cube Shelving with Fabric Bins
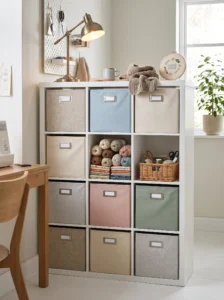
Cube shelves are the workhorse of craft storage. Each cube becomes a slot for a bin, and the grid keeps everything square and stackable, which makes a small room look calmer.
Choose a unit sized to your wall, such as a two by four or a three by three grid. Slide fabric or canvas bins into each cube, and label the front so you don’t have to open them. Leave one or two cubes open for display, since a bin of yarn looks nice when you want it to.
Use the cubes’ top surface for a lamp, a small basket, or a few finished pieces. Anchor tall units to the wall, since a loaded shelf can tip.
Fabric bins sag if you overload them. Match the bin size to the contents, and keep heavy items like paint in sturdier containers.
The cube system also scales. Start with a small unit, and add another beside it when your collection grows, rather than buying a huge piece you may not need.
8. A Thrifted Dresser or Cabinet
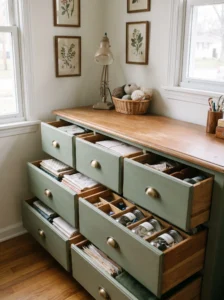
An old dresser is one of the best deals in craft storage. Drawers are already sized for paper, fabric, and bulky supplies, and the top works as a worktable. Secondhand shops and online listings sell them cheaply, and solid wood outlasts most flat-pack furniture.
Look for sturdy drawers that slide smoothly, and measure your space before you buy. A shallow dresser fits a narrow room better than a deep one. Sand rough spots, then paint or stain it to match the room.
Line the drawers with shelf liner and add dividers so supplies don’t slide into one heap. Label each drawer on the front, so you don’t open five before finding the right one.
Skip anything with warped drawers or strong smells, since odors linger and soak into fabric. A thrifted piece costs a fraction of new furniture, and it often has character that a flat-pack unit lacks.
For many crafters, a single good dresser replaces three or four smaller organizers.
9. Magnetic Strips for Metal Tools
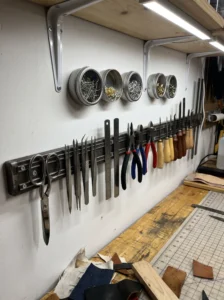
Metal tools love magnets. A strip mounted on the wall holds scissors, tweezers, rotary blade guards, and small metal rulers off the table, freeing up work surface and keeping edges in view.
Mount a strip near your cutting area, at a height where you can reach without stretching. Choose one strong enough for scissors, since a weak strip lets heavy items slide. Keep sharp tools pointing away from where hands naturally pass, and consider a strip with a small lip.
Magnetic tins work the same way. Stick a few to the strip or the side of a metal cabinet, and they hold pins, needles, and small findings.
Keep magnets away from electronics and some sewing machine parts if your manual warns about it. Don’t use them near magnetic stripe cards.
The advantage is speed. When your tools sit in the same place, visible and ready, you stop hunting for the scissors you swear you just had.
10. Vertical Storage for Paper
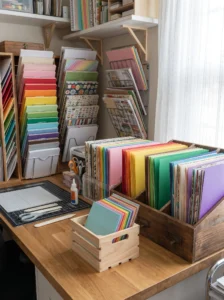
Paper is awkward. It’s flat, it creases, and stacks slide into messy drifts. Storing it vertically, like files in a cabinet, keeps sheets flat and lets you flip through them quickly.
Use a desktop file sorter, a magazine holder, or a tall bin with dividers. Sort by size first, then by color or pattern. Large sheets like poster board can slide into a box stored on its side, or into a flat shelf slot.
Keep paper away from windows and damp corners, since sunlight fades it and humidity makes it curl. A closed cabinet or box gives extra protection.
Don’t overfill each slot. Crowded paper tears at the edges when you pull a sheet free.
Scrapbookers and card makers get the most from this, since they handle many small sheets. One habit that helps: store scraps in a separate bin by color. Leftover bits get used when they’re easy to find, and you waste less paper overall.
11. Storage Under the Worktable
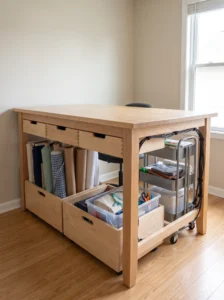
The space under your table is probably wasted. Shallow bins, small drawers, or a rolling cart tucked underneath add real capacity without taking floor space.
Measure the clearance before buying anything. You want legroom and room for a chair, so choose containers shorter than the gap. A pair of low bins on a wooden board with casters can roll in and out easily.
Use the zone for things you need often but not constantly: extra paper, spare materials, a project in progress. Heavy items go on the floor, lighter ones above.
Skirting a table with fabric hides the clutter and looks tidy, though it makes access slower. Choose open fronts if you pull things out many times a day.
Make sure cords and power strips stay clear of the storage. A bin dragging on a cable is a quick way to unplug your machine mid-stitch.
Under-table storage is especially handy in a shared space, since it puts supplies out of sight when the room doubles as something else.
12. A Fold-Down Wall Table
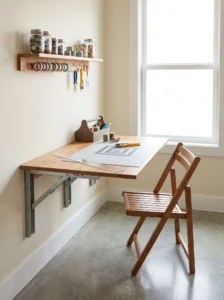
Floor space disappears fast in a small craft room, and a fold-down table gives it back when you’re not working. It mounts to the wall and folds flat, leaving the room open for other uses.
Mount it into studs, since a loaded table puts real stress on the wall. Choose a depth that suits your projects, about 20 to 24 inches for most crafts, and test the folding brackets for stability before you trust them.
Add a shelf above for supplies you use daily, and a small hook or two for tools. A chair that tucks under or folds away completes the setup.
The trade-off is setup time. You open and clear the table each session, which suits occasional crafters better than daily ones. If you craft constantly, a fixed table may work better.
For a guest room or dining nook that doubles as a workspace, a fold-down table makes a small area flexible without needing extra furniture.
13. Convert a Closet into a Craft Station
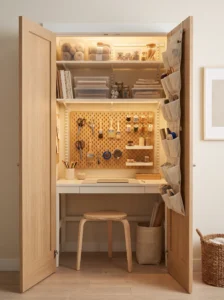
A reach-in closet holds a lot more than clothes. Remove the doors or fold them back, add shelves, and you’ve got a compact station with everything within reach and a way to close it away when guests visit.
Install adjustable shelves at varied heights, with a lower section for a small table or a work surface. Add a light inside, since closets are dark, and a plug strip if you use a glue gun or a small machine.
Use the shelf edges for baskets, the door’s inside for an over-the-door organizer, and the walls for a pegboard. Keep daily supplies at eye level and rarely used items higher.
The closet’s depth is its strength. A slim, deep space suits rolling carts and tall storage, while shallow shelves hold small items.
Closing the doors on a messy project ends the stress of guests arriving. For people with a tiny home, a closet station is often the best answer, since it turns a forgotten corner into a dedicated workspace without needing another room.
14. Project Bins with Clear Labels
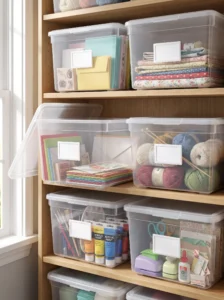
The simplest system on this list is also one of the best. One bin per project, with a clear label, keeps half-finished work from spreading across the room.
Use matching bins, if you can, because they stack neatly and look calm on a shelf. Clear plastic lets you see contents, while opaque bins hide the mess. Label the front with the project name and its status, such as “waiting for paint” or “needs binding.”
Store each project’s materials, patterns, and tools together, so when you come back after a month, you’re not hunting for the pieces. Put the bin you’re working on at easy reach, and park the rest higher or lower.
A small rule helps: only a few active bins at a time. When you finish one, empty and reuse it.
The real benefit is momentum. When everything for a project waits in one container, starting again takes minutes, and abandoned projects stop piling up as guilty clutter.
Comparison Table: Craft Storage Options at a Glance
| Type | Best Use | Material | Style/Vibe | Difficulty Level |
|---|---|---|---|---|
| Pegboard wall | Tools, spools, small gear | Painted hardboard, metal hooks | Visible, practical | Easy to Moderate |
| Rolling cart | Project-based supplies | Metal or plastic frame, wheels | Flexible, portable | Easy |
| Cube shelving with bins | General supply storage | Wood or laminate, fabric bins | Neat, modern | Easy |
| Thrifted dresser | Paper, fabric, bulky items | Solid wood or veneer | Vintage, characterful | Moderate |
| Fold-down table | Small rooms, shared spaces | Plywood, steel brackets | Space-saving, minimal | Moderate |
| Closet conversion | Tiny homes, hidden setups | Shelving, lighting, pegboard | Contained, tidy | Moderate to Difficult |
How to Choose the Right Storage for Your Craft Room
Start with what you own. Count your supplies by type before buying anything, because a storage plan built on guesses is how people end up with empty bins and overflowing shelves. Lay everything out once, even if it takes an afternoon, and group it.
Measure the space carefully, including height, since vertical room is usually the cheapest room to gain. A tall, narrow shelf takes less floor than a wide, low one.
On materials, solid wood and metal outlast thin particleboard, especially for shelves holding heavy items like paint or fabric. Plastic bins are cheap and light but crack under heavy loads, so reserve them for lighter contents. Fabric bins soften the look, but stain more easily, so pick darker or textured fabrics.
Maintenance is minor if you choose well. Wipe surfaces down regularly, and avoid damp areas for paper and fabric storage, since moisture causes mildew and curling.
Budget wisely. Thrifted furniture, jars, and DIY pegboards cost very little, while built-ins and custom cabinetry run higher. Spend on the pieces you touch every day, like your worktable and chair, and save on bins and baskets.
Quality matters most where weight is involved. Cheap brackets on a shelf full of paint can fail, while a cheap jar costs nothing to replace.
Common regrets include buying a whole matching set before testing a system, and choosing storage too small for a growing collection. Try one or two solutions, live with them for a few weeks, and then expand. Returning half a dozen bins is far more annoying than adding one more later.
Final Thoughts
A well-organized craft room has little to do with spending money and a lot to do with matching storage to habits. The best systems on this list share one trait: they keep supplies visible, reachable, and grouped by how you use them. A pegboard, a few jars, and a labeled bin can do more than a room full of expensive organizers.
You don’t need all 14 ideas. Choose the two or three that tackle your biggest daily annoyance, whether that’s losing tools, tripping over bins, or running out of table space. Start with free changes like zoning the room, then add cheap storage where you still feel pain.
Give each change a couple of weeks before judging it. Habits shift slowly, and a system that feels awkward on day two may become second nature by day fifteen. If something isn’t working, adjust it rather than starting over.
Aim for a room that makes starting a project easy and cleaning up quick. When both of those happen, you’ll find yourself crafting more often, and that’s the whole point of getting organized in the first place.
Frequently Asked Questions
How do I organize a craft room on a tight budget?
Start with free fixes like zoning and decluttering, then add cheap storage such as jars, thrifted dressers, and a DIY pegboard. Reusing household containers and buying secondhand furniture saves a lot compared with new organizers.
What’s the best way to store craft supplies in a small room?
Use vertical space first, with wall-mounted pegboards, shelves, and over-the-door organizers. A rolling cart or under-table bins add capacity without eating floor space.
How do I keep craft supplies from getting messy again?
Give every item a clear home, label containers, and set aside five minutes at the end of each session to put things back. Systems stay tidy when they’re easy to follow.
Are plastic bins good for craft storage?
They work well for light items and are cheap, but they crack under heavy loads and can warp in heat. Use sturdier containers for paint, tools, or fabric stacks.
How should I store paper so it doesn’t curl or fade?
Keep it flat or upright in a dry spot away from direct sun. Sort by size and avoid overfilling, since cramped sheets bend at the edges.
Is a pegboard strong enough for heavy tools?
It can be if mounted into studs with spacers behind it, and if you spread the weight out. Check the board’s rated capacity and avoid hanging very heavy items on single hooks.
What’s the biggest mistake people make organizing a craft room?
Buying lots of containers before sorting what they own. Sort, measure, and test a few solutions first so you buy only what the room actually needs.
Can a craft room double as a guest room or office?
Yes, with storage that closes away, such as a fold-down table, cabinets, or a closet station. Keeping supplies contained makes the shared space easy to switch between uses.