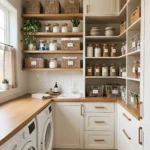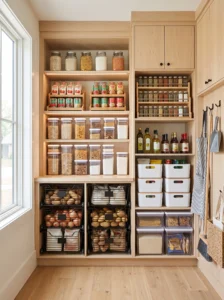
Open almost any pantry and you’ll find the same story repeating itself: cans stacked three deep, boxes shoved sideways to make room, and something at the back that’s been there so long nobody remembers buying it. It’s rarely a space problem. It’s a layout problem. Most pantries are built with a handful of identical straight shelves, and identical shelves force you to store very different items the exact same way.
A bag of rice and a jar of spices don’t need the same amount of space, yet a standard shelf treats them like they do. That mismatch is where clutter actually comes from — not from having too much stuff, but from shelving that doesn’t match how that stuff is shaped, used, or grabbed.
The good news is that pantry shelving is one of the more forgiving areas of a home to fix. You don’t need a full renovation to see a real difference. Sometimes it’s swapping one fixed shelf for two adjustable ones. Sometimes it’s adding a shallow riser so nothing hides behind a tall box anymore.
This list walks through 29 pantry shelving layouts, covering everything from simple adjustable systems to more involved built-ins, so you can find an approach that fits your pantry’s actual size, shape, and the way your household really cooks — not just how a showroom pantry happens to look.
1. Adjustable Shelf Pin System
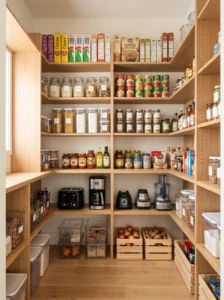
Swapping fixed shelves for an adjustable pin system is the single most useful upgrade most pantries can make, since it lets shelf height change as your storage needs change throughout the year.
This works in almost any pantry, from a shallow closet to a full walk-in, because the pins simply slot into pre-drilled holes along the cabinet sides. Space pins roughly an inch apart for maximum flexibility, and finish them in a color that blends with the shelving rather than standing out. Set shorter gaps for spice jars and canned goods, taller gaps for cereal boxes and small appliances.
The mistake people make is drilling too few holes when installing the system, which limits future flexibility. Once it’s in, though, reorganizing the pantry for a new grocery routine takes minutes instead of a weekend project — a small change that quietly pays off every single time your shopping habits shift.
2. Tiered Riser Shelving for Cans and Jars
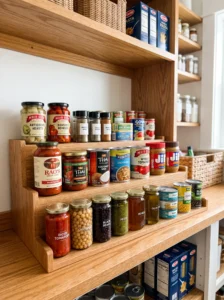
Stair-step risers placed on top of a flat shelf let you see every can or jar at a glance instead of digging through rows to find what’s hiding behind the front line.
This layout shines in pantries where canned goods pile up fast — think households that cook from scratch regularly. Choose a riser depth that matches your can height, usually three tiers works for standard sizes. Metal or bamboo risers both hold up well; metal tends to feel sturdier under heavier glass jars.
Group by category rather than size for the best results — beans together, tomatoes together, and so on. The typical misstep is buying a riser too shallow for the shelf, which wastes the extra depth behind it. Done right, this layout turns a formerly chaotic shelf into something you can restock and shop from in seconds.
3. Door-Mounted Rack Shelving

Attaching slim wire or wood racks to the inside of a pantry door adds a genuinely useful extra layer of storage without giving up an inch of interior shelf space.
This works best for lightweight, frequently grabbed items — spice packets, snack bags, foil, small condiment bottles. Keep the depth under four inches so the door still closes without hitting interior shelving, and mount the lowest rack high enough to clear any baseboard trim. Coated wire resists rust better than raw metal in a pantry that shares a wall with the kitchen sink.
Weight is the main thing to watch here — overloading door racks puts stress on the hinges over time. Reserve this layout for lighter goods, and it becomes one of the most efficient additions in the whole pantry, especially in smaller kitchens where every surface needs to earn its keep.
4. Pull-Out Wire Basket Shelving
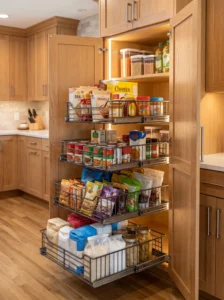
Wire baskets on drawer slides bring the back of a deep shelf within easy reach, solving one of the most common pantry complaints: never actually seeing what’s stored toward the rear.
This layout works particularly well in pantries deeper than 16 inches, where a fixed shelf inevitably swallows items whole. Choose baskets rated for at least 30 pounds if you’re storing canned goods, and stick with a coated finish to prevent snagging on packaging. Group produce, snacks, or bulk dry goods by basket rather than mixing categories, which keeps the pull-out motion purposeful instead of a rummage.
The common error is installing baskets that are too wide for the cabinet opening, causing them to stick when pulled fully out. Measured correctly, though, this is one of the layouts that makes the biggest daily difference — nothing gets forgotten at the back anymore.
5. Open Wall Shelving with Labeled Bins
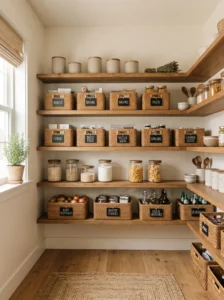
Skipping cabinet doors entirely and using open wall-mounted shelving, paired with labeled bins for anything loose, turns a pantry into a space that’s genuinely quick to shop from.
This suits pantries with decent natural or overhead lighting, since open shelving needs to look tidy to function well — dim, cluttered open shelves just look messy. Use uniform bins in a neutral material like woven rattan or matte-finish plastic, and label by category rather than specific product so the system doesn’t need constant relabeling as brands change.
Keep heavier items on lower shelves for safety and easier access. The tradeoff with any open system is more frequent tidying, since nothing’s hidden behind a door. For pantries that get used constantly throughout the day, though, this visibility often means less food gets forgotten and wasted.
6. Corner Diagonal Shelving
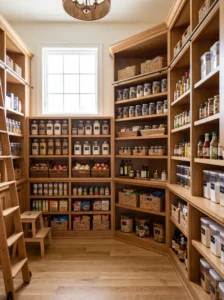
Angled shelving built specifically for a pantry’s corner turns what’s normally dead space into genuinely usable storage, since it follows the room’s actual geometry instead of ignoring it.
This layout works best in larger walk-in pantries where a square or rectangular footprint leaves an awkward corner gap. Build shelves at a 45-degree angle across the corner, and keep the depth consistent with the rest of the pantry so items don’t get lost in an oversized gap. Lighter, frequently used items belong on the lower angled shelves; bulk or seasonal goods can go higher.
The mistake to avoid is treating the corner shelf exactly like a straight one — the triangular shape needs shallower storage bins to avoid wasted air space. Handled well, it’s often the single most improved section of a walk-in pantry once it’s finally put to use.
7. Floor-to-Ceiling Fixed Shelving
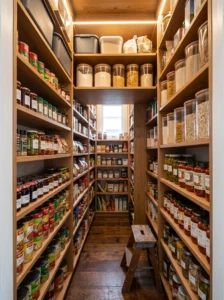
Running shelving all the way from floor to ceiling maximizes storage in pantries with limited floor footprint but decent vertical height to spare.
This works especially well in narrow closet-style pantries where width is tight but the ceiling runs the full room height. Reserve the top two shelves for bulk or occasional-use items, since a step stool becomes part of the routine up there. Keep shelf spacing tighter near the bottom, where daily-use goods live, and wider up top for bulkier storage containers.
Lighting matters more here than in a standard-height pantry, since the upper shelves sit further from any ambient light source. A single warm LED strip near the top keeps the whole column visible. The typical misstep is loading the highest shelf with everyday items just because there’s room — keep that top shelf for things you genuinely reach for only occasionally.
8. Modular Cube Shelving Units
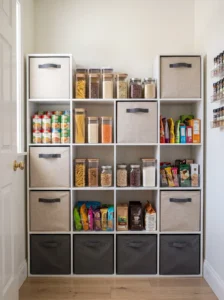
Stackable cube shelving units offer a flexible, semi-permanent layout that adapts easily if you move or want to rearrange your pantry down the line.
This suits renters or anyone who doesn’t want to commit to built-in shelving. Choose cubes in a consistent size, typically around 12 to 13 inches, so they stack evenly and don’t leave gaps. Solid wood or laminate cubes handle weight better than particleboard versions, which can sag under canned goods over time.
Mixing open cubes with a few fabric bin inserts keeps miscellaneous items contained without hiding everything. The main risk with modular units is stacking them too high without anchoring — always secure taller stacks to the wall for safety. It’s a layout that grows or shrinks with your space, which makes it especially practical for anyone still figuring out their long-term kitchen setup.
9. Slide-Out Spice Shelving
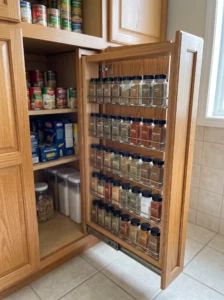
A slim, slide-out shelf built specifically for spice jars keeps one of the most frequently used pantry categories from getting buried behind bulkier items.
This layout works well tucked into a narrow gap, often between a full-height shelving unit and the wall, where a standard shelf wouldn’t otherwise fit. Depth should stay around four to five inches, just enough for a single row of jars, and a slide-out track lets you see every label without pulling jars out individually.
Keep jar sizing consistent for the cleanest look and best use of space — mismatched jar heights waste vertical room on a shelf this shallow. The common mistake is making the slide-out too deep, which just recreates the same “stuff hiding behind stuff” problem it’s meant to solve. Done right, it turns spice hunting into a five-second task instead of a recurring frustration.
10. Bulk Bin Shelving with Clear Containers
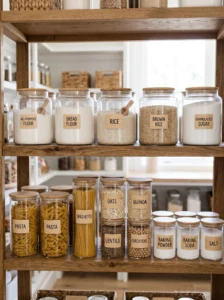
Dedicating one section of pantry shelving to clear, airtight bins for bulk staples like flour, rice, pasta, and sugar keeps these high-volume items both visible and fresh.
This works best on a mid-height shelf, easy to lift from without straining, since bulk containers get heavy fast. Choose uniform, stackable bins so they use shelf space efficiently rather than leaving odd gaps between mismatched shapes. Clear containers let you see stock levels at a glance, which cuts down on both waste and unnecessary duplicate purchases.
Labeling still matters even with clear containers, since flour and cornstarch look nearly identical from a distance. The typical error is buying bins before measuring the shelf, resulting in a layout that either wastes space or doesn’t fit at all. Once dialed in, this section becomes the most efficient part of the pantry to restock from a grocery haul.
11. Narrow Can Organizer Shelving
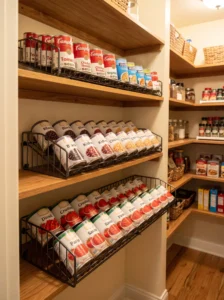
Purpose-built can organizer shelves, angled slightly so cans roll forward as you use them, keep canned goods rotating naturally instead of piling up at random.
This layout suits pantries that go through a steady volume of canned goods — soups, beans, tomatoes — since the front-to-back rolling system naturally uses older stock first. Choose a shallow depth, holding two to three cans deep, and a slight forward tilt of roughly 15 degrees for smooth rolling without cans tumbling out.
Metal or sturdy plastic tracks both work, though metal holds up better under heavier glass jars. The mistake to avoid is mixing can sizes within a single track, which disrupts the rolling mechanism. For households that cook with canned staples often, this is a small layout change that quietly eliminates the “why do I have five expired cans of the same thing” problem.
12. Shallow Shelving for Small Packaged Goods
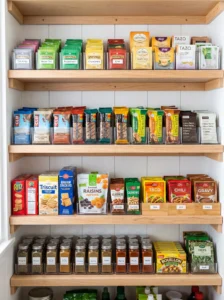
Shelves set at a shallow six to eight inches, rather than the standard 12, are built specifically for small packaged goods — seasoning packets, tea bags, snack bars — that get lost on deeper shelving.
This works well as a dedicated middle section within a larger pantry, positioned at eye level where these smaller items are easiest to spot. Because nothing sits more than one item deep, everything stays visible without needing to move anything aside. Light wood or painted MDF both suit this style, since the shelves carry minimal weight.
Group by type rather than brand to make the layout intuitive for anyone in the household grabbing a snack. The common misstep is using standard-depth shelving here out of convenience, which defeats the purpose entirely. This narrow layout might be the smallest change on this list, but it solves one of the most persistent small-item clutter problems in any pantry.
13. Adjustable Wire Shelving System
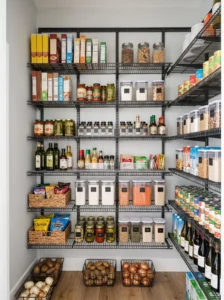
Full wire shelving units, adjustable along a wall-mounted track, combine the flexibility of a pin system with better airflow than solid shelving provides.
This layout works particularly well in pantries prone to humidity, since open wire construction prevents the moisture buildup that solid shelves can trap underneath packaging. Choose a chrome or epoxy-coated finish for rust resistance, and keep shelf spacing generous enough for tall bottles and boxes on at least one or two levels.
Wire shelving does have a downside worth noting — small, loose items can slip through the gaps. Adding a few flat liner mats or trays on the shelves you use for smaller goods solves this without giving up the airflow benefit elsewhere. It’s a layout well suited to basements or garage pantries where ventilation matters as much as storage capacity.
14. Two-Level Step Shelving for Deep Cabinets
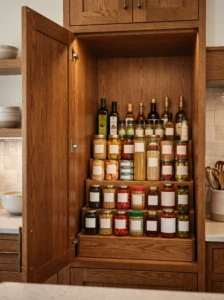
Step shelving, built in two staggered levels within a single deep cabinet, brings the back portion of a standard-depth shelf forward and into view instead of leaving it hidden behind the front row.
This suits kitchens without a dedicated walk-in pantry, where cabinet-based storage has to work harder. The lower step sits toward the front, the upper step toward the back, creating a layout similar to bleacher seating for cans and jars. Keep the height difference between steps around four to five inches for the clearest visibility.
Lighter items belong on the raised back step, since reaching over the front row works better without heavy jars in the way. The frequent mistake is building steps too shallow, which cramps standard can sizes. Properly sized, this layout can roughly double what’s actually visible and usable in a deep cabinet.
15. Pegboard Wall Shelving
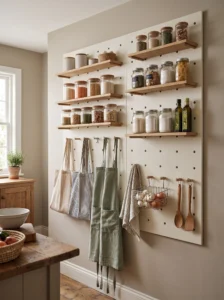
A pegboard-backed pantry wall, fitted with small shelf brackets and hooks, offers one of the most customizable layouts on this list, since the entire configuration can shift as your storage needs change.
This works especially well in smaller pantries where a fixed shelving plan quickly feels outdated. Paint the pegboard to match your cabinetry for a built-in look, or leave it in a contrasting tone as a small design feature. Mix small shelves for jars with hooks for aprons, reusable bags, or hanging utensils to make full use of the format.
Weight capacity per peg is limited, so this layout suits lighter goods better than bulk canned storage. The common error is overcrowding the board with too many accessories, which starts to look cluttered fast. Used with restraint, it’s a layout that can be completely reconfigured in an afternoon whenever your routine changes.
16. Lazy Susan Shelf Inserts
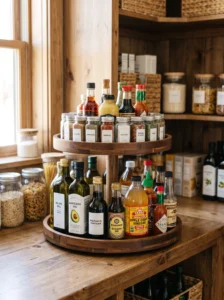
Circular lazy Susan inserts placed on individual pantry shelves — not just in corner cabinets — keep small, easily buried items like oils, sauces, and condiments in constant rotation and view.
This layout works well on a mid-height shelf holding a mix of bottles and jars that are hard to organize any other way. Choose a turntable with a raised edge to prevent bottles from sliding off during rotation, and keep the surface non-slip for glass containers especially. Two-tier turntables add extra capacity without needing more shelf footprint.
Balance items evenly around the turntable, since a lopsided load makes rotation stick over time. The typical mistake is using a lazy Susan for items that are rarely used, wasting its main benefit — constant visibility. Reserved for everyday condiments and oils, it turns a jumbled shelf into something you can spin and grab from in seconds.
17. Vertical Tray Dividers for Trays and Boards
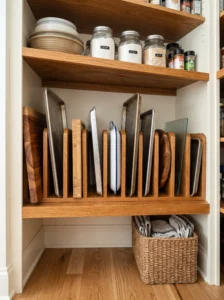
Vertical dividers built into pantry shelving give flat items like baking sheets, cutting boards, and trays a dedicated slot instead of stacking loose and sliding around.
This suits pantries near the kitchen that double as extra storage for cookware overflow. Space dividers about one to two inches apart, adjustable if possible, to fit varying tray widths. Wood or metal both work, though wood tends to look more finished if the shelving is otherwise open and visible.
Position this section on a lower shelf, since flat items are heavier and easier to slide in and out near floor level. The common misstep is spacing dividers too wide, which lets trays lean and clatter together. Once set up, it’s a layout that keeps an otherwise awkward category of kitchen items fully out of the way and genuinely easy to grab.
18. Under-Shelf Hanging Baskets
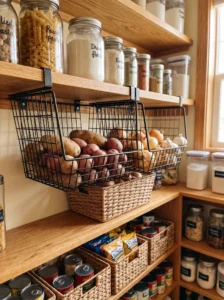
Wire baskets that hang beneath an existing shelf add a second layer of storage in the gap that normally goes unused between one shelf and the next.
This works particularly well for produce like onions, potatoes, or garlic that need airflow rather than a sealed container. Choose a basket depth that leaves at least an inch of clearance below, so nothing catches on the shelf underneath. Coated wire holds up better than uncoated metal against produce moisture over time.
Keep heavier produce in the lower hanging baskets, closer to counter height, for easier lifting. The frequent mistake is hanging baskets too close to the shelf above, which limits airflow and defeats their purpose. This layout is a simple way to reclaim otherwise wasted vertical space without adding a single new shelf.
19. Built-In Cutting Board and Tray Slots
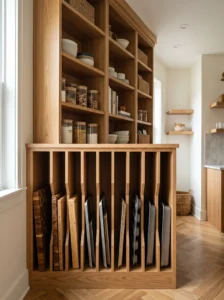
Dedicated vertical slots, built directly into a pantry’s shelving frame, hold flat items like cutting boards upright rather than stacked flat, which saves real shelf space elsewhere.
This layout works best when planned during a pantry build or remodel, since it requires notched or grooved shelving rather than a simple add-on. Space slots around three-quarters of an inch apart for standard cutting boards, wider for larger trays or sheet pans. A wood frame finished to match surrounding shelving keeps the look cohesive.
Position slots near the bottom of the pantry for stability, since top-heavy upright storage near the top isn’t ideal. The typical error is making slots a uniform width, which doesn’t accommodate different board thicknesses well. Built thoughtfully, this layout turns bulky flat items into one of the tidiest, most space-efficient sections of the entire pantry.
20. Glass Jar Shelving with Uniform Containers
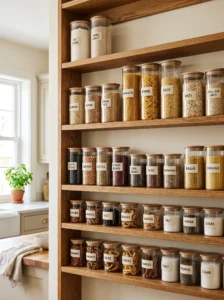
Replacing mismatched packaging with uniform glass jars, arranged on shelving sized specifically to their height, creates one of the most visually organized pantry layouts possible.
This suits pantries that double as a design feature, especially in open-shelf or glass-door setups where contents are on display. Measure jar height carefully before setting shelf spacing, leaving just enough clearance to lift lids without hitting the shelf above. Stick to one or two jar sizes for the cleanest, most uniform look.
Labeling becomes essential here, since decanted goods lose their original packaging cues. The common mistake is decanting everything at once without a labeling system ready, leading to a guessing game within weeks. Done consistently, though, this layout doesn’t just organize the pantry — it makes it genuinely satisfying to open every day.
21. Sliding Shelf Panels for Tight Spaces

Shelves mounted on a sliding track, rather than fixed in place, let you access items behind the front row without removing anything first — a smart fix for narrow or shallow pantries.
This layout works especially well in pantries under 24 inches deep, where a fixed shelf setup often means constant shuffling to reach anything toward the back. Choose a smooth-gliding track rated for the shelf’s expected weight, and keep the sliding shelf itself slightly shorter than the cabinet width to avoid catching on the frame.
Lighter items suit the front sliding shelf best, since it moves more easily without heavy jars weighing it down. The common misstep is skipping a stopper mechanism, which lets the shelf slide out too far and risk tipping. For genuinely tight pantry spaces, this layout solves the “everything’s in the way of everything else” problem better than most alternatives.
22. Mixed-Height Shelving for Varied Item Sizes
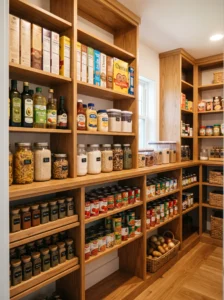
Rather than spacing every shelf identically, a mixed-height layout intentionally varies the gap between shelves to match what’s actually being stored — tall gaps for cereal and oil bottles, shorter gaps for canned goods and spices.
This works in essentially any pantry size, since it’s more about planning than added hardware. Map out your most common item heights before setting final shelf positions, and leave one section adjustable for anything seasonal or unpredictable. Painted or natural wood both work equally well, since the visual interest here comes from the layout itself rather than the material.
The frequent mistake is defaulting to evenly spaced shelves out of habit, which wastes vertical space on shorter items and cramps taller ones. Once you switch to a mixed-height plan, the difference in usable capacity is often surprising — the same physical shelving suddenly holds noticeably more.
23. Freestanding Shelving Unit for Small Pantries
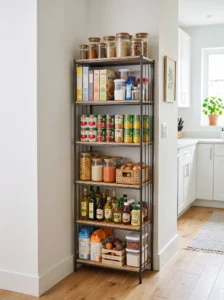
A freestanding shelving unit, rather than built-in shelving, offers flexibility for smaller kitchens without a dedicated pantry closet at all.
This suits apartments or older homes where a pantry space was never part of the original layout. Choose a unit sized to fit a spare corner or the end of a cabinet run, and prioritize adjustable shelves so it can adapt as your storage needs shift. Metal wire units keep the look light in a small space, while solid wood feels more like built-in cabinetry.
Anchor taller units to the wall for safety, especially in households with kids. The common error is buying a unit too deep for the available space, which ends up blocking walkways. Sized correctly, a freestanding shelf can function almost identically to a built-in pantry without any construction at all.
24. Angled Shelving for Easy Visibility
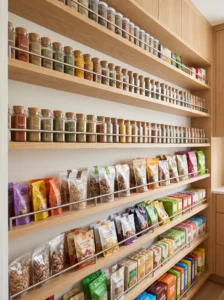
Slightly angled shelves, tilted a few degrees toward the front, keep smaller items like spice jars or snack packets from sliding to the back where they’re easy to forget.
This layout works particularly well combined with a shallow shelf depth, since the angle does more work when there’s less room for items to shift out of place. A five to ten degree tilt is usually enough — anything steeper risks items sliding off entirely. A small front lip or rail helps prevent spillover on a shelf angled this way.
Lightweight items suit this layout best; heavier jars can strain the angled bracket over time. The typical mistake is applying this tilt to a standard-depth shelf, where the benefit gets lost in the extra space behind it. Used on the right shelf, it’s a small mechanical trick that keeps small items visible without any daily rearranging.
25. Shelf-Top Basket Zones
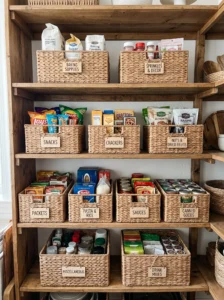
Rather than adding new shelving, placing uniform baskets directly on top of existing shelves creates defined “zones” for loose or miscellaneous items without any construction at all.
This works as an easy upgrade for pantries that already have solid shelving but struggle with a jumble of loose snack bags, packets, or small boxes. Choose baskets sized to leave a small gap on either side for easy sliding in and out, and stick to a consistent material — woven, wire, or fabric — across the whole pantry for a coherent look.
Label each basket by category rather than specific product for easier long-term use. The common misstep is buying baskets before measuring shelf depth, leading to awkward overhang or wasted space. It’s one of the simplest layout changes on this list, and often one of the fastest to implement in a single afternoon.
26. Cabinet-Style Shelving with Doors
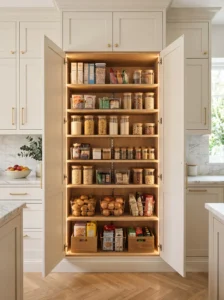
Enclosing pantry shelving behind simple cabinet doors, rather than leaving it fully open, suits households that prefer a clean, uncluttered look from the kitchen itself.
This layout works especially well when the pantry shares a wall with the main kitchen and needs to blend visually with surrounding cabinetry. Match door style and finish to existing kitchen cabinets for a seamless look, and consider adding interior lighting that activates when the door opens, since enclosed shelving loses ambient light. Adjustable shelves inside still matter just as much as with an open layout.
The tradeoff is losing the at-a-glance visibility that open shelving offers, so a bit more intentional organization is worth the effort inside. The common mistake is treating the interior layout as an afterthought just because it’s hidden — a messy cabinet is still a messy pantry, just with a door on it.
27. Rolling Cart Shelving as a Movable Layout
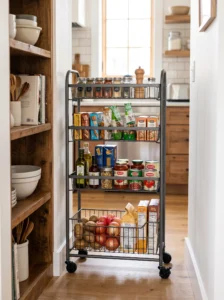
A slim rolling cart, tucked into a pantry corner or narrow gap, adds a genuinely flexible shelving layer that can be pulled out fully or repositioned as needs change.
This suits pantries with an odd leftover gap too narrow for fixed shelving but wide enough for a slim cart, typically 10 to 14 inches. Choose a cart with locking wheels for stability when it’s parked, and consider a material like powder-coated metal that holds up to regular movement without wearing down. Baskets or open tiers both work, depending on what you’re storing.
The main risk is overloading a cart not rated for heavier goods, since the wheels and frame need to support real weight when rolled. Used within its limits, though, a rolling cart is one of the few layouts on this list that can shift zones entirely — from spice storage to overflow snacks — in the time it takes to wheel it somewhere new.
28. Divided Shelf Sections for Multi-Use Pantries
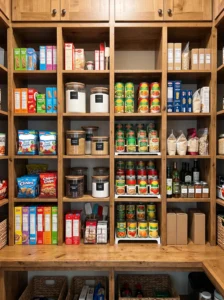
Physically dividing a single wide shelf into distinct sections, using simple dividers or bookend-style separators, keeps different categories from drifting into one another over time.
This layout works well in pantries shared by multiple household members with different habits — kids’ snacks, baking supplies, and pantry staples can all coexist on one shelf without blending into a single messy row. Choose dividers tall enough to actually contain what’s stored, usually at least half the height of the tallest item in that section.
Label each section clearly, since dividers alone don’t prevent drift if nobody knows where things belong. The common mistake is dividing a shelf without accounting for how items are actually used day to day, creating sections that don’t match real habits. Set up thoughtfully, this layout keeps a busy, shared pantry from sliding back into clutter within a week of being organized.
29. Adjustable Bracket Shelving for Long-Term Flexibility
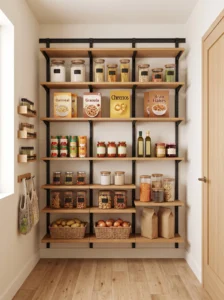
Wall-mounted bracket and track shelving, similar to what’s used in closets, offers one of the most adaptable long-term layouts since the entire shelf position can shift without any new drilling.
This works well for households that expect their storage needs to change — a growing family, a shift toward bulk buying, or simply a kitchen routine still being figured out. Choose a track rated for the shelf material you’re using, since wood shelving needs sturdier brackets than lightweight wire. Space vertical tracks no more than 24 inches apart for stability across a full shelf span.
The common error is under-spacing tracks to save on hardware costs, which leads to sagging over time under real pantry weight. Installed properly, this layout is close to future-proof — as your storage needs shift over the years, the shelving shifts right along with them.
Comparison Table: Pantry Shelving Layouts at a Glance
| Type | Best Use | Material | Style/Vibe | Difficulty Level |
|---|---|---|---|---|
| Adjustable Shelf Pin System | Any pantry needing flexible height | Wood, laminate | Practical, versatile | Easy |
| Pull-Out Wire Basket Shelving | Deep pantries with hidden back space | Coated steel wire | Functional, modern | Moderate |
| Open Wall Shelving with Bins | Well-lit pantries, frequent daily use | Wood, rattan, plastic | Airy, farmhouse | Easy |
| Corner Diagonal Shelving | Larger walk-in pantries with corners | Wood, MDF | Custom, built-in | Moderate–High |
| Modular Cube Shelving | Renters, flexible or temporary setups | Laminate, solid wood | Minimal, adaptable | Easy |
| Adjustable Bracket Shelving | Long-term, changing storage needs | Wood, metal track | Clean, closet-style | Moderate |
How to Choose the Right Pantry Shelving Layout
The right layout starts with an honest look at your pantry’s actual dimensions, not the shelving style you like best in photos. Measure depth, width, and ceiling height before choosing anything — a layout that looks great in a wide walk-in can feel completely wrong crammed into a narrow closet pantry.
Sizing and scale matter most at the planning stage. Shallow shelves suit spices and small packaged goods; deeper shelves suit bulk staples and small appliances. Mixing both within one pantry, rather than picking a single depth throughout, almost always makes better use of the available space.
Material choice affects both durability and maintenance down the line. Solid wood holds up well but costs more and can warp in humid conditions if not sealed properly. Wire shelving resists moisture but isn’t ideal for very small, loose items that can slip through the gaps. Laminate and engineered wood sit in the middle — budget-friendly, but worth checking weight ratings before loading up with canned goods.
On budget, the biggest expense usually isn’t the shelving material itself but the hardware — brackets, tracks, and pull-out mechanisms. It’s worth spending a bit more on the moving parts of any layout you choose, since a cheap track or hinge is often what fails first, regardless of how nice the shelving above it looks.
Common buying mistakes tend to come from skipping measurements or assuming one layout will suit the whole pantry. Most well-organized pantries actually combine two or three layouts from this list — adjustable shelving in the main area, a pull-out basket for the back corner, a door rack for lightweight extras — rather than relying on a single system throughout.
Avoid overbuying elaborate mechanisms for a pantry that mostly needs simple, well-planned shelf spacing. A well-measured, adjustable shelving system often solves more problems than an expensive specialty layout that doesn’t quite fit your actual storage habits.
Final Thoughts
A well-organized pantry rarely comes down to one dramatic upgrade. More often, it’s a handful of smaller layout decisions working together — adjustable heights here, a pull-out basket there, a shallow shelf dedicated to spices instead of forcing them onto a standard-depth shelf where they get lost.
What separates a pantry that stays organized from one that slides back into chaos within a month usually isn’t the materials or the budget behind it. It’s whether the layout actually matches how the household uses that space day to day. A beautiful shelving system that doesn’t fit real habits will clutter up again regardless of how much it cost.
Start with the sections of your pantry that frustrate you most often, rather than trying to overhaul everything at once. A single fixed shelf swapped for an adjustable one, or one deep cabinet fitted with a pull-out basket, can make a noticeable difference on its own. From there, the rest of this list offers plenty of room to keep refining the layout as your storage needs continue to change.
Frequently Asked Questions
How much does it typically cost to redo pantry shelving?
Costs vary widely by layout. A basic adjustable shelf pin system might only cost the price of new hardware, while pull-out baskets or custom corner shelving can run into the hundreds once materials and installation are factored in. Freestanding units and shelf-top baskets tend to be the most affordable starting points.
What’s the best shelving material for a humid pantry?
Coated wire shelving generally handles humidity better than solid wood, since it allows airflow and won’t warp over time. If you prefer the look of wood, make sure it’s properly sealed, and consider adding a small vent or fan if the pantry consistently feels damp.
How deep should pantry shelves be?
Most pantry shelves work best between 12 and 16 inches deep for general storage, with shallower six to eight inch shelves reserved for spices and small packaged goods. Anything deeper than 16 inches usually needs a pull-out or step layout to stay fully usable.
Is adjustable shelving worth the extra cost over fixed shelves?
In most cases, yes. Adjustable shelving costs a little more upfront but pays off over time, since it adapts as your grocery habits and storage needs shift. Fixed shelving can feel restrictive within a year or two as your pantry’s contents naturally change.
How do I keep pull-out baskets from sticking over time?
Regular cleaning of the tracks and avoiding overloading beyond the rated weight are the two biggest factors. Dust and spills can build up on the glide mechanism, so wiping tracks down every few months keeps baskets sliding smoothly.
What’s the most common mistake people make with pantry shelving?
Choosing a single shelving style for the entire pantry instead of mixing layouts to match different item types. A combination of adjustable shelves, a pull-out section, and a few shallow shelves for spices usually outperforms any single uniform layout.
Can I upgrade pantry shelving without a full renovation?
Yes, easily. Shelf pin systems, door-mounted racks, riser shelves, and freestanding units can all be added to an existing pantry without construction. These are good starting points if you want better organization without a bigger project.
How do I decide which layout fits my pantry best?
Start by measuring your pantry’s depth, width, and height, then think through your actual grocery habits — bulk buying, frequent canned goods, lots of small packaged snacks. Matching the layout to those real patterns matters more than choosing a style based on appearance alone.