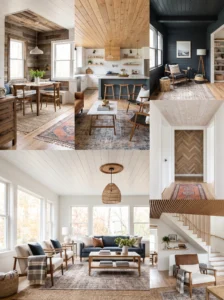
Most people decorate from the floor up and never give the ceiling a second thought until they’re standing in a rental or a builder-grade home staring at flat, featureless drywall above their heads. It’s the one surface in a room that gets almost zero attention, which is strange when you consider how much visual real estate it actually takes up. A ceiling spans the entire footprint of a room, and leaving it completely blank is a missed opportunity most people don’t even register as a choice — it just feels like the default.
Wood ceilings have a way of fixing that instantly, adding warmth and texture to a space without needing to touch the walls or floors at all. The surprising part is how affordable this can be done. People tend to assume wood ceiling treatments mean exposed beams and a serious renovation budget, but there are plenty of lower-cost approaches using reclaimed lumber, thin plank paneling, or even peel-and-stick wood veneer that deliver real impact without the structural work or the price tag that comes with it.
This list runs through 11 budget-friendly wood ceiling ideas, from full plank installations to smaller accent treatments that only cover part of the ceiling. Some of these are weekend DIY projects. A few need more time or a second set of hands. Either way, you’ll come away with a clear sense of what fits your room, your budget, and your comfort level with a ladder and a staple gun.
1. Shiplap Plank Ceiling
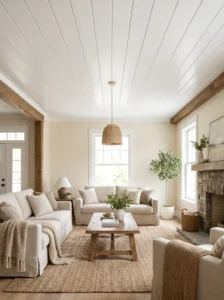
Shiplap has become almost synonymous with budget-friendly wood transformation, and ceilings are genuinely one of the best places to use it, since the horizontal grooves between boards create visible texture and shadow lines that read clearly even from floor level.
This works particularly well in living rooms, bedrooms, and farmhouse-style kitchens, especially in rooms with flat, featureless drywall ceilings that need some kind of visual interest. Standard shiplap boards run around 5.5 inches wide, which installs quickly across most ceiling sizes without needing excessive cutting.
Paint the boards white or a soft neutral before installation if you want a bright, classic farmhouse look, or leave them in a natural or stained finish for more warmth and contrast against white walls. Install perpendicular to the ceiling joists for proper structural support, using a stud finder to mark joist locations before you start nailing anything up. The most common mistake here is skipping the pre-painting step and trying to paint the boards after installation, which is far more tedious and prone to drips once you’re working overhead. Done well, a shiplap ceiling genuinely changes how a room feels the moment you walk in — it’s one of those details guests notice immediately, even if they can’t quite articulate why the room suddenly feels more finished.
2. Reclaimed Barn Wood Accent Ceiling
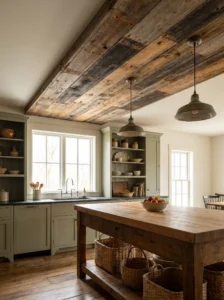
Reclaimed barn wood brings genuine age and character to a ceiling that no amount of new lumber can replicate, with each board carrying its own weathered grain, nail holes, and color variation from decades of actual use.
This suits rustic, farmhouse, or industrial-leaning spaces, and it works especially well as a partial treatment over a kitchen island, a reading nook, or a bedroom headboard wall extending onto the ceiling, rather than covering an entire room, which keeps both the cost and the visual weight manageable.
Source reclaimed boards from salvage yards, local barn demolition companies, or online marketplaces specializing in architectural salvage, since authentic reclaimed wood tends to run cheaper through these channels than through retailers marketing “reclaimed-style” new lumber at a premium. Clean and treat the boards for pests and stability before installation, since old barn wood sometimes harbors insects or structural weakness that needs addressing first. Mix boards of slightly varying width and tone rather than sorting for uniformity, since the whole appeal of reclaimed wood is its inconsistency. The genuine payoff with this option is depth of character that simply can’t be faked with new materials — a reclaimed ceiling patch looks like it’s always been part of the house, which is part of why it photographs and lives so well in older or farmhouse-style homes specifically.
3. Peel-and-Stick Wood Plank Panels
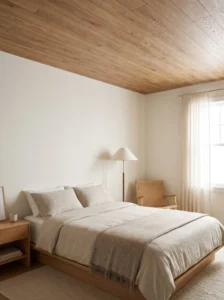
For anyone renting or hesitant to commit to a permanent installation, peel-and-stick wood panels offer a genuinely low-risk way to test a wood ceiling look without nails, glue, or any damage to the existing drywall underneath.
This works well in apartments, rental homes, or anyone wanting a temporary or easily reversible update. It suits smaller rooms and accent areas particularly well, like a bathroom ceiling or a closet, where the lower square footage keeps both material cost and installation time manageable.
Clean the ceiling surface thoroughly before application, since any dust or residue compromises the adhesive’s grip over time, and ceilings in particular accumulate more dust than most people expect. Work in small sections, pressing firmly from the center of each panel outward to avoid trapping air bubbles underneath. Choose panels with a textured, embossed wood grain rather than a flat printed finish, since the texture reads far more convincingly from below than a smooth surface ever does. Avoid this option in bathrooms with heavy, sustained steam exposure, like a shower ceiling directly, since prolonged moisture can weaken the adhesive bond over time even with moisture-resistant panels. This remains one of the fastest, cheapest ways to completely change a room’s feel in a single afternoon, with the added benefit that it comes right back down if you move or simply change your mind.
4. Painted Wood Plank Ceiling in a Bold Color

Rather than leaving wood planks natural or white, painting a plank ceiling in a deep, saturated color — navy, forest green, charcoal — creates a dramatic, cocooning effect that a flat painted drywall ceiling in the same color simply can’t replicate.
This works especially well in dining rooms, home offices, or bedrooms where a moodier, more intimate atmosphere is the goal rather than a bright, airy feel. Smaller rooms benefit particularly well from this treatment, since a dark ceiling in a compact space reads as cozy rather than oppressive, while the same treatment risks feeling heavy in a very large room.
Prime the wood planks properly before painting, since raw or unfinished wood absorbs paint unevenly without a proper primer coat, leading to a blotchy finish that becomes obvious once the room’s lighting hits it. Use a paint with a matte or eggshell finish rather than anything glossy, since sheen on a ceiling tends to create distracting glare from overhead lighting fixtures. Let the plank texture do the visual work rather than adding a secondary pattern or accent, since the groove lines between boards already provide enough dimension on their own. The detail that surprises people most about this approach: a dark ceiling paired with lighter walls draws the eye up in a way that actually makes the room feel taller, not smaller, contrary to what most people assume about using dark colors overhead.
5. Wood Plank Ceiling with Exposed Beams
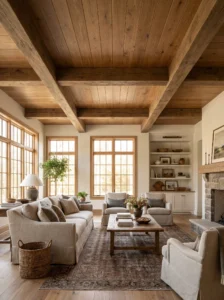
Pairing simple wood plank paneling with a few faux or lightweight exposed beams running perpendicular to the planks gives you the look of substantial, structural timberwork without the cost or weight of real structural beams.
This suits living rooms, great rooms, and kitchens with higher ceilings, roughly 9 feet or taller, since the beams need enough vertical clearance to read as a deliberate architectural feature rather than something crowding the room. It works less well in standard 8-foot ceiling rooms, where the added beam depth can make the space feel noticeably lower.
Use lightweight faux wood beams, often made from polyurethane with a convincing wood-grain finish, rather than solid lumber, since faux versions install far more easily without needing structural reinforcement and cost considerably less. Stain or paint the beams to complement rather than exactly match the plank ceiling beneath them, since a slight tonal contrast helps the beams read as a distinct architectural layer instead of blending flat into the planks. Space beams evenly, generally every 3 to 4 feet, rather than clustering them unevenly, which can look accidental rather than intentional. This combination genuinely elevates a plain plank ceiling into something that resembles custom timber-frame construction, and most visitors won’t realize the beams are lightweight faux pieces unless they’re specifically looking for the seams.
6. Herringbone Wood Ceiling Pattern
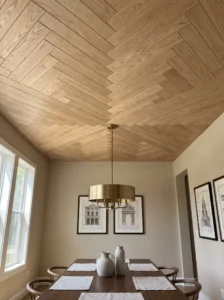
Installing wood planks in a herringbone pattern rather than straight, parallel rows turns a ceiling into a genuine statement feature, bringing a level of visual sophistication that a standard plank installation doesn’t quite reach.
This works particularly well in entryways, dining rooms, or small powder rooms, where the ceiling is viewed up close and the geometric pattern can actually be appreciated in detail, rather than in a sprawling great room where the pattern might read as busy from a distance.
Plan the layout carefully before cutting any boards, working from the center of the ceiling outward so the pattern stays symmetrical and doesn’t end awkwardly at the room’s edges. Use thinner, narrower planks than you would for a standard straight installation, since herringbone patterns read more clearly and look more refined with smaller individual pieces. Keep the finish relatively simple — a single wood tone or a light stain — since the pattern itself already provides plenty of visual complexity without needing additional color variation competing for attention. This is genuinely one of the more labor-intensive projects on this list, requiring more precise cutting and planning than a straight installation, but the final result reads as considerably more custom and high-end than the actual cost of materials would suggest.
7. Whitewashed Wood Ceiling

Whitewashing wood planks, rather than fully painting or staining them, lets the natural grain show through a soft, translucent white wash, creating a brighter, airier version of a wood ceiling that doesn’t feel as heavy as a fully stained or natural finish.
This suits coastal, Scandinavian, or farmhouse-style rooms where the goal is warmth and texture without darkening the space. It works especially well in rooms with limited natural light, since the lighter finish reflects more ambient light back into the room compared to a deeply stained wood tone.
Mix a whitewash solution using diluted white paint and water, generally in a 1:1 ratio as a starting point, adjusting based on how much wood grain you want visible through the finish. Apply with a rag or a dry brush rather than a standard paint roller, working in the direction of the wood grain and wiping away excess before it dries for the most natural, translucent effect. Test the mixture on a scrap piece of the same wood first, since different wood species absorb the whitewash differently and the ratio that works on pine may look too opaque or too sheer on oak or cedar. This finish genuinely softens a room’s whole feel — it keeps the warmth and texture of real wood while avoiding the slightly heavy, cabin-like effect that a fully natural or dark-stained wood ceiling can sometimes create in a smaller space.
8. Wood Ceiling Medallion or Centerpiece
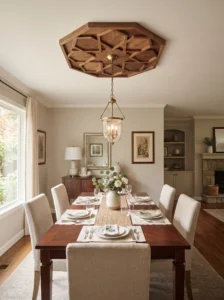
Rather than covering an entire ceiling, installing a single wood medallion or geometric centerpiece around a light fixture adds a focal point without the material cost or labor of a full installation.
This works well in dining rooms, entryways, or bedrooms where a chandelier or pendant light already serves as a natural focal point, since the wood medallion frames and enhances that existing fixture rather than competing with it for attention. It suits rooms with standard flat ceilings that otherwise have no other architectural detail.
Choose a medallion sized proportionally to the room and the fixture it surrounds — a small bedroom pendant needs a considerably smaller medallion than a dining room chandelier over a large table. Pre-made wood medallions are available in various sizes and styles, though a simple DIY version can be built from thin plywood cut into a geometric pattern, like a sunburst or hexagon, and stained or painted to complement the ceiling color. Center the medallion precisely around the existing fixture’s mounting point before installation, since an off-center medallion is immediately noticeable and hard to correct after the fact. This is one of the lowest-cost options on the entire list in terms of both materials and labor, making it a smart entry point for anyone wanting to test a wood ceiling detail without committing to covering an entire room.
9. Tongue-and-Groove Pine Ceiling
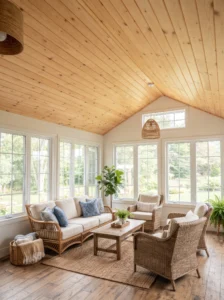
Tongue-and-groove pine boards remain one of the most classic, time-tested approaches to a wood ceiling, interlocking cleanly for a tight, gap-free finish that looks considerably more polished than simple butt-jointed planks.
This works especially well in cabins, porches, sunrooms, and bedrooms where a warm, traditional wood ceiling fits the overall style. It’s also a practical choice for covered outdoor or three-season porch ceilings, since pine holds up reasonably well in a sheltered, non-direct-weather-exposed setting.
Pine remains one of the more affordable wood options for this treatment compared to oak, cedar, or other hardwoods, which matters since ceiling installations require covering a fairly large surface area. Seal the pine with a clear polyurethane or a light stain to protect against yellowing over time, since unsealed pine darkens and ambers noticeably within just a few years, which may or may not suit your intended look. Install with finish nails at a slight angle through the tongue of each board, hiding the fastener within the groove of the next board for a clean, seamless appearance with no visible nail heads. The classic, timeless quality of this approach is exactly why it’s remained a go-to choice for decades — it doesn’t chase a specific trend, which means a tongue-and-groove pine ceiling installed today will likely still look appropriate and current a decade from now, unlike some more trend-driven finishes.
10. Wood Slat Ceiling with Gaps for a Modern Look
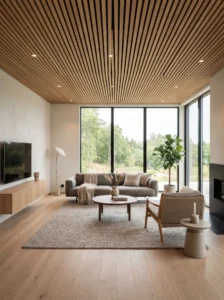
Spacing wood slats with visible gaps between each board, rather than installing them flush against each other, creates a more contemporary, architectural look that differs noticeably from the tighter, traditional plank or shiplap approach.
This suits modern or Scandinavian-style homes, particularly in entryways, hallways, or living rooms where clean lines and a more minimal aesthetic are the priority over a cozier, more traditional feel. It also works well paired with recessed lighting, since the gaps between slats allow light to filter through in an interesting way if fixtures are positioned thoughtfully above the slat layer.
Space slats evenly, typically with gaps between a half-inch and one inch depending on the desired density of coverage, and use a consistent spacer tool during installation to keep the spacing precise across the entire ceiling. Choose a single, consistent wood tone across all slats rather than mixing finishes, since the clean, repetitive geometry of this style depends on visual consistency to read as intentional rather than mismatched. Avoid overly thick slats, which can look heavy and clunky in this more minimal style — thinner, more refined slat profiles suit the contemporary aesthetic better than the chunkier boards used in rustic shiplap treatments. This approach tends to appeal specifically to people who like the warmth of wood but find fully enclosed plank ceilings a bit too traditional or heavy for their taste, offering a middle ground between bare drywall and a fully rustic wood treatment.
11. Wood Veneer Ceiling Tiles

Lightweight wood veneer ceiling tiles, often designed to drop into an existing suspended ceiling grid or install directly onto drywall, offer one of the most budget-friendly ways to achieve a wood ceiling look in basements, offices, or commercial-adjacent spaces with existing grid systems.
This works particularly well in finished basements or home offices that already have a suspended drop ceiling, since the tiles replace standard acoustic panels without requiring any structural changes to the room. It also suits spaces needing easy access to wiring or plumbing above the ceiling, since individual tiles pop out for maintenance far more easily than a fully installed plank ceiling would allow.
Measure your existing grid dimensions carefully before ordering tiles, since suspended ceiling grids come in a couple of standard sizes and an ill-fitting tile won’t sit flush or look intentional. Choose tiles with a genuine wood veneer layer rather than a printed wood-look laminate, since the real veneer catches light and shows grain texture in a way printed versions simply can’t replicate convincingly. Mix tile orientation slightly, rotating some pieces if the wood grain pattern allows, to avoid an obviously repetitive, stamped-out look across a larger ceiling area. This option solves a specific problem few other ideas on this list address directly — bringing real wood warmth into a space that still needs the practical accessibility of a drop ceiling system, which matters a lot in basements and offices with exposed mechanicals overhead.
Comparison Table: Wood Ceiling Options at a Glance
| Type | Best Use | Material | Style/Vibe | Difficulty Level |
|---|---|---|---|---|
| Shiplap Plank Ceiling | Living rooms, bedrooms, kitchens | Pine or MDF shiplap boards | Farmhouse, classic | Moderate |
| Peel-and-Stick Panels | Rentals, bathrooms, small rooms | Adhesive-backed wood veneer | Temporary, flexible | Easy |
| Reclaimed Barn Wood | Accent areas, rustic spaces | Salvaged weathered lumber | Rustic, character-rich | Moderate to Difficult |
| Herringbone Pattern | Entryways, dining rooms | Thin wood planks | Sophisticated, geometric | Difficult |
| Wood Veneer Tiles | Basements, offices with drop ceilings | Veneer-topped ceiling tiles | Practical, accessible | Easy to Moderate |
| Tongue-and-Groove Pine | Cabins, porches, sunrooms | Interlocking pine boards | Traditional, timeless | Moderate |
How to Choose the Right Wood Ceiling for Your Space
Start by being honest about your ceiling height before picking a style. Lower, standard 8-foot ceilings generally do better with lighter finishes, whitewashing, or thin slat treatments, since heavier dark stains or thick exposed beams can make a already-low room feel more cramped rather than more interesting. Taller ceilings handle bolder, darker treatments and structural-looking beam additions far more comfortably.
On materials, pine remains the most budget-friendly real wood option for most of these projects, while reclaimed wood costs more upfront but delivers character that new lumber simply can’t match regardless of how it’s finished. Peel-and-stick panels and veneer tiles sit at the more affordable end overall, trading some authenticity for significantly lower cost and installation time.
Durability depends heavily on the room. Bathrooms and kitchens need moisture-resistant sealants or finishes regardless of which wood treatment you choose, since humidity and steam will warp or discolor unsealed or improperly sealed wood over time. Living rooms and bedrooms have far more finish flexibility, since they don’t deal with the same moisture exposure.
Maintenance is generally low across most of these options once properly sealed or finished, though natural or whitewashed finishes may need occasional touch-ups as the wood ages and shifts slightly with seasonal humidity changes, which is normal and part of real wood’s character rather than a flaw to fix aggressively.
Budget-wise, peel-and-stick panels and simple plank treatments sit at the most affordable end, while herringbone patterns, reclaimed wood, and exposed beam combinations cost more due to either material sourcing or the added labor of more complex installation.
A common expensive regret is committing to a full-room wood ceiling installation before testing the look on a smaller scale first. Try a closet, a small bathroom, or even a single accent wall extending onto part of the ceiling before committing budget and labor to an entire living room or bedroom, since wood ceilings read very differently in person than they do in inspiration photos, and it’s far cheaper to adjust course on a small test area than after a full installation.
Final Thoughts
A wood ceiling doesn’t need to mean exposed structural beams and a contractor-level renovation budget to make a genuine difference in how a room feels. Some of the ideas here, like peel-and-stick panels or a simple wood medallion, take a single afternoon and barely dent a weekend project budget. Others, like a full herringbone installation or reclaimed barn wood treatment, take more time and planning but deliver a result that looks considerably more expensive than the actual materials cost.
The right choice depends mostly on your ceiling height, your room’s existing style, and how much of a permanent commitment you’re ready to make. A rental benefits most from reversible options like peel-and-stick panels, while a long-term home with higher ceilings can take on something more involved like exposed beams or a full plank installation. Start smaller than you think you need to, see how the finished look actually feels in your specific room’s light, and expand from there if it’s working the way you hoped.
Frequently Asked Questions
How much does a budget wood ceiling typically cost per square foot?
Costs vary widely by method, but peel-and-stick panels and basic pine shiplap tend to run on the lower end compared to reclaimed wood or custom herringbone installations, which cost more due to either sourcing or labor. Pricing out your specific room’s square footage before committing helps avoid surprises partway through a project.
Do wood ceilings make a room feel smaller?
Not necessarily, and lighter finishes like whitewashing often do the opposite by reflecting more light around the room. Dark stains and heavy beams can make a low-ceilinged room feel more enclosed, so matching the finish weight to your actual ceiling height matters more than avoiding wood altogether.
Are peel-and-stick wood panels durable enough for long-term use?
They hold up reasonably well in dry, low-traffic areas like bedrooms and living rooms, though they’re generally better suited to temporary or rental situations than permanent installations. Heat and humidity can weaken the adhesive over time, so avoid them directly above steam-heavy areas like a shower.
Can I install a wood ceiling myself, or do I need a professional?
Many of these options, especially peel-and-stick panels, basic shiplap, and wood medallions, are genuinely doable as a DIY weekend project with basic tools. More complex installations like herringbone patterns or structural-adjacent beam work benefit from either prior DIY experience or professional installation for the best result.
How do I keep a wood ceiling from darkening or yellowing over time?
Seal the wood with a clear polyurethane or UV-protective finish, since unsealed or unfinished wood, particularly pine, ambers noticeably within just a few years of exposure to light and air. Choosing a pre-tinted stain also helps mask gradual yellowing better than leaving the wood completely natural.
What’s the biggest mistake people make with budget wood ceilings?
Committing to a full-room installation without testing the finish and style in a smaller area first. Wood ceilings read very differently in a real room’s lighting than they do in photos, and a small test area saves both money and regret if the look doesn’t turn out the way you expected.
Is reclaimed wood actually cheaper than buying new lumber for a ceiling?
It depends on the source, but reclaimed wood purchased directly from salvage yards or demolition companies is often comparable to or cheaper than new lumber, while reclaimed-style new wood sold at a premium through retailers tends to cost more for a similar look without the authentic age and character.
Do wood ceilings need special cleaning or upkeep?
Minimal upkeep is needed once properly sealed, generally just occasional dusting since ceilings collect less daily grime than other surfaces in a room. Kitchens and bathrooms may need more frequent attention due to grease or moisture exposure, depending on the room’s typical use.