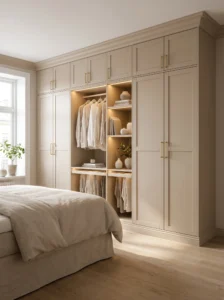
You can usually spot a flat-pack wardrobe from the doorway. There’s a gap above it where dust gathers, a strip of wall showing at one side, and a plastic-looking handle that says “assembled on a Saturday.” None of those problems are really the wardrobe’s fault. They come from how it gets finished, and finishing is where a few hundred dollars of effort can make a unit look like it was built into the house.
The PAX system happens to be unusually good at this. The frames are plain, square, and consistent in size, which is exactly what trim carpenters want to work with. They come in two depths, roughly 13 3/4 and 22 7/8 inches, two heights, about 79 1/4 and 93 1/8 inches, and several widths, so you can fill most walls with very little leftover space. The adjustable feet level the frame on an uneven floor, and the doors can be swapped, painted, or dressed up.
This list covers 12 ways to push a PAX wardrobe toward a custom built-in look. Some are structural, like closing gaps and adding molding. Others are surface details, like paint, hardware, and door texture. You won’t need every one. Three or four well-chosen moves usually do most of the work, and the order you tackle them in matters more than people expect.
1. Close the Ceiling Gap with Tall Frames and Crown
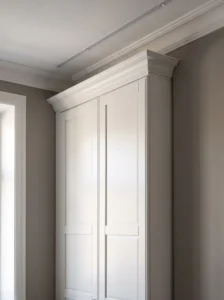
Nothing gives away a freestanding wardrobe faster than a visible gap between its top and the ceiling. Fixing that single detail changes how the whole wall reads.
Start with the taller frames, about 93 1/8 inches. In a standard 8-foot room, that leaves roughly three inches to cover, which a strip of crown molding or a plain flat trim board handles easily. Rooms with higher ceilings need a built-up header, such as a painted plywood box or a stack of trim, to bridge the difference.
Measure the ceiling in several spots, since few ceilings are truly level. Scribe the trim to match, and caulk the top edge where it meets the ceiling. A thin bead of paintable caulk hides small gaps that would otherwise show as a dark line.
Match the trim color to the wall or ceiling, not the wardrobe, if you want it to disappear. The result looks surprisingly like carpentry. Standing back from the finished wall, most visitors assume it was custom framed into the room.
2. Fill Wall to Wall with Filler Panels
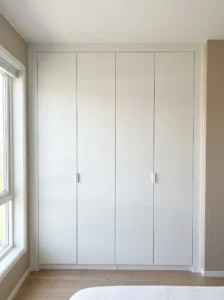
A wardrobe that stops a few inches short of the corner always looks like furniture. A wardrobe that touches both walls looks like architecture.
Combine frame widths to get as close as possible to your wall length. The widths, about 19 5/8, 29 1/2, and 39 3/8 inches, give you plenty of combinations, but they rarely hit your wall exactly. Make up the difference with filler panels and narrow strips cut to fit the leftover space on one or both sides.
Measure the wall at the top, middle, and bottom, because walls lean and corners aren’t square. Use the smallest measurement as your guide, then scribe the filler to match the wall’s actual line. A slight shadow gap looks fine. A gap you can slide a coin into does not.
Keep the filler in the same finish as the doors and the frame. Mixing white frames with a mismatched filler shows up in daylight.
In older houses, plan for walls that bow. A bit of patience with a pencil and a plane saves you from a wavy edge that ruins the effect.
3. Hide the Feet with a Plinth and Baseboard
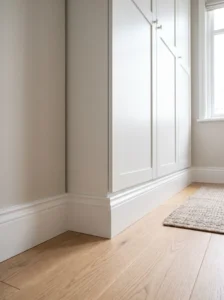
Those adjustable feet are handy, but they leave a gap at the bottom where dust and socks collect. A plinth fixes both problems and ties the wardrobe into the room.
Build a simple base from plywood or a trim board that matches your existing baseboard height, then set the wardrobe frame on top of it, or tuck the plinth in front of the feet as a cover strip. Continue your room’s baseboard across the front, so the line reads unbroken from one wall to the other.
Use the adjustable feet to level the frame first, then add the plinth. Trying to fix an out-of-level frame with trim just leaves visible gaps.
Paint the plinth to match the baseboard, not the doors. This tiny detail does a lot, because the eye reads baseboard as part of the room, and anything that connects to it feels original to the house.
Allow for floor vents or heating elements before you box anything in. Blocking airflow is a mistake that’s easy to avoid and annoying to fix.
4. Paint the Wardrobe the Same Color as the Wall
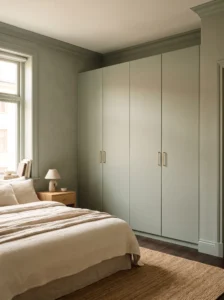
A white wardrobe on a white wall looks like a white wardrobe. A wardrobe painted to match the walls looks like part of the wall.
Choose a color you love enough to live with on a large surface. Soft grays, warm greiges, and muted greens blend well in bedrooms, while a deeper tone like navy makes the unit feel intentional and moody. Painting also hides the laminate look that some people dislike about flat-pack finishes.
Preparation decides everything. Sand lightly, clean thoroughly, and use a bonding primer made for slick laminate before applying paint, or the finish will peel at the edges within months. Use a durable satin or semi-gloss paint, which stands up to fingerprints better than flat.
Spray or use a fine foam roller for the smoothest result, and paint the doors off the unit if you can, laying them flat to avoid drips.
Check the manufacturer’s guidance on modifications, since painting may affect warranty terms. The difference is dramatic, though. Matching the wall color makes a large piece of furniture visually recede, so a small bedroom feels calmer.
5. Swap the Handles for Something with Weight
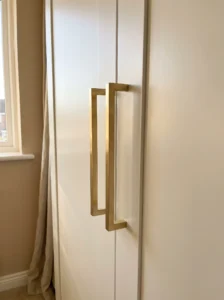
Cheap hardware is the quickest giveaway of an unmodified wardrobe. Replacing it costs little and takes an hour.
Pick pulls with some heft: brass, matte black, or leather straps all feel more expensive than the stock options. Cup pulls and bar handles suit modern rooms, while knobs lean traditional. Look for handles that are comfortable to grip with a full hand, since you’ll use them daily.
Measure the existing hole spacing before ordering, because pull hardware comes in set widths and it’s easy to buy the wrong size. If the holes don’t match, you can fill and re-drill them, or buy a backplate that covers the old marks.
Use a drill guide or a template to keep the new holes consistent across every door. A single crooked handle on a long wall is hard to ignore once you notice it.
Keep the metal finish consistent with other hardware in the room, like lamps and cabinet pulls. Mixed metals can work, but coordinating them keeps the look polished.
6. Add Applied Molding for Shaker-Style Doors
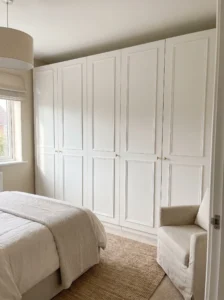
Flat slab doors read as modern, which isn’t always what you want. Gluing thin strips of molding onto the face turns them into paneled doors with a classic, custom look.
Use thin MDF or pine trim, about half an inch wide, and glue it in a rectangle on each door, leaving a border of two to three inches around the edge. Paint everything together after assembly. The shadow lines the molding creates give the door depth, and from a few feet away it reads as true carved panels.
Mark your layout with painter’s tape first, and measure each door separately, since sizes vary. A level and a small brad nailer or strong adhesive make the job easier. Fill nail holes and caulk the seams before painting.
Stay consistent. The same border width on every door is what sells the look. Uneven spacing is the most obvious mistake.
This idea fits traditional bedrooms and farmhouse styles especially well. It’s also an inexpensive upgrade, since the molding costs very little compared with buying custom panel doors.
7. Fluted or Slatted Door Fronts
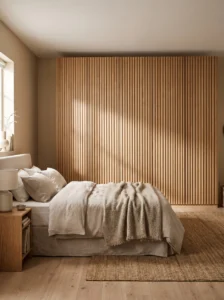
Texture is a quiet way to make a plain wall feel designed. Fluted or slatted panels, made of thin vertical strips, add rhythm and warmth that flat doors can’t.
Buy ready-made fluted panels or cut your own from half-round dowels or slim wood strips, then fix them to the door faces. Natural oak tones suit Scandinavian and Japandi rooms, while paint-grade strips suit a more tailored look. Vertical lines also make the ceiling feel higher.
Plan the strip spacing so the pattern runs continuously across the doors, with the gaps between doors falling where a strip would naturally fall. A break in the pattern shows up from across the room.
Keep dust in mind. Grooves collect it, so a soft brush attachment on a vacuum becomes part of your routine. Seal the wood with a clear finish to make wiping easier.
Light matters here too. Side lighting from a window or a sconce throws soft shadows across the grooves, and that play of light is the main reason this look feels so expensive.
8. Flank a Window and Bridge Overhead
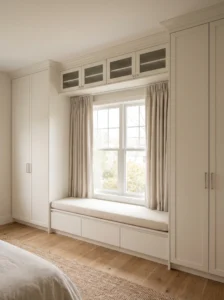
Two PAX units on either side of a window, joined by a shelf or cabinet above, create a built-in alcove with a window seat or reading spot in the middle. It’s one of the most convincing built-in effects you can make from flat-pack parts.
This works on a wall with a window centered or close to it. Measure the window width and the wall space on each side, and size the frames so they sit flush with the window casing. A bridge piece above, made from shelving, plywood, or a ready-made cabinet, links the two sides.
Build a bench or a simple platform between the units for seating, with a cushion on top. Add drawers below if you want hidden storage.
Mind the light. Keep the bridge shallow enough that it doesn’t block daylight, and consider a small downlight underneath for evening reading.
Anchor everything to the wall studs, especially the bridge, since an overhead load needs solid support. When finished, the window becomes a focal point, and the whole wall feels deliberately designed.
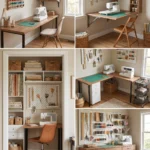
9. A Desk Tucked Between Two Units
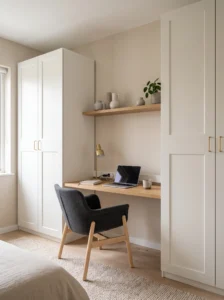
A built-in desk framed by PAX wardrobes is a quiet solution for small homes that need a workspace without a separate room.
Leave a gap between two frames wide enough for a desk, usually 40 to 55 inches. Use a simple plank or a countertop slab as the work surface, supported by cleats fixed to the sides of the frames or by legs. A shelf above ties the whole arrangement together.
Choose shallow frames for the sides if the room is narrow, and make sure the desk depth leaves legroom. Run cable access through a hole in the back of the unit, so cords stay hidden.
Add light overhead. A small task lamp or a strip fixed under the bridge shelf gives you even illumination without glare on screens.
Use doors in a shared finish across the whole run, and the desk reads as part of the wardrobe. When you close the doors, the workspace disappears, which is a nice trick in a bedroom you also want to relax in.
10. Entry Wall with Shallow Frames and a Bench
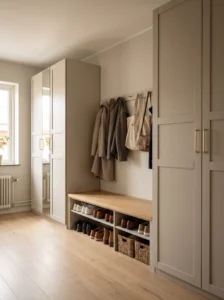
An entryway needs different storage than a bedroom: coats, bags, shoes, and a place to sit. Shallow PAX frames, about 13 3/4 inches deep, take less hallway space and still hold plenty.
Line a wall with shallow frames, then add a bench either between two units or in front of an open section. Hooks inside the doors or on the back panel handle bags and scarves. Use pull-out shoe trays or simple shelves for footwear.
Pick a durable, easy-to-wipe finish, because entry walls take more abuse than bedroom ones. A semi-gloss or satin paint cleans up quickly, and darker colors hide scuffs.
Keep a clear path. Doors need room to swing, and a hallway that feels tight defeats the purpose, so sliding doors may suit narrow spaces better.
Add a mirror on one door, and you’ve got an everyday entry station: look in, grab your keys, and go. Families especially notice how much calmer mornings feel when each person has a spot for their stuff.
11. Mix Open Shelves with Closed Doors
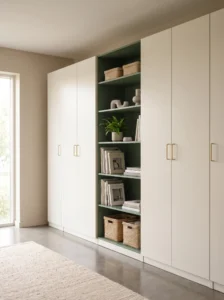
An unbroken wall of doors can feel heavy. Leaving a section or two open, with shelves for books, baskets, or objects, breaks up the mass and makes the wardrobe look like furniture someone designed on purpose.
Place the open section in the middle or at one end, at eye level, where display looks best. Use the same frames as the closed units and simply leave the doors off that bay. Style the shelves with a mix of items, such as books, a plant, and a few baskets, and avoid filling every inch.
Keep the interior tidy, since an open shelf shows everything. Paint the back of the open section a contrasting color, like a deep green or warm terracotta, for extra depth.
This idea suits living rooms and dining areas, where a wardrobe-like unit doubles as a display wall. It also helps bedrooms feel less like a dressing room.
The balance matters. Roughly one open bay to two or three closed ones usually looks right, with the closed doors hiding the daily clutter.
12. Lighting That Looks Architectural
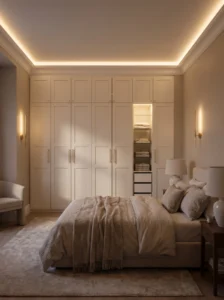
Light is the final layer that makes a built-in feel permanent. A wall of cabinets with no lighting looks like furniture. One with soft, integrated light looks like part of the house.
Add strip lights along the top edge, either inside the cornice trim or tucked behind it, so they wash the ceiling and wall with warm light. Interior lighting, designed for the system, brightens the inside when doors open. Wall sconces or picture lights on either side add a finishing touch.
Choose warm white, around 2700 to 3000K, for a cozy glow. Cool light feels clinical in a bedroom. A dimmer lets you set the mood from bright dressing light to a soft evening glow.
Plan wiring early. Running cables behind trim is easy during construction and painful after the wall is finished. Use cable clips and cover strips to keep cords neat.
Hidden light sources are the key. When you see the glow but not the fixture, the effect feels like a designer built it, and every other detail on the wall looks better for it.
Comparison Table: Built-In Finishing Options at a Glance
| Type | Best Use | Material | Style/Vibe | Difficulty Level |
|---|---|---|---|---|
| Crown molding wrap | Closing the ceiling gap | Wood or MDF trim, caulk | Polished, traditional | Moderate |
| Filler panels | Wall-to-wall fits | Panels cut to match frames | Seamless, tailored | Moderate |
| Paint to match walls | Small bedrooms, calm looks | Primer and satin paint | Subtle, modern | Moderate |
| Applied molding doors | Traditional, farmhouse rooms | Thin MDF or pine strips | Classic, paneled | Moderate |
| Fluted door fronts | Scandinavian, Japandi spaces | Wood strips or half-rounds | Textured, warm | Moderate to Difficult |
| Hardware swap | Any PAX wardrobe | Brass, matte black, leather | Refined, personal | Easy |
How to Choose the Right Finishing Touches
Start with the room, not the product page. Measure the wall width, the ceiling height at several spots, and any obstacles like outlets, vents, and window trim. These numbers decide which frame heights and widths you need, and they show how much filler and trim you’ll have to add.
Pick a priority. If the gap above the wardrobe bothers you most, begin with the tall frames and crown. If the surface looks cheap, begin with paint and hardware. Trying every upgrade at once usually leads to half-finished work and a longer, costlier project.
On materials, use paint-grade MDF or pine for trim and molding, since both are inexpensive and take paint well. Solid hardwood costs more and only matters if you plan to stain it. For hardware, solid metal feels better than hollow plated pulls and usually lasts longer.
Durability depends on preparation. Painted laminate chips if you skip the bonding primer, and applied trim loosens if the glue is rushed. Caulk and paint tie the pieces together, so take time with them.
Maintenance is light. Dust textured fronts regularly, wipe painted doors with a damp cloth, and check screws on heavy shelves occasionally.
On budget, the frames are inexpensive, and the extras add up quickly. Doors, lighting, and custom trim can cost more than the wardrobe itself. Spend on the details people see and touch every day, like handles and finish, and save on hidden parts. Check current prices, since they change with size and configuration.
The costliest regrets are mismeasuring and skipping the wall anchors. Measure twice, assemble the frames before ordering anything else, and always secure tall units to the wall.
Final Thoughts
A built-in look comes from small decisions, not big spending. Closing a gap, painting a surface, swapping a handle, and adding a line of trim each seem minor alone, but together they change how a wall reads. The PAX frames provide a clean, consistent base, and everything you add on top turns that base into something that feels permanent.
You don’t need all 12 ideas. Choose the three or four that suit your room and your skills. A rental might stick with paint and hardware, since both are easy to adjust. A long-term home can justify trim, lighting, and a bridge over a window.
Plan the sequence. Set the frames and level them first, then add filler and trim, then paint, and finish with hardware and lighting. Working in this order keeps you from redoing steps and keeps the paint clean.
Give yourself a weekend or two, and live with the result before adding more. The best built-ins feel calm and obvious, as if the room always had them. If a visitor asks who built your wardrobe, you’ll know the details worked.
Frequently Asked Questions
Can PAX wardrobes really look like custom built-ins?
Yes, with a few finishing steps. Closing the ceiling gap, filling side gaps, adding a plinth, and painting or upgrading the doors make a big difference. The frames are consistent in size, which makes trimming easier.
How much space should I leave at the ceiling for trim?
In a standard 8-foot room, the taller frame, about 93 1/8 inches, leaves roughly three inches. A strip of crown or flat trim covers that gap. Measure your own ceiling in several places before buying.
Do I need to paint the wardrobe to get a built-in look?
Not necessarily, but painting helps the unit blend into the wall. If you paint, use a bonding primer made for laminate and a durable satin or semi-gloss finish to avoid peeling.
Is it hard to add molding to the doors?
It’s a manageable weekend project with basic tools. Mark a consistent border, glue and nail thin strips, fill the holes, caulk, and paint. Uneven spacing is the most common mistake.
How do I anchor a tall wardrobe safely?
Fasten the frame to wall studs using the hardware and instructions supplied with the system. This matters most in homes with children or pets, and for any unit with a bridge or overhead shelf.
Will these changes affect the warranty?
Modifications such as painting or adding trim can affect warranty terms, so check the manufacturer’s current policy before you start. Structural frames carry a 10-year limited warranty when used as intended.
What’s the cheapest upgrade that makes the biggest difference?
Swapping the handles and caulking and painting the trim gaps cost little and show immediately. Closing the ceiling gap is the next most noticeable change.
Can I build a PAX built-in in a rental?
Yes, using freestanding frames, removable trim, and peel-and-stick or paintable surfaces that can be undone. Avoid permanent changes without your landlord’s permission.