The ceiling is the fifth wall of every room, and in most homes it gets the same flat white paint it was given the day the drywall went up. You can spend thousands on a sofa and a rug, and the room will still feel a little ordinary if the biggest uninterrupted surface above your head is blank.
That’s why designers keep going back to wood overhead. It adds warmth, texture, and a sense of craft that paint can’t copy. A plain bedroom with a slatted ceiling feels like a boutique hotel. A kitchen with beams feels settled and permanent. Even a small entry looks more considered with a few well-chosen planks above.
The catch is that wood overhead can go wrong. Too dark and the room closes in. Too busy and it competes with everything below. The wrong species or finish can look like a basement from 1985. Cost is also a question, since real hardwood across a whole ceiling isn’t cheap, though several options here cost far less than people assume.
Below are 16 ideas with notes on materials, sizing, finishes, lighting, and the mistakes that tend to show up halfway through a project. After that you’ll find a comparison table, a buying guide, and answers to questions people ask before they commit. Ceiling work often involves structural support, fire ratings, and sometimes permits, so check local rules and get a professional opinion for anything beyond cosmetic cladding.
1. Shiplap Planks in a Light Natural Finish

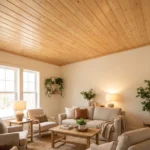
Shiplap is the friendliest way into wood ceilings, because the boards are easy to find, easy to cut, and forgiving to install. Overlapping edges create a clean line, and a pale finish keeps the room bright instead of heavy.
It works well in living rooms, bedrooms, and sunrooms where you want warmth without drama. Pine, poplar, and cedar are common choices. Boards around 5 to 6 inches wide suit most rooms, while narrower ones can look busy in a large space. Run the planks parallel to the longest wall, which makes the room feel longer.
Choose a clear matte sealer or a light whitewash to keep the grain visible. Glossy finishes show every flaw and glare under lamps. Prime the back of each board before installing if the room is humid, to slow warping.
The mistake people make is skipping the layout. Starting at one wall without checking the opposite end often leaves a thin sliver of board at the finish. Measure and adjust the first row so both edges look balanced.
Looking up at a soft, even grain feels calming, and the room seems to hold the evening light longer.
2. Tongue-and-Groove Pine With a Warm Stain
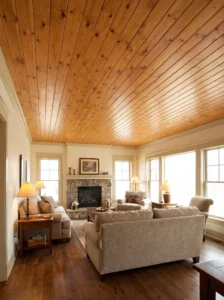
Tongue-and-groove boards lock together, so the surface stays tight and flat for years. With a warm honey or amber stain, pine takes on a cabin-like glow that suits lodges, family rooms, and covered porches.
It’s a good pick for rooms with plenty of daylight, since the stain can deepen the space. Combine it with lighter walls, cream trim, and plenty of windows. Matching floors is a risk: wood above and wood below can feel like a box. Make the ceiling a different tone from the floor, either lighter or noticeably warmer.
Choose boards between 3 and 5 inches wide, and test the stain on a spare piece, because pine absorbs color unevenly. A pre-stain conditioner helps avoid blotches. Two thin coats beat one heavy coat.
Think about knots. Clear grade boards look polished but cost more, while knotty pine adds rustic character. Neither is wrong, but pick one on purpose.
The everyday payoff is acoustic. Real wood softens echo in a way painted drywall never does, so conversation in a big room feels warmer and quieter.
3. Exposed Beams Across a White Ceiling
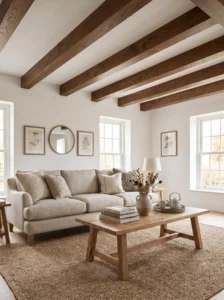
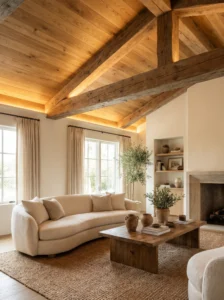
Beams are the classic move for adding character, and they work best against a plain white ceiling, which lets the wood stand out. Real timber is heavy and costly, so many homeowners use hollow box beams that look the same without the load.
They suit living rooms, kitchens, and open-plan spaces with ceilings at least 8.5 or 9 feet high. In lower rooms, beams can feel oppressive, so go slim and keep them widely spaced, around 4 feet apart. Run them across the narrower dimension to visually widen the room.
Pick a stain that matches or contrasts deliberately with other wood in the space. Walnut and espresso tones feel modern, while medium oak suits traditional homes. Hand-hewn textures add age, while smooth planed faces feel crisp.
Hollow beams still need proper attachment into joists, and any lighting you embed should be rated for the enclosure. Check the weight if you plan to hang fans or fixtures.
A well-placed set of beams gives the eye a rhythm to follow, and rooms with plain walls suddenly feel finished, even before any art goes up.
4. Vertical Slat Ceiling for a Modern Look
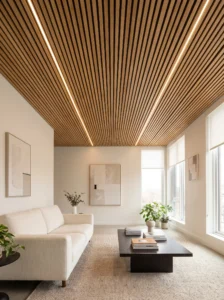
Slats bring a streamlined, architectural feel that reads as expensive without being fussy. Thin wooden strips, usually 1 to 2 inches wide with consistent gaps, create gentle shadows and a sense of depth.
They suit contemporary living rooms, entryways, and dining spaces. Oak, walnut, and ash veneers are popular, and many systems come as panels backed with acoustic felt, which also helps with sound. A black backing behind the gaps adds contrast, while a pale backing keeps things airy.
Space matters more than people think. Gaps around half an inch to an inch tend to look balanced. Wider gaps read as a pergola, and narrow ones lose the shadow effect. Install lighting between slats for a soft glow that makes the ceiling feel like it’s floating.
Dust settles easily on slats, so choose finishes that wipe clean, and plan for an occasional vacuum with a soft brush.
Test one panel before buying them all. The color and grain look different on a ceiling than in a showroom, and a sample taped up for a few days shows whether it suits the room.
5. Dark Stained Wood for a Moody Library Feel
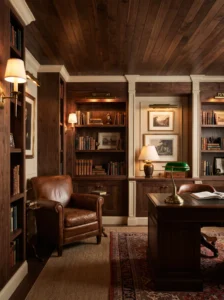
A dark ceiling surprises people, because everyone has been told to go light. In the right room it feels intimate and rich, like a hotel bar or a private study.
It works in rooms with strong lighting, high ceilings, and a layered palette. Deep walnut, espresso, or charcoal stain on tongue-and-groove planks looks striking over bookshelves, a leather sofa, or dark paneled walls. If you’re nervous, try it in a smaller space first, such as a den, powder room, or reading nook.
Light must do the heavy lifting. Add wall sconces, table lamps, and picture lights so the ceiling doesn’t swallow the room. Warm bulbs around 2700K keep things inviting.
Pick a matte or satin finish, since gloss shows every scratch and bounces light in odd ways. Keep trim and crown molding in a lighter tone for contrast, or the edges disappear.
The common mistake is going dark in a room with low ceilings and little natural light. It will feel like a cave. In a space with the right proportions, though, the dark wood wraps you up, and people tend to linger longer.
6. Whitewashed Wood for Coastal Calm

Whitewash keeps wood’s texture while softening its color, creating that sun-bleached look common in beach houses. It’s a relaxed, breezy alternative to solid white paint, with grain showing through.
It suits bedrooms, sunrooms, and open kitchens in light-filled homes. Pair it with natural fibers, linen, rattan, and pale blues or sandy neutrals. The effect is airy, and it helps low ceilings feel higher by bouncing more light around.
Mix one part white paint with one part water, brush it on, then wipe back with a rag. For a stronger effect, add a second coat. Rough-sawn or lightly textured boards hold the wash better than very smooth ones.
Seal with a clear matte topcoat, particularly in humid rooms, where untreated whitewash can turn patchy or collect stains.
Avoid too many coats. The goal is translucence, not opaque paint with faint lines. If you can’t see the grain, the effect is gone.
There’s a restful quality to a whitewashed ceiling. In the evening, it takes on a soft glow from lamps and reads as gently luminous, not stark.
7. A Coffered Wood Ceiling for Formal Rooms
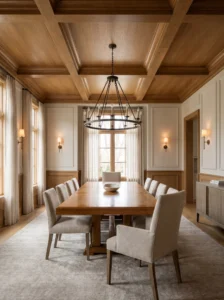
Coffers are sunken or raised panels arranged in a grid, and in wood they look like fine joinery. Few ceiling treatments signal quality as clearly, which is why you see them in libraries, dining rooms, and grand entries.
They need height. A ceiling of at least 9 feet works best, since the beams reduce the clearance. Panels should be proportional to the room, typically 2 to 4 feet square, with beams 4 to 8 inches wide. Too many small squares look cluttered.
Stained wood suits traditional spaces, while painted beams with a wood-paneled center feel more modern. Add small recessed lights or a central chandelier for focus. Keep the beams and panels similar in tone so the pattern reads clearly.
Quality of joinery is where people get caught. Gaps and uneven corners show in this design more than in others, so hire a carpenter who has done it before, or choose a pre-assembled kit and follow the instructions carefully.
A formal dining room with a coffered ceiling brings a quiet sense of occasion, and even weeknight dinners seem slightly more special.
8. Reclaimed Barn Wood With Real Character
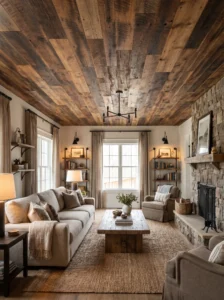
Reclaimed boards carry a history that new wood can’t imitate: nail holes, saw marks, and tonal shifts from decades of weather. Used overhead, they bring a lived-in, collected look that suits farmhouse, rustic, and eclectic homes.
Source them from a reputable salvage yard and ask about treatment. Reclaimed wood can contain old pests or lead-based paint residue, so inspect and clean boards carefully, and let a reputable seller explain how they were processed. Kiln-dried boards are the safer choice.
Mix widths and tones deliberately for a patchwork effect, but keep the pattern from becoming chaotic. Group dark boards together with a few lighter ones scattered through, and install the rows in a staggered pattern.
Use a clear matte sealer to lock in dust and protect the surface without hiding the character. Avoid heavy staining, which flattens the age.
This is a wonderful choice for a kitchen or a family room that gets daily use, since scuffs and marks only add to the look. The ceiling tells a story, and guests tend to ask where the wood came from.
9. Herringbone or Chevron Wood Patterns
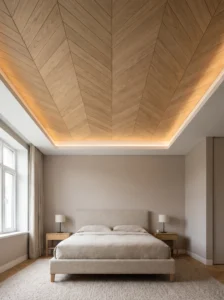
A pattern turns a ceiling into a feature, and herringbone has an elegance that feels tailored rather than loud. Short boards set in a zigzag create movement, so even a simple room gains a sense of design.
It suits dining rooms, entryways, and bedrooms where you want a focal point. Use narrow planks, around 3 to 4 inches wide and 12 to 24 inches long, in a single stain for a quiet effect. Chevron, which meets in a continuous V, looks bolder and more graphic.
Installation takes patience. Snap a center line, start from the middle, and work outward so the pattern stays symmetrical. Use a precise miter saw, because even small cutting errors accumulate across the ceiling.
Plywood panels cut into herringbone shapes are a cheaper alternative to individual boards, though the grain won’t flow as naturally. Seal edges well to avoid curling.
Keep the rest of the room simple. Patterned ceiling, patterned wallpaper, and patterned rug together create noise. With restraint, the herringbone reads as a bit of quiet theater overhead that visitors notice only after a moment.
10. Wood-Clad Tray Ceiling
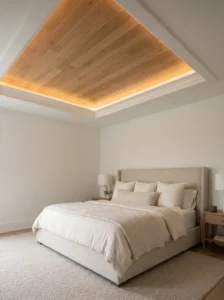
A tray ceiling already has built-in architecture, with a recessed center and a stepped border. Cladding the recess in wood gives that detail more presence and makes the whole room feel considered.
It suits bedrooms, dining rooms, and master suites. Keep the border painted in a soft white, and fill the center with planks in oak, walnut, or a mid-tone stain. The contrast frames the wood like a picture.
Run the boards in one direction, ideally toward the focal wall or the longest dimension. Add indirect LED strips tucked in the ledge of the tray for a soft glow. Warm white light on the wood gives it depth after dark.
Size the planks to the space. Narrower boards, around 4 inches, suit smaller trays, while wider ones suit large rooms. Leave a small, consistent reveal between the wood and the border so the edge looks crisp.
In a bedroom, this is a lovely change. Lying in bed under a glowing wooden panel feels like staying in a boutique hotel, and it makes the room seem more finished than its furniture alone ever could.
11. Painted Ceiling With Natural Wood Beams

Not every ceiling needs to be fully wood. Painting the ceiling a rich color and leaving the beams in natural wood creates a refined contrast that feels designed.
Try deep green, navy, or warm clay between honey-colored beams in a living room or study. In a kitchen, a soft cream ceiling with oak beams feels bright and farmhouse-friendly. The painted surface recedes, while the timber pops forward.
Choose a flat or matte finish for the ceiling paint, since it hides imperfections and avoids glare. Seal the beams with a clear coat to keep the grain visible and guard against dust.
Match the paint color to something else in the room, such as cushions, art, or cabinetry, so it feels connected. Avoid very dark colors in rooms with little daylight.
Because there’s less wood to buy, this is also friendlier to the budget. The beams carry the visual weight, and the paint does the rest. In the evening, the color glows softly between the wood, and the room feels warm without being too heavy.
12. Plank Ceiling in a Covered Porch or Patio
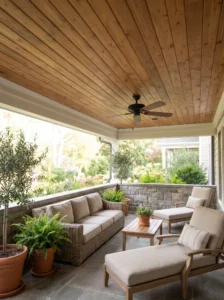
A wooden ceiling can make an outdoor space feel like an extension of the home. Beadboard or tongue-and-groove planks in a weather-ready finish give porches a finished look that bare joists never will.
Pick materials rated for exterior use. Cedar and redwood resist moisture naturally, while pine needs a good sealer or paint. Haint blue is a traditional porch ceiling color in some regions, but natural wood stains work beautifully too.
Leave a gap for ventilation, since trapped moisture leads to rot. Use stainless or coated fasteners that won’t rust or stain the wood.
Add a fan or pendant fixtures rated for damp or wet locations. Warm light under a wooden ceiling gives an evening glow that feels like a cozy room outdoors.
Mistakes often involve skipping sealing on the back of boards. Moisture can reach them from above, so seal every surface before installation. A properly finished porch ceiling lasts for years, and sitting beneath it with a morning coffee shows how much a covered space benefits from a real ceiling.
13. Wood Ceiling Panels in the Bedroom
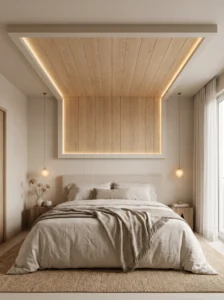
A wood ceiling over a bed feels like a quiet luxury. It adds warmth and acoustic softness, and it gives the headboard wall something to relate to.
Panels or planks in a light to mid-tone finish work best. Dark wood can feel heavy when you’re lying under it. Oak, ash, and maple veneers pair with linen bedding and neutral rugs, creating a calm, spa-like mood.
Consider extending the wood above only the bed area, like a canopy, rather than across the whole ceiling. A defined rectangle with a few inches of border around the bed frame creates a cozy zone and costs less than full coverage.
Add dimmable lighting. Concealed LEDs along the edge or small pendant fixtures on each side give soft light for reading. Avoid harsh downlights directly overhead.
Check ceiling height before committing. In rooms under 8 feet, a full wood ceiling can feel low, and the canopy approach is safer. People often report sleeping better in a space that feels wrapped and quiet, perhaps because the acoustic softness cuts street noise a little.
14. A Wood Ceiling in the Kitchen
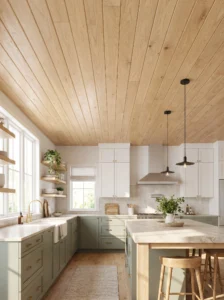
Kitchens already have plenty of hard surfaces, so wood overhead adds a welcome contrast. A pale ceiling with natural planks makes a white or sage kitchen feel layered and warm.
Choose finishes that resist moisture and grease. A satin or semi-gloss polyurethane wipes clean, and a tight tongue-and-groove joint prevents splatter from getting into seams. Avoid raw, unfinished wood above a range.
Keep range hood ventilation strong. Steam and grease will shorten the life of any finish otherwise. Light-toned woods hide residue better than dark ones.
Place beams or planks to follow the room’s main axis, and align them with the island or main work zone. Pendants over the island pick up the wood tone beautifully. Matching one or two accents, like open shelves or stools, ties everything together.
Be realistic about maintenance. Wipe the ceiling down once or twice a year, and be ready to touch up the sealer if needed. Under a cleaned and sealed wood ceiling, a kitchen feels less like a utility room and more like the center of the house.
15. Wood Ceiling in the Entryway or Hallway
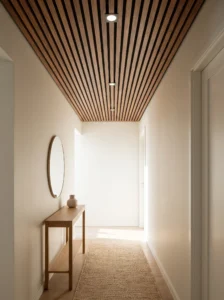
A small space is the best place to try a bold idea. An entry or hallway gets a short burst of attention, so a wood ceiling makes a strong first impression for a modest amount of material.
Slats, shiplap, or a herringbone pattern all suit this scale. Because the area is small, you can afford a higher-grade wood or a more dramatic finish. Walnut slats in a narrow hall feel like walking into a gallery.
Keep the walls light and uncluttered. A simple console, a mirror, and a pendant or flush light are enough. Warm lighting reveals the grain and makes the entry feel welcoming.
Run the boards along the length of the hallway to emphasize depth, or across it to make a narrow space feel wider. Test both with painter’s tape and paper before cutting any wood.
Watch for height. Low entries can feel cramped with a heavy, dark treatment, so lean toward lighter tones. Guests tend to notice a wood ceiling in the first few seconds, and it sets a tone for the rest of the house.
16. Wood Ceiling With Integrated Lighting
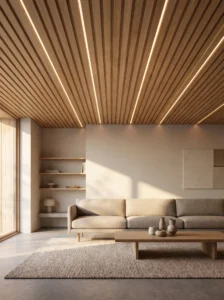
The most expensive-looking ceilings are often the ones where the lighting seems to belong to the wood. Recessed strips, slim linear fixtures, and hidden LEDs turn planks or slats into a glowing feature.
Plan the lighting before the wood goes up. Cutouts for recessed cans, channels for LED strips, and access for wiring are all easier to handle during installation than afterward. A licensed electrician should handle the connections.
Choose warm white lighting, around 2700K to 3000K, to bring out the color of the grain. Dimmers allow you to shift from task lighting to mood lighting. Keep fixtures evenly spaced and aligned with the boards, so the layout looks intentional.
Avoid overloading the ceiling with downlights. A few well-placed ones plus indirect strips look richer than a grid of holes.
Check heat ratings. Recessed fixtures installed near wood need appropriate clearance and the correct type for the material. When it’s done properly, the ceiling becomes the main light source of the room, and the glow across the grain gives the space an upscale feel in the evening.
Quick Comparison: Which Wood Ceiling Style Suits You?
| Type | Best Use | Material | Style/Vibe | Difficulty Level |
|---|---|---|---|---|
| Shiplap planks | Bedrooms, sunrooms, living rooms | Pine, poplar, or cedar | Relaxed, cottage | Easy |
| Tongue-and-groove with stain | Family rooms, porches | Pine or cedar | Warm, cabin-like | Moderate |
| Exposed beams | Open-plan living areas, kitchens | Solid or hollow box beams | Rustic or traditional | Moderate |
| Vertical slats | Entryways, modern living rooms | Oak, walnut, or ash veneer | Sleek, contemporary | Moderate |
| Coffered ceiling | Dining rooms, libraries | Stained hardwood or painted MDF | Formal, tailored | Advanced |
| Reclaimed barn wood | Kitchens, family rooms | Salvaged boards | Rustic, characterful | Advanced |
How to Choose the Right Wood Ceiling
Start with the room’s height. In ceilings under 8 feet, stay with light finishes and flat cladding, and skip heavy beams or coffers. At 9 feet or more, you have room for texture, depth, and darker tones.
Choose the wood to suit the room’s conditions. Pine and poplar are friendly on budget and easy to cut, while oak, walnut, and ash look richer but cost more. For kitchens, baths, and porches, moisture resistance matters, so lean toward cedar, sealed hardwood, or engineered products rated for the space.
Veneer panels and engineered boards are more stable than solid wood and often cheaper, though quality varies widely. Ask for a sample to check thickness, veneer depth, and finish.
Think about durability and upkeep. Wood can move with humidity, so leave small expansion gaps and acclimate the boards in the room for several days before installing. Dust ceilings now and then, and reseal exposed areas every few years.
Budget in terms of the whole project: materials, finish, fasteners, lighting, and labor. Installing overhead is slow and tiring, so professional help can be worth it for large areas. A mid-priced board installed well looks better than a luxury one installed badly.
Typical regrets include picking a stain from a small sample, skipping fire and building code checks, choosing a dark tone for a low room, and not planning the lighting. Hang a large sample overhead for a few days, check it in morning and evening light, and ask your supplier about warranty and return policies before you buy.
Wrapping It Up
A wood ceiling works because it adds something paint can’t: grain, warmth, and a sense that the room was built with care. The ideas above range from simple shiplap to coffers and integrated lighting, and none of them depend on a huge budget if you pick the right scale.
If you’re new to the idea, start small. A hallway, entry, or bedroom canopy gives you the effect with less material and less risk. For a larger space, think about how the wood will meet the lighting, the walls, and the floor, and keep the palette restrained so the ceiling can shine.
Match the style to the house. Shiplap and whitewash suit relaxed homes, slats and walnut suit modern ones, and beams and coffers suit traditional rooms. Whatever you choose, get a proper sample, check the height, and plan the wiring early.
Take your time over the finish. A good sealer, applied carefully, protects the wood and keeps the color true for years. When the last board goes up and the lights come on, you’ll probably find yourself looking up more than you expected, which is a good sign the choice was right.
FAQs
Are wood ceilings expensive to install?
It depends on the material and room size. Pine shiplap and veneer panels cost far less than solid hardwood or custom coffers. Labor can be a large part of the budget, so get several quotes with the same scope.
Do wood ceilings make a room look smaller?
They can if the wood is very dark or the ceiling is low. Light finishes and wide, simple layouts keep a room feeling open. In taller rooms, darker wood adds coziness without crowding.
What is the best wood for a ceiling?
Pine and poplar are affordable and easy to work, while oak, walnut, and ash look richer. Cedar suits moist or covered outdoor spaces. Choose according to the room’s moisture, budget, and the look you want.
Can I install a wood ceiling myself?
Simple shiplap or tongue-and-groove is manageable for a confident DIYer with help to hold the boards. Coffers, herringbone, and integrated lighting are more demanding. Wiring should always be done by a licensed electrician.
How do I clean and maintain a wood ceiling?
Dust it with a soft brush or vacuum attachment a few times a year. Wipe sealed surfaces with a slightly damp cloth, and reseal exposed areas every few years, especially in kitchens or porches.
Will a wood ceiling affect lighting in the room?
Yes. Wood absorbs more light than white paint, so a darker ceiling may need extra fixtures. Warm bulbs and indirect lighting bring out the grain, and dimmers give you control over the mood.
Is real wood better than faux wood or veneer panels?
Solid wood feels richer and can be refinished, while veneers and engineered panels are more stable and often cheaper. Good-quality veneer looks very convincing overhead, so judge by samples, not labels.
Do I need a permit for a wood ceiling?
Cosmetic cladding usually doesn’t, but structural changes, new wiring, or fire-rated assemblies may. Check with your local building office before starting, particularly in multifamily buildings.