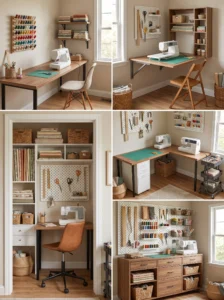
A sewing hobby has a way of outgrowing its space fast. What starts as a sewing machine on the dining table turns into fabric stacked in every spare corner, a cutting mat leaning against the wall because there’s nowhere flat to store it, and thread spools rolling into couch cushions. If you’re working with a small room — a converted closet, a narrow spare bedroom, a corner of a shared space — the challenge isn’t finding ideas online. It’s finding ideas that actually fit a room smaller than most of the photos you’ve been scrolling through.
Small sewing rooms force a different kind of thinking than larger ones. You can’t rely on a sprawling U-shaped workstation or a separate design wall when you’re working with 60 or 80 square feet. Every piece of furniture has to earn its spot, and the layout has to account for how you physically move through the space without constantly bumping elbows or tripping over a cutting mat propped against the wall. The upside is that small rooms, done right, often end up more efficient than larger ones — nothing’s wasted, everything’s within reach, and there’s less temptation to let clutter spread into unused corners because there simply aren’t any.
This list walks through 12 layouts specifically built for tight spaces, from closet conversions to narrow galley-style setups, along with the practical details that make the difference between a cramped room that frustrates you daily and a compact one that genuinely works. Pick the layout that matches your room’s actual shape and your own sewing habits, not the one that photographed best somewhere online.
1. Single-Wall Galley Layout
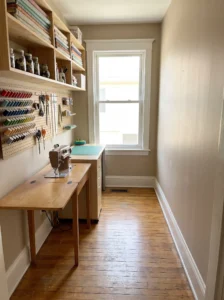
Running every piece of furniture along one wall, rather than trying to spread stations around the room, is often the smartest starting point for a genuinely small sewing space, since it keeps the entire center of the room open for walking and maneuvering fabric.
This works particularly well in narrow rooms, closets converted into sewing nooks, or any space under 80 square feet where a U-shape or multi-wall layout simply won’t fit without feeling like an obstacle course. A single wall at least 8 feet long gives enough room for a compact sewing table, a slim storage unit, and a small cutting surface in sequence.
Keep the furniture depth shallow, ideally under 20 inches, so the opposite side of the room stays genuinely walkable rather than just technically clear. Use vertical storage above the single wall run — shelves or a pegboard — rather than adding more furniture along the floor, which would eat into the walking space you’re trying to preserve. The mistake people make most often here is treating the single wall as license to cram everything flush together with no gaps, which makes it hard to actually reach the back of any one station. Leaving even six inches of breathing room between the sewing machine and the next piece of furniture makes daily use noticeably less frustrating.
2. Fold-Down Wall-Mounted Workstation
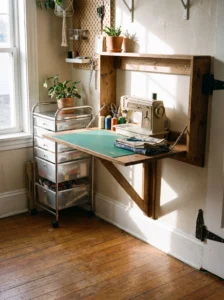
A wall-mounted table that folds flat when not in use turns a tiny room into a sewing space during the day and gives the floor back the rest of the time, which matters enormously in rooms doing double duty as a guest room or home office.
This suits rooms under 70 square feet, or any space where floor area needs to serve more than one purpose. Position the fold-down table along the room’s longest open wall, mounted at standard sewing height, roughly 28 to 30 inches from the floor.
Choose sturdy folding brackets rated for the combined weight of your machine and a cutting mat, not just a decorative shelf bracket repurposed for the job, since any wobble while sewing is genuinely frustrating and can throw off stitch accuracy. Keep a small rolling cart nearby to hold your machine when the table’s folded away, rather than trying to lift and store the machine itself each time. The detail worth knowing before committing to this layout: folding the table down and setting back up adds a couple of minutes to every session, which sounds minor until you’re doing it daily — for anyone who sews most days, a fixed small table might serve better than a fold-down one despite the space savings.
3. Closet Conversion Sewing Nook
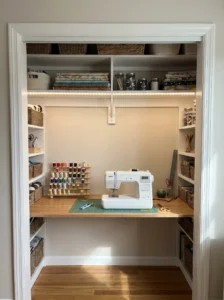
Converting an unused closet into a compact sewing station is one of the more popular small-space solutions, since it takes genuinely wasted square footage and gives it a real purpose without expanding into a shared room’s floor area.
This works best with closets at least 24 inches deep and 36 inches wide, which is enough to fit a slim desk-height surface and basic storage without feeling like working inside a box. Reach-in closets suit this better than walk-in ones, since the open face gives you natural light and airflow while sewing.
Remove the closet doors entirely or replace them with a curtain, since swinging doors eat into your already limited elbow room every time you need to step back from the machine. Add a battery-powered LED light strip along the closet’s upper interior, since most closets lack any dedicated lighting suited to detail work. Mount shelving on the side walls for thread and notions rather than relying on floor space for storage bins. The closet conversion tends to surprise people with how functional it feels despite the small footprint — having everything within arm’s reach in a defined, contained space often speeds up small projects compared to a larger room where supplies are scattered further apart.
4. Corner L-Shaped Mini Station
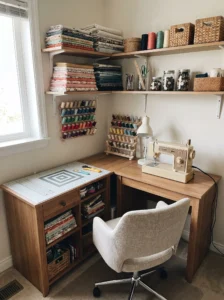
Tucking an L-shaped setup into a room’s corner, rather than along a flat wall, makes efficient use of two wall surfaces at once without needing nearly as much total floor space as a full-room L-shape would.
This suits bedrooms, home offices, or living room corners being repurposed for occasional sewing, particularly in homes without a dedicated spare room. A corner with at least 5 feet of usable wall on each side accommodates a small sewing table on one leg and a narrow cutting surface or storage unit on the other.
Keep the inside corner itself clear rather than cramming a chair or stool directly into the angle, which creates an awkward pinch point every time you turn between the two work surfaces. A corner desk unit, either purchased or built from two straight pieces joined at a right angle, uses the space more efficiently than two separate rectangular pieces pushed together imprecisely. Add a small swivel chair rather than a fixed one, since turning between the two legs of the L happens constantly and a fixed chair makes that movement more awkward than it needs to be. This layout works particularly well for anyone who sews occasionally rather than daily, since the compact footprint doesn’t dominate a multi-purpose room the way a larger dedicated station would.
5. Rolling Cart System for No Fixed Furniture
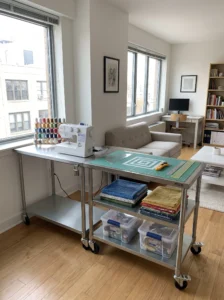
Rather than committing any furniture permanently to a small room, building your entire sewing setup around rolling carts gives you a workspace that assembles when needed and disappears when it’s not, which suits rooms that genuinely can’t spare a dedicated furniture footprint.
This works in rooms under 60 square feet, studio apartments, or any shared space where a sewing machine needs to coexist with completely unrelated daily activities. A multi-tier rolling cart holds the machine itself, while a second, narrower cart handles cutting tools and notions.
Choose carts with locking wheels so they stay put once positioned for a sewing session, rather than drifting as you lean on the table surface. Keep both carts narrow enough, generally under 18 inches wide, to tuck into a closet or against a wall when not actively in use. The real tradeoff with this layout is setup time — you’re assembling and breaking down your workspace each session rather than walking into a room that’s always ready, which works fine for occasional sewists but becomes tiresome fast for anyone sewing several times a week. For people who genuinely have no spare square footage to dedicate permanently, though, this remains one of the only layouts that works at all.
6. Murphy-Style Hideaway Sewing Desk
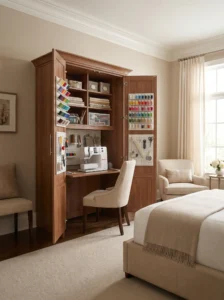
Similar in spirit to a Murphy bed, a sewing desk that folds up and disappears into a cabinet or wall unit when not in use lets a small room serve double duty without a fold-down table’s more basic, exposed-bracket look.
This suits guest bedrooms, home offices, or any room where appearances matter when the sewing setup isn’t in use — for guests arriving, or simply for someone who prefers their multi-purpose room not to constantly look like a workshop. A built or purchased cabinet unit roughly 4 to 6 feet wide handles most compact sewing machine setups comfortably.
Look for units specifically designed for craft or sewing use rather than adapting a standard Murphy desk meant for general office work, since sewing-specific versions typically include features like a raised machine platform or built-in thread storage that general desks lack. Keep a small caddy of frequently used tools, like scissors and pins, stored just inside the cabinet door for quick access once it’s opened, rather than needing to hunt for basics each time you set up. The investment here runs higher than most layouts on this list, but for anyone who genuinely values a tidy, guest-ready room most of the time, the convenience of folding an entire workstation away completely is hard to replicate with any cheaper option.
7. Vertical Storage Wall with Compact Desk
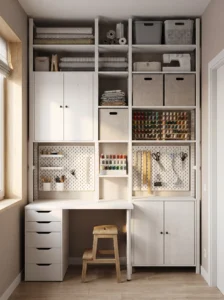
Dedicating one entire wall to floor-to-ceiling vertical storage, paired with just a small desk below it, maximizes storage capacity without requiring any additional floor footprint beyond the desk itself.
This works especially well in narrow rooms where horizontal space is scarce but ceiling height is standard or better, roughly 8 feet or more. The vertical storage can include a mix of open shelving, closed cabinets, and a pegboard section, stacked to use every inch from floor to ceiling.
Keep daily-use items — thread, scissors, frequently reached-for fabric — on the lower two-thirds of the wall, reserving the top shelves for seasonal fabric, patterns, or equipment used only occasionally, since climbing or reaching for something daily gets old fast if it’s stored too high. A small step stool tucked beside the desk handles the rare trips to the top shelves without needing to drag one in from elsewhere in the house. This layout’s real strength shows up in storage capacity — a wall used this efficiently can hold roughly the same amount as a much larger room with scattered furniture, which matters enormously when square footage is the one thing you can’t add more of.
8. Under-the-Stairs Sewing Nook
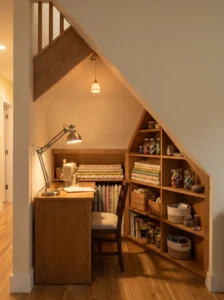
For homes with an awkward understairs space that’s otherwise wasted on random storage, converting that triangular nook into a compact sewing station makes genuinely smart use of square footage most homes never think to activate.
This works in homes with stairs that have at least 4 feet of usable width and 5 feet of height at the tallest point, giving enough room for a small desk and basic seating without feeling cramped at the entry. The sloped ceiling actually suits a seated sewing station well, since you don’t need headroom while working at a machine the way you would standing.
Position the sewing machine at the taller end of the slope, and use the lower, more cramped end purely for storage where standing height doesn’t matter. Built-in shelving that follows the slope’s angle makes far better use of the available space than standard rectangular furniture pushed into an oddly shaped nook. Add a dedicated light fixture directly above the machine, since understairs spaces are almost always darker than the rest of the house and rarely have adequate existing lighting. This is one of the more satisfying small-space conversions on this list precisely because it takes space that would otherwise sit completely empty or become a junk catch-all, and gives it genuine daily purpose.
9. Dual-Purpose Guest Room Sewing Corner
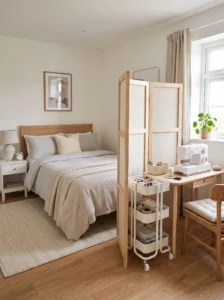
Carving out a defined sewing corner within a guest bedroom, rather than letting sewing supplies sprawl across the whole room, lets both functions coexist without either one taking over or feeling like an afterthought.
This suits homes without a dedicated spare room for sewing, where the guest bedroom needs to remain genuinely guest-ready most of the time. Choose a corner away from the bed’s sightline, ideally near a window, so the sewing station doesn’t become the first thing visible from the doorway.
Use a narrow desk and a single rolling storage cart rather than a full furniture suite, keeping the footprint small enough that guests don’t feel like they’re sleeping in a workshop. A folding screen or curtain can visually separate the corner when guests are staying over, which takes the sewing setup out of view without needing to pack everything away completely. Keep fabric and project bins in closed containers rather than open bins for this particular layout, since a guest room benefits from looking tidy rather than clearly mid-project at all times. This arrangement tends to work best for occasional sewists rather than daily ones, since the compact footprint and need to stay guest-ready limits how sprawling any single project can get.
10. Pegboard-Centered Micro Station
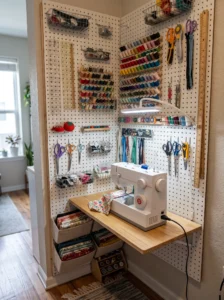
For truly tiny spaces, sometimes under 40 square feet, building the entire layout around a floor-to-ceiling pegboard wall, with just a narrow shelf or fold-down surface for the machine itself, maximizes function in a footprint too small for much else.
This works in closets, alcoves, or narrow unused corners that wouldn’t accommodate traditional furniture at all. The pegboard itself becomes the primary storage system, holding tools, thread, rulers, and small notions on hooks and small shelves rather than in drawers or cabinets that would eat into the limited square footage.
Mount the pegboard across the entire available wall, floor to ceiling if possible, and use a mix of hook sizes and small baskets rather than hooks alone, since not every tool or supply hangs well on a simple hook. A slim fold-down shelf beneath the pegboard, just wide enough for the sewing machine, completes the setup without requiring a full desk. This is admittedly the most limited layout on this list in terms of what it can comfortably handle — large cutting projects won’t work here — but for anyone doing small mending, quilting blocks, or simple garment repairs in an otherwise impossible space, it’s a genuinely workable solution rather than no sewing space at all.
11. Bed-Adjacent Bedroom Station
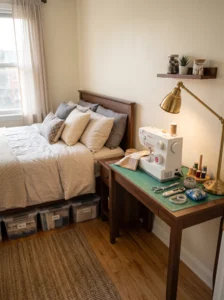
Positioning a small sewing desk directly beside or at the foot of a bed, rather than trying to carve out a separate zone, works surprisingly well in bedrooms too small for a defined corner setup but with a few feet of spare wall space near the bed itself.
This suits studio apartments and small bedrooms where literally every wall is already accounted for by other furniture. A narrow desk, no more than 24 inches deep, fits along the foot of a bed frame or beside it without blocking the room’s main walking path.
Keep the desk’s color and material consistent with the bedroom’s existing furniture rather than introducing a completely different style, which helps the sewing station blend into the room’s overall look instead of standing out as an obviously separate function crammed into the space. Store fabric and supplies in under-bed storage bins, taking advantage of the one genuinely underused storage zone most small bedrooms have, rather than adding more visible furniture to an already tight room. Keep noise and light considerations in mind if you share the bed with a partner — a bright task lamp or a machine’s hum close to a sleeping area isn’t ideal for late-night sewing sessions. This layout is really a last-resort-but-functional option, suited to genuinely space-starved apartments rather than homes with any other spare corner available.
12. Compact U-Shape for Slightly Larger Small Rooms
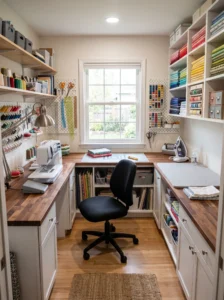
For small rooms that still have slightly more breathing room, generally 90 to 120 square feet, a scaled-down U-shaped layout gives you the efficient cutting-to-sewing-to-pressing workflow of a larger studio without needing nearly as much space as a full-sized version.
This works in spare bedrooms or larger closets-turned-rooms where you have at least two adjoining walls free of windows or doors, allowing for a continuous run of counter space even at a reduced scale. Keep each leg of the U shorter than you would in a larger room, generally 4 to 5 feet per side, rather than trying to replicate a full-sized studio’s proportions in a smaller footprint.
Use the same counter height across all three stations, and choose narrow-depth furniture, around 18 to 20 inches, to keep the whole U from eating too much of the room’s limited floor space. Leave at least 26 inches of clearance in the open side of the U for a chair and basic movement, even if that means scaling back the counter length slightly from what you’d prefer. This compact version loses a little of the generous workspace a full-sized U offers, but it keeps the core workflow advantage — moving between cutting, sewing, and pressing without crossing the room — which matters more for daily efficiency than having extra surface area you’d rarely use anyway.
Comparison Table: Small Sewing Room Layouts at a Glance
| Type | Best Use | Space Needed | Style/Vibe | Difficulty Level |
|---|---|---|---|---|
| Single-Wall Galley | Narrow rooms, closets | 80 sq ft+ | Streamlined, efficient | Easy |
| Fold-Down Wall Table | Multi-purpose rooms | Under 70 sq ft | Space-saving, flexible | Moderate |
| Closet Conversion | Unused reach-in closets | 24″+ deep closet | Contained, cozy | Moderate |
| Rolling Cart System | Shared or studio spaces | Under 60 sq ft | Mobile, adaptable | Easy |
| Pegboard Micro Station | Alcoves, tiny corners | Under 40 sq ft | Minimal, functional | Easy to Moderate |
| Compact U-Shape | Slightly larger small rooms | 90–120 sq ft | Workflow-focused | Moderate |
How to Choose the Right Layout for Your Room
Start by measuring your actual available space rather than guessing, and be honest about whether the room serves any other purpose, since a sewing-only closet and a shared guest bedroom call for very different approaches even at similar square footage.
Think about how often you actually sew before committing to a layout. Daily sewists generally do better with a fixed setup, even a small one, since the time spent folding tables down or assembling rolling carts each session adds up fast over weeks and months. Occasional sewists can get more value from flexible, disappearing setups that free the room for other uses most of the time.
On materials, prioritize durability for anything that gets touched daily, like the sewing table surface and the chair, over decorative elements that matter less in a small, function-first room. A sturdy, stable table matters more in a compact space than it might in a larger room, since there’s less room to compensate for wobble by spreading weight across a bigger surface.
Storage should scale to your actual fabric and supply collection rather than an idealized version of it. Vertical storage solutions generally outperform horizontal ones in small rooms, since floor space is almost always the more limited resource compared to wall height.
Budget-wise, small-space layouts are often cheaper than larger ones simply because there’s less furniture to buy, but don’t let that tempt you into cramming in more storage or furniture than the room can actually handle. A cluttered small room is far more frustrating to work in than a sparse one with just the essentials.
A common regret in small sewing spaces is underestimating how much clearance you need to actually move and work, not just to fit furniture into the room. Always test your planned layout with masking tape on the floor before committing to furniture placement or permanent fixtures like fold-down brackets, since a layout that looks fine on paper sometimes feels completely different once you’re standing inside it.
Final Thoughts
Small sewing rooms succeed or fail based on how honestly they’re planned around the actual space and actual habits of the person using them, not on cramming in every feature a larger studio might have. Some of the layouts here, like the closet conversion or the pegboard micro station, work specifically because they accept real limitations rather than fighting them. Others, like the compact U-shape, scale down a more traditional workflow without losing what makes it efficient.
The right choice usually comes down to two questions: how often you actually sew, and whether the room needs to serve any other purpose. A daily sewist with a dedicated closet should lean into fixed storage and a permanent station, while someone squeezing in a project here and there in a shared guest room needs something that disappears cleanly when it’s not in use. Measure carefully, test the layout before committing to anything permanent, and build around how you really work rather than how a much bigger studio might look in photos.
Frequently Asked Questions
What’s the minimum space needed for a functional sewing nook?
A space as small as 30 to 40 square feet can work with the right layout, particularly a pegboard-centered setup or a closet conversion. Smaller spaces limit what projects you can comfortably handle, but basic mending, small quilting blocks, and simple repairs are genuinely doable even in compact corners.
How do I keep a small sewing space from feeling cluttered?
Prioritize vertical storage over floor-based storage, and keep only frequently used items visible while storing the rest in closed bins or cabinets. A smaller space shows clutter more obviously than a larger room, so regular tidying matters more here than it might elsewhere.
Is a fold-down table sturdy enough for regular sewing use?
Yes, as long as the brackets are rated for the combined weight of your machine and materials, and the table is properly anchored to wall studs rather than just drywall. A wobbly fold-down table is almost always a sign of inadequate bracket hardware rather than a flaw in the concept itself.
Can I fit a cutting table into a small sewing room?
Often yes, though it may need to be a fold-down or rolling option rather than a large, permanently fixed surface. Many small-space sewists also use a portable cutting mat that can sit on top of an existing desk or table rather than dedicating separate furniture to cutting alone.
How much does it typically cost to set up a small sewing room?
Costs vary widely depending on whether you’re buying new furniture or repurposing what you already own, but small-space setups are often cheaper than larger ones simply because less furniture is needed overall. Budget more for quality lighting and a sturdy machine table than for decorative extras.
What’s the biggest mistake people make with small sewing room layouts?
Underestimating how much clearance is needed to actually move and work, not just to fit furniture into the available square footage. Testing a layout with tape on the floor before committing to permanent fixtures helps avoid this more than any amount of careful measuring on paper alone.
Do I need special lighting for a small, often dark sewing nook?
Yes, more than in a larger room with natural light from multiple angles. Closets, understairs nooks, and other tucked-away spaces usually need dedicated task lighting, since ambient room light rarely reaches these areas adequately for detailed sewing work.
How do I store fabric in a sewing room with very little floor space?
Vertical shelving, under-bed bins if the sewing area is in a bedroom, and slim rolling carts all help maximize storage without using floor space that’s needed for actual movement. Sorting fabric by project or color also makes smaller storage areas feel more organized and less overwhelming.