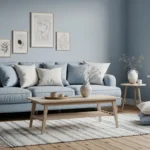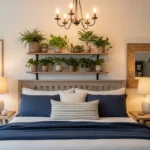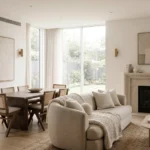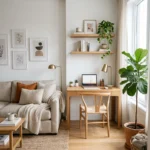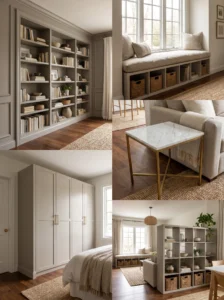
Walk into enough apartments and you start recognizing the same bookshelf, the same side table, the same shelving unit arranged in roughly the same configuration. IKEA furniture is everywhere for good reason — it’s affordable, it’s sturdy enough for the price, and it ships flat in a box you can actually fit in a sedan. The tradeoff is that a lot of homes end up looking faintly interchangeable, like everyone shopped from the same twelve-page catalog and called it a day.
The good news is that IKEA furniture happens to be some of the easiest in the world to modify. The flat panels, standard dimensions, and simple joinery that make it cheap to manufacture also make it genuinely forgiving to hack — add legs, swap hardware, apply trim, or paint over the factory finish, and a piece that cost less than a nice dinner out starts looking like something from a boutique furniture shop. None of this requires carpentry school. Most of these projects need a drill, some patience, and an afternoon.
This list runs through 21 hacks spanning furniture you probably already own or are considering buying — BILLY bookcases, KALLAX shelving, LACK tables, PAX wardrobes, and a few others that show up constantly in home renovation circles for exactly this reason. Some of these are weekend projects. A few are more involved and worth tackling over a few days. Either way, by the end you’ll have a solid sense of which hacks fit your space, your skill level, and how much of a transformation you’re actually after.
1. BILLY Bookcase Built-In Wall
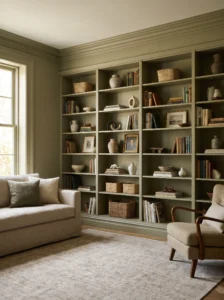
Turning a row of BILLY bookcases into something that looks like a custom, architect-designed built-in is one of the most popular IKEA hacks for a reason — it delivers a result that would otherwise cost thousands in custom millwork, using furniture that costs a fraction of that.
This works best along a long, uninterrupted wall in a living room or home office, ideally one without too many outlets or vents breaking up the surface. Line up several BILLY units side by side, matching heights, then run crown molding or simple trim along the top connecting them to the ceiling.
Paint the entire wall of bookcases and the surrounding trim the same color as the wall itself, which is the detail that really sells the built-in illusion — a contrasting color reads as furniture, while a matched color reads as architecture. Fill the shelves with a mix of books and objects at varying depths rather than lining everything up flush, since uneven depth creates shadow and visual interest. The biggest mistake here is skipping the trim work entirely and assuming the bookcases alone will look built-in; without that connecting molding at the top and sides, it still reads as a row of furniture pushed against a wall.
2. KALLAX Window Seat
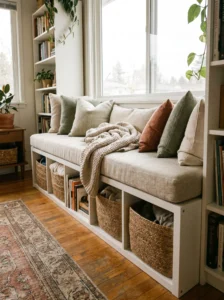
A row of KALLAX cubes tucked beneath a window turns an often-wasted stretch of wall into genuine seating with built-in storage underneath, and it’s one of the more functional hacks on this entire list.
This suits any room with a window that sits low enough for comfortable seating height, roughly 16 to 18 inches, and enough wall width to fit at least two KALLAX units side by side. Living rooms, breakfast nooks, and bedrooms all work well for this.
Top the units with a custom cushion cut to the exact length and depth of the combined KALLAX tops, upholstered in a durable fabric if the seat will see daily use. Use woven storage baskets in the open cubbies below rather than leaving them empty, which keeps the look tidy while adding real storage for blankets, books, or toys. Secure the units to the wall with simple anti-tip brackets, especially if kids will be climbing on or off the seat regularly. What’s easy to underestimate about this hack until you’ve lived with one is how much a window seat actually gets used daily — it becomes the spot people gravitate toward without anyone planning for that to happen.
3. LACK Table Marble Finish
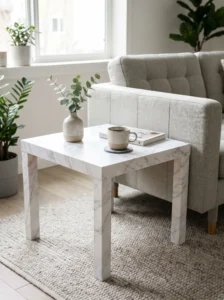
The plain LACK side table is one of the cheapest pieces in the entire IKEA lineup, and covering its surface with faux marble contact paper turns it into something that looks considerably more expensive than its actual price tag suggests.
This works particularly well in living rooms or bedrooms where a marble side table would otherwise cost significantly more from a traditional furniture retailer. The LACK’s flat, simple surface makes it one of the easier pieces to apply adhesive film to cleanly.
Choose a high-quality marble-effect contact paper rather than the cheapest option available, since the veining pattern and finish quality make a real difference in how convincing the result looks from a few feet away. Apply the film slowly, working out air bubbles with a credit card or squeegee as you go, and trim the edges precisely with a sharp blade rather than scissors for a clean finish. Avoid placing hot items like mugs directly on the covered surface without a coaster, since the adhesive film doesn’t have the heat resistance of real stone. This hack costs very little and takes under an hour, which makes it one of the best entry points for anyone nervous about trying furniture hacks for the first time.
4. PAX Wardrobe Custom Closet System
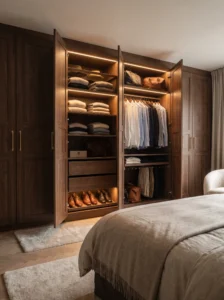
Converting a standard PAX wardrobe into something resembling a custom-built closet system is a bigger project than most on this list, but the payoff genuinely rivals closets that cost many times more when professionally installed.
This works best in bedrooms with enough wall space for a full wardrobe run, and it particularly suits anyone who’s outgrown generic hanging-rod-and-shelf storage and wants dedicated zones for shoes, folded clothing, and accessories.
Mix PAX’s interior components deliberately rather than using the default configuration — drawers at a lower, easily reachable height, open shelving for folded items, and a mix of long and short hanging space based on what you actually own. Add interior lighting strips along the top of each section, since PAX interiors can be surprisingly dark once the doors close. Choose door fronts that complement your room’s existing trim and hardware rather than sticking with the default IKEA options, which is often the single detail that makes the whole system look custom rather than off-the-shelf. The real value in this hack shows up in daily use — a wardrobe organized around how you actually get dressed each morning saves genuine time compared to generic shelving that doesn’t match your actual habits.
5. KALLAX Room Divider
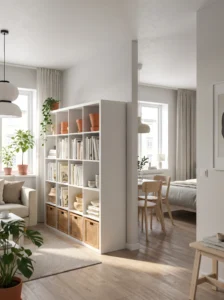
Standing a KALLAX unit perpendicular to a wall, rather than flush against it, turns simple shelving into a functional room divider, which is especially useful in open-concept spaces or studio apartments that need visual separation without a permanent wall.
This works well dividing a living area from a dining space, or carving a sleeping zone out of a studio apartment. A taller KALLAX configuration, like the 5×5 cube version, provides enough height to genuinely break up sightlines between two zones.
Style both sides of the unit differently, since each side faces a different part of the room and functions almost like two separate pieces of furniture. Use a mix of open cubbies and closed baskets on both faces so the divider doesn’t look like a solid wall of clutter from either direction. Anchor the unit securely to the floor or wall with furniture straps, since a tall, freestanding divider in a high-traffic area carries real tip-over risk, especially with kids or pets around. This hack solves a genuinely common problem in smaller homes — creating the feeling of separate rooms without sacrificing the openness and light that drew people to an open floor plan in the first place.
6. BILLY Bookcase Library Ladder
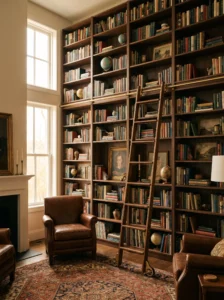
Adding a sliding library ladder to a tall run of BILLY bookcases brings genuine old-world charm to a home library or office, and it solves a real practical problem for anyone with floor-to-ceiling shelving and top shelves that are otherwise hard to reach.
This suits rooms with at least 8-foot ceilings and a continuous run of BILLY units along one wall, since the ladder needs a track long enough to actually slide and a wall sturdy enough to mount the rail securely.
Choose a ladder kit designed specifically for retrofit installations rather than attempting to build the rail system from scratch, since getting the track level and properly weight-rated matters enormously for safety. Match the ladder’s wood tone and metal hardware finish to the room’s existing fixtures, whether that’s brass, black, or brushed nickel, so it reads as a cohesive design choice rather than an afterthought. Keep frequently used books on the lower shelves regardless of the ladder’s convenience, since climbing a ladder for a book you need daily gets old fast despite how charming it looks in photos. This is admittedly one of the more involved and costly hacks on this list, but for the right home office or library room, it transforms the whole feel of the space in a way few other single additions can match.
7. HAVSTA Cabinet Glass Door Upgrade
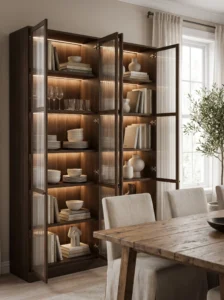
Swapping the standard doors on a HAVSTA cabinet for glass panels turns a simple storage piece into a display cabinet, letting you show off dishware, books, or collectibles instead of hiding everything behind solid wood.
This works particularly well in dining rooms or living rooms where you want storage that also functions as a showcase. The HAVSTA’s classic, slightly traditional silhouette suits glass fronts especially well, echoing the look of antique china cabinets without the antique price tag.
Choose reeded or fluted glass rather than completely clear panels if you want a softer, more diffused view of the contents, which also forgives a slightly less-than-perfectly-organized interior. Add interior shelf lighting if the cabinet will display anything worth highlighting after dark, since ambient room lighting rarely reaches cabinet interiors effectively. Arrange contents with some negative space between pieces rather than packing shelves tightly, since a cluttered glass-front cabinet undercuts the whole point of the display upgrade. This hack works especially well for anyone who’s inherited nice dishware or glassware sitting unused in a box somewhere — suddenly there’s a proper place to actually enjoy looking at it.
8. KALLAX Pet Bed Integration
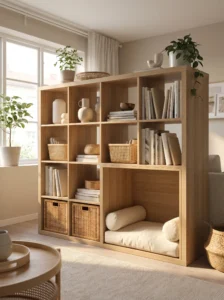
Converting one cube of a KALLAX unit into a built-in pet bed solves the awkward problem of pet furniture clashing with the rest of a room’s design, tucking your dog or cat’s sleeping spot into existing furniture instead of adding a separate bed taking up floor space.
This works particularly well in living rooms, entryways, or home offices where a pet tends to settle during the day. Choose a lower cube, easily accessible without the pet needing to jump, and measure your pet’s size against the cube’s interior dimensions before committing, since KALLAX cubbies vary depending on the configuration.
Line the cube with a removable, washable cushion or pet bed insert cut to fit the space, rather than a loose blanket that bunches up and loses its shape over time. Skip adding a door or cover to this particular cube, since pets generally prefer visibility and airflow over an enclosed, cave-like space unless they’re a breed known to prefer denning. Keep the surrounding cubes for actual storage rather than more pet supplies, which helps the whole unit still look intentional rather than entirely pet-focused. The genuinely nice outcome here is a pet bed that doesn’t look like a separate purchase plopped into the room — it reads as part of the furniture because it is.
9. ALEX Desk Drawer Unit as a Vanity Base
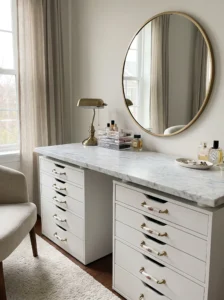
The ALEX drawer unit, normally sold as a desk component, works surprisingly well repurposed as the base for a bathroom or bedroom vanity, giving you deep, sturdy drawer storage beneath a custom countertop.
This suits bathrooms undergoing a budget-conscious remodel, where a custom vanity from a bath retailer often costs several times more than this approach. It also works in bedrooms as a makeup or dressing vanity paired with a mirror.
Pair two ALEX units side by side with a countertop cut to span both, leaving a gap in the middle if you’re installing a sink, or keeping it solid for a dressing table setup. Seal the top of the units if there’s any chance of water exposure nearby, since the standard finish isn’t rated for consistent moisture. Swap the default drawer pulls for something with a bit more character — brass, ceramic, or leather pulls tend to elevate the look considerably more than the basic hardware that ships with the unit. This hack tends to surprise people with how sturdy the drawers feel under daily use despite the relatively low cost of the base units, which isn’t always the case with budget furniture repurposed for a different job than it was designed for.
10. BESTÅ Media Console with Brass Legs
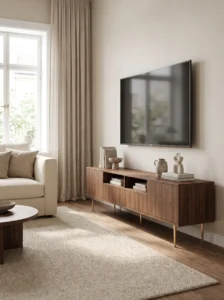
Adding slim brass or metal legs to a BESTÅ storage unit instantly shifts its look from boxy and flat-pack toward something resembling a mid-century credenza, and it’s one of the quickest ways to modernize a living room’s media storage.
This works especially well in living rooms with a slightly warmer, mid-century or contemporary aesthetic, where the raised silhouette and metallic accent tie into existing design choices elsewhere in the room.
Choose tapered, angled legs over straight ones for the most convincing mid-century effect, and measure carefully before drilling, since BESTÅ’s base isn’t pre-drilled for aftermarket leg attachments. Keep the unit’s door or drawer fronts simple and matte if you’re going for this look, since busy patterns or glossy finishes compete with the clean lines the legs are meant to introduce. Raising the unit off the floor also makes the room feel more open, since furniture with visible legs reads as lighter than furniture that sits flush with the floor. This is a relatively quick hack in terms of actual labor, but it’s the kind of change that visitors notice without necessarily being able to pinpoint why the piece suddenly looks more expensive than it did before.
11. IVAR Shelving Pantry Conversion
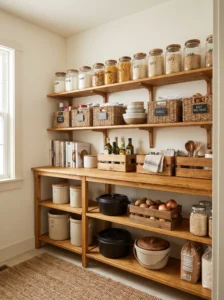
The raw, unfinished IVAR shelving system becomes genuinely useful as a kitchen pantry once it’s painted, fitted with baskets, and organized by category, giving you open, visible storage for an area that’s often hidden behind closed cabinet doors.
This suits kitchens with an awkward nook, a spare closet, or even a dedicated wall that can house open shelving without looking out of place. Pantries styled this way work particularly well in farmhouse or cottage-leaning kitchens where open storage already fits the aesthetic.
Paint or stain the raw pine finish rather than leaving it untouched, since the natural wood can look unfinished rather than intentionally rustic without some treatment. Use uniform glass jars and labeled baskets for the actual food storage, which does more visual work than almost anything else to make open pantry shelving look organized rather than chaotic. Keep heavier items on lower shelves for stability and easier access, saving the top shelves for infrequently used items like extra appliances or seasonal cookware. The daily benefit here is real — being able to see your entire pantry inventory at a glance cuts down on the duplicate grocery purchases that happen when everything’s hidden behind a cabinet door.
12. KALLAX Aquarium or Terrarium Stand
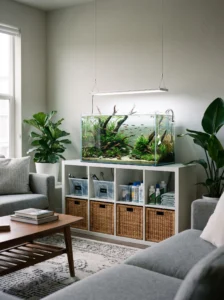
Repurposing a KALLAX cube as a stand for an aquarium or terrarium gives you a sturdy, attractive base with built-in storage for supplies, rather than buying a dedicated aquarium stand that often costs more and offers less storage.
This works well for anyone with a mid-sized tank, since KALLAX units are rated for substantial weight when the load sits centered on the unit rather than on an unsupported shelf edge. Living rooms, home offices, and bedrooms with a dedicated spot for a tank all suit this hack.
Reinforce the top surface with an additional layer of plywood if your tank exceeds a certain weight, since standing water adds considerably more load than typical shelf contents, and it’s worth checking manufacturer weight ratings before assuming standard KALLAX construction is sufficient. Use the surrounding cubbies for filters, food, testing kits, and other supplies, keeping them organized in small bins so the whole setup looks tidy rather than like equipment scattered around the tank. Place the unit away from direct sunlight if you’re housing fish or amphibians, since nearby windows can cause algae growth and temperature swings in the tank itself. This hack works well specifically because it solves two problems at once — a sturdy, appropriately sized stand and dedicated storage for everything that comes with maintaining an aquarium or terrarium.
13. LACK Shelf Floating Wall Unit
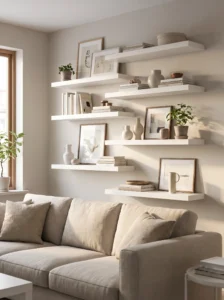
Mounting a few LACK shelves at staggered heights, rather than using them individually in different rooms, creates a floating wall display that looks considerably more intentional than scattered single shelves ever do.
This works especially well above a sofa, a bed, or a console table, where a grouping of floating shelves fills vertical wall space without the bulk of a full bookcase. It also suits smaller rooms where floor space is limited but wall space isn’t.
Stagger the shelves at varying heights and slight horizontal offsets rather than lining them up in a perfectly even grid, which creates a more dynamic, gallery-like arrangement. Paint the shelves to match the wall color if you want them to look like a built-in architectural feature, or choose a contrasting wood tone if you’d rather they stand out as a deliberate design element. Avoid overloading any single shelf with too many items, since LACK shelves have a lower weight capacity than people sometimes assume, and sagging or warping over time looks far worse than a slightly sparse, well-edited display. This is one of the more budget-friendly hacks here, and it’s genuinely effective for renters who can’t drill into walls for larger built-ins but still want some dimensional, styled storage.
14. KALLAX Kitchen Island
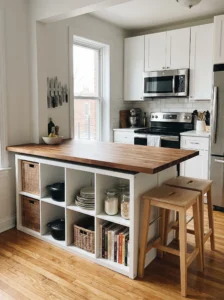
Topping a KALLAX unit with a butcher block or laminate countertop, then adding wheels or legs, turns inexpensive shelving into a functional kitchen island, giving renters and small-kitchen owners extra counter space without a permanent renovation.
This works particularly well in galley or smaller kitchens that lack enough counter or storage space, especially in apartments where a built-in island simply isn’t an option.
Choose a countertop slightly larger than the KALLAX footprint, so it overhangs enough on at least one side to tuck a couple of stools underneath for casual seating. Add locking caster wheels if you want the island mobile for cleaning or rearranging, or sturdy furniture legs if you’d rather it stay fixed in place. Seal any wood countertop surface properly before regular kitchen use, since unsealed wood absorbs moisture and stains quickly near food prep areas. The genuine upside of this hack over buying a pre-made kitchen island is the built-in storage underneath — most purchased islands in this price range don’t offer nearly the cubby and basket storage that a KALLAX base provides as a side benefit of its original design.
15. BILLY Bookcase Desk Nook
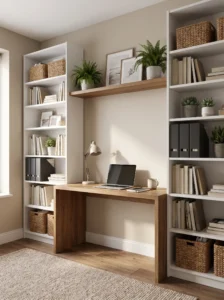
Flanking a desk with two BILLY bookcases, rather than leaving the desk as a standalone piece against a blank wall, creates a built-in-looking home office nook that makes efficient use of corner or alcove space.
This suits home offices, especially in spare bedrooms or converted closets where square footage is tight and every surface needs to pull double duty as both storage and workspace.
Match the bookcase height to roughly the same level on both sides, and consider adding a simple top shelf connecting them above the desk for additional storage and a more finished, built-in appearance. Keep the desk surface itself relatively clear, using the flanking shelves for books, files, and decor instead, which keeps the actual working area functional rather than visually competing with everything stacked around it. Add a layer of trim or molding where the bookcases meet the wall for the same built-in effect mentioned in the earlier library wall hack. This is a particularly smart setup for anyone working from home in a smaller space, since it visually signals “office” even in a room that reverts to guest bedroom duty on weekends.
16. RÅSKOG Cart Bar Cart Conversion
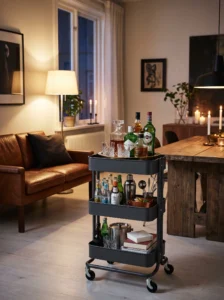
The RÅSKOG utility cart, originally designed for general storage, makes an excellent rolling bar cart with almost no modification needed beyond some thoughtful styling, giving you mobile entertaining storage for a fraction of what a dedicated bar cart typically costs.
This works in any living room, dining room, or entertaining space where you want drink service that can move between rooms rather than staying fixed in one spot.
Keep the top tier for glassware and frequently used bottles, the middle for mixers and bar tools, and the bottom for less-used items like extra ice buckets or backup supplies. Add a tray or two on the top shelf to corral smaller items and protect the metal surface from spills and condensation rings. Choose a cart color that complements your existing metal finishes elsewhere in the room — matte black, white, or one of the brighter colorways IKEA periodically offers, depending on whether you want it to blend in or stand out as a statement piece. This hack requires essentially no construction at all, just thoughtful arrangement, which makes it one of the fastest wins on this entire list for anyone wanting a quick, low-effort upgrade with real visual payoff.
17. NORDLI Dresser Built-In Window Bench
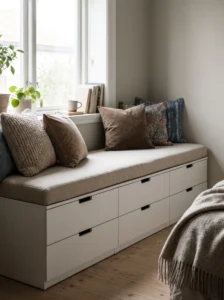
Similar in concept to the KALLAX window seat mentioned earlier, using NORDLI dresser units under a window creates a bench with considerably more storage, since NORDLI’s drawer configuration offers deeper, more substantial storage than open cube shelving.
This suits bedrooms specifically, where the extra drawer storage can handle folded clothing, extra linens, or seasonal items that need to stay out of sight rather than displayed openly.
Measure the dresser height carefully against the windowsill, aiming for the drawers to sit at a comfortable seated height once topped with a cushion, generally landing somewhere around 17 to 19 inches total. Choose a cushion with a removable, washable cover, since window seats collect dust and the occasional spill more than people expect given how little they’re actually used for eating or drinking. Add a few throw pillows in a coordinating but not identical fabric to keep the bench from looking too uniform or showroom-staged. This hack works especially well in smaller bedrooms where a dedicated dresser and a separate window seat would otherwise compete for the same limited wall space.
18. KALLAX Shoe Cubby with LED Lighting
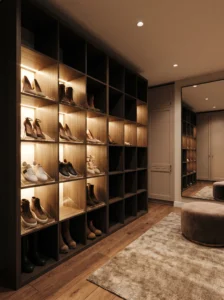
Adding battery-powered LED strip lighting inside select KALLAX cubbies, paired with slanted shoe inserts, turns basic shelving into a genuinely striking shoe display, the kind normally associated with high-end closet systems rather than budget furniture.
This works best in entryways, walk-in closets, or dedicated dressing areas where shoes are both stored and displayed rather than hidden away. It particularly suits anyone with a collection worth showing off rather than simply storing.
Install the LED strips along the top interior edge of each cubby you’re highlighting, choosing warm white light over cool white for a more boutique-store feel rather than a clinical one. Use angled shoe risers inside the cubbies so each pair sits slightly tilted forward, making them easier to see and select without pulling every box or cubby content forward. Avoid lighting every single cubby in a larger unit, since selectively highlighting just a few creates more visual drama than evenly lighting the whole thing, which tends to look flat by comparison. This hack genuinely changes the daily experience of getting dressed — being able to see your shoe options clearly rather than digging through a dark cubby saves real time during a rushed morning.
19. BILLY Bookcase Sliding Barn Doors
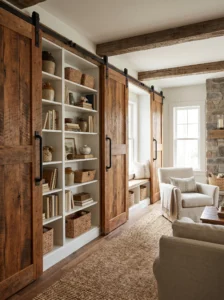
Adding sliding barn-style doors across a run of BILLY bookcases hides contents behind a rustic, farmhouse-inspired facade, which works well for anyone who likes the look of open shelving in theory but struggles to keep it looking tidy in practice.
This suits living rooms, home offices, or media rooms where you want storage flexibility without the visual commitment of permanently open shelves. It’s particularly useful for households with kids, where the mess level behind the shelves fluctuates more than most adults would prefer to display constantly.
Mount a sliding door track above the bookcase run, sized to the combined width of all the units, and build simple panel doors from plywood with a wood-grain finish that leans into the barn door aesthetic rather than fighting against it. Add decorative hardware — a classic black iron handle and track hardware — which does most of the visual work in selling the barn door look convincingly. Keep at least one section open or glass-fronted if you want some visual break from solid doors across the entire wall, since a completely enclosed wall of cabinetry can feel heavier and more closed-off than intended. This hack essentially gives you the best of both worlds — real storage capacity with the option to hide clutter completely when guests are coming over.
20. KALLAX Headboard Storage Wall
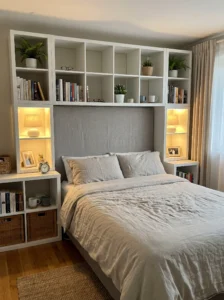
Positioning KALLAX units on either side of, or directly behind, a bed frame creates a headboard wall with built-in nightstand storage, solving two furniture needs — headboard and bedside storage — with a single cohesive piece.
This works particularly well in smaller bedrooms where separate nightstands and a traditional headboard would eat up more floor space than the room can comfortably spare. It also suits anyone who wants significantly more bedside storage than a standard nightstand drawer offers.
Position the units so the top surface lands at a comfortable reaching height from bed, generally matching or slightly exceeding mattress height, and secure them to the wall for stability since they’ll be bumped and leaned against regularly. Use the open cubbies closest to the bed for items you reach for often — books, a lamp, glasses — and save the further cubbies for less frequently accessed storage. Add a padded or upholstered panel behind the units if you want a softer headboard look rather than leaving the wall bare above the storage. This hack solves a genuinely common small-bedroom problem, giving you far more storage than a typical headboard-and-nightstand combination while taking up roughly the same footprint.
21. PAX Wardrobe Room Divider with Mirror Doors
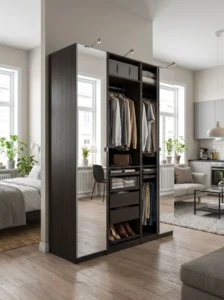
Positioning a PAX wardrobe perpendicular to a wall, with mirrored doors facing outward on both sides, creates a functional room divider that also doubles as a full-length mirror from either direction — a clever two-for-one solution in open or shared bedrooms.
This works particularly well in shared kids’ rooms, studio apartments, or any bedroom that needs a visual boundary without permanent construction. The mirrored finish also helps bounce light around a room that might otherwise feel divided and darker as a result of the added furniture.
Choose mirror doors on both the front and back of the unit if budget allows, since a divider that’s only mirrored on one side loses half the functional benefit. Anchor the wardrobe securely to the floor, especially in a shared kids’ room, since a tall, freestanding unit positioned away from a wall carries real tip-over risk without proper bracing. Use the wardrobe’s interior for actual clothing storage on one side, dedicating the other side’s shelving to whichever occupant or zone that half of the room serves. This hack tends to work especially well for anyone splitting a bedroom between two kids or two roommates, since it provides a clear physical and visual boundary while still functioning as genuinely useful storage rather than a divider that serves no other purpose.
Comparison Table: IKEA Hack Types at a Glance
| Type | Best Use | Material Focus | Style/Vibe | Difficulty Level |
|---|---|---|---|---|
| BILLY Built-In Wall | Living rooms, home libraries | Painted wood, trim molding | Architectural, custom | Moderate to Difficult |
| KALLAX Window Seat | Living rooms, bedrooms, nooks | Cube shelving, custom cushion | Cozy, functional | Easy to Moderate |
| LACK Marble Finish | Side tables, small surfaces | Adhesive contact film | Elevated, budget-luxe | Easy |
| PAX Custom Closet | Bedrooms, dressing areas | Wardrobe panels, lighting | Organized, boutique | Difficult |
| RÅSKOG Bar Cart | Living or dining rooms | Metal cart, glassware | Mobile, entertaining-ready | Easy |
| KALLAX Room Divider | Studios, open-concept spaces | Cube shelving, baskets | Zoned, practical | Moderate |
How to Choose the Right Hack for Your Space
Start with an honest assessment of your tools and comfort level before picking a project. Hacks like the LACK marble finish or the RÅSKOG bar cart conversion need almost no specialized skill, while built-in wall units and custom closet systems involve measuring, cutting, and sometimes electrical work for lighting that’s genuinely harder to get right on a first attempt.
On materials, match whatever you’re adding — trim, legs, hardware, paint — to the existing finishes already in the room rather than treating the hack as an isolated project. A beautiful brass leg upgrade looks disconnected in a room full of matte black fixtures, and mismatched wood tones are one of the fastest ways to make a hack look unfinished rather than intentional.
Durability varies significantly by hack. Structural changes like added legs or a repurposed base for a vanity need to be checked against realistic weight loads, since IKEA furniture is engineered for its original intended use, not necessarily for whatever creative purpose you’re assigning it. When in doubt, reinforce joints and connections rather than assuming the base furniture can handle more than it was designed for.
Maintenance mostly comes down to the finishes you choose. Contact paper and painted surfaces need gentler cleaning than factory laminate, and anything near water, like a vanity or kitchen island hack, benefits from a proper sealant rather than skipping that step to save time.
Budget-wise, the appeal of IKEA hacking is that even the more involved projects usually cost a fraction of buying custom furniture outright. That said, costs add up quickly with premium hardware, quality trim, and specialty finishes, so it’s worth pricing out the full project, including these extras, before assuming a hack will always be the cheaper route compared to buying something pre-made.
A common regret is rushing into a structural hack, like a window seat or built-in wall, without properly measuring the space first. Always measure twice, check for outlets, vents, or baseboard heaters that might interfere with your plan, and consider living with a basic mockup of the furniture in place for a few days before committing to permanent modifications like drilling or trim installation.
Final Thoughts
The best IKEA hacks tend to share one thing in common — they solve an actual problem in the room rather than existing purely for visual effect. A window seat that genuinely gets used, a pantry system that keeps groceries visible and organized, a room divider that actually separates two functions in a shared space — these hold up over time in a way that purely decorative upgrades sometimes don’t.
Pick one or two projects that address your space’s real limitations rather than trying to tackle everything on this list at once. A small apartment benefits more from a multi-functional piece like the KALLAX window seat than from a sprawling built-in wall system better suited to a larger home. Measure carefully, match finishes to what’s already in the room, and give yourself permission to start with an easier hack before working up to something more involved. The furniture was affordable to begin with — there’s no reason the upgrade process needs to feel high-stakes either.
Frequently Asked Questions
Do IKEA hacks void any warranty on the furniture?
Generally yes, since modifying the furniture beyond its original assembly instructions typically falls outside standard warranty coverage. Most people hacking budget furniture accept this tradeoff, but it’s worth knowing before starting, especially on higher-cost pieces like PAX wardrobes.
How much do these hacks typically cost compared to buying similar furniture new?
Costs vary widely depending on the project, but most hacks land somewhere between 30 to 60 percent of what a comparable custom or boutique piece would cost. Simpler hacks like contact paper or added legs cost very little, while built-in walls or custom closets cost more as materials and labor add up.
Are these hacks reversible if I move or change my mind?
It depends on the hack. Contact paper, added hardware, and furniture legs are generally reversible with minimal damage. Permanent trim, wall-mounted brackets, and built-in configurations are harder to undo cleanly and may leave marks or holes that need patching.
How sturdy is hacked IKEA furniture compared to the original?
Properly executed hacks, especially ones that reinforce joints or add structural support, can be just as sturdy as the original furniture. The risk comes from skipping reinforcement on hacks that add weight or stress the furniture wasn’t originally designed to handle, like a heavy countertop or aquarium.
What’s the easiest hack on this list for a complete beginner?
The LACK table marble finish and the RÅSKOG bar cart styling are both excellent starting points, since neither requires drilling, cutting, or any specialized tools beyond basic patience and careful application.
Can renters do these hacks without risking their security deposit?
Many can, with some adjustment. Skip anything requiring drilling into walls or permanent trim installation, and stick to freestanding modifications like added legs, contact paper, or furniture rearrangement that can be fully undone before moving out.
How long do most of these hacks take to complete?
Simpler projects like the LACK finish or bar cart styling take under an hour. Moderate hacks like window seats or room dividers typically take a weekend. More involved projects like built-in walls or custom closet systems can take several days spread across a week or two.
Is it cheaper to hack IKEA furniture or just buy it already styled from another retailer?
In most cases, hacking remains cheaper, sometimes significantly so, especially for larger pieces like built-in walls or custom vanities. The main cost to factor in is your own time, which matters more for the labor-intensive hacks than the quick, low-effort ones.