There’s a particular kind of chaos that happens when sewing takes over a dining table. Fabric scraps end up tucked under cushions before guests arrive, the machine gets unplugged and hidden in a closet, and every project turns into a twenty-minute setup-and-teardown ritual before you’ve even threaded a needle. If you’ve got a spare bedroom sitting mostly empty or filled with boxes nobody’s opened in years, that frustration has an obvious fix.
A dedicated sewing room changes the whole relationship people have with their hobby. When the machine stays set up, the fabric stays organized, and the cutting mat stays exactly where you left it, sewing stops feeling like a production and starts feeling like something you can do for twenty free minutes between errands. The real obstacle isn’t usually space — most spare bedrooms are a perfectly workable size for this — it’s knowing how to lay the room out so it functions well rather than just looking like a regular bedroom with a sewing machine shoved in the corner.
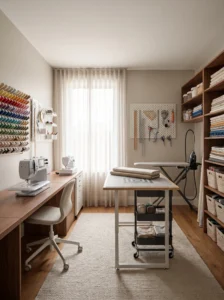
This list runs through 17 practical layout and design ideas for turning a spare bedroom into a sewing room that actually gets used daily, not just admired once and left to collect dust. Some ideas focus on furniture and workflow, others on storage and lighting, and a few are specifically for smaller rooms where every square foot has to earn its place. Pick the ones that match your room’s size and your own sewing habits, and the space will hold up far better than something copied wholesale from a photo online.
1. U-Shaped Workstation Layout
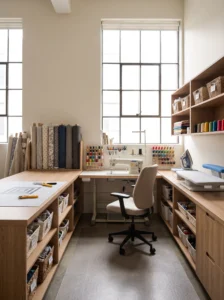
Arranging your cutting table, sewing machine, and ironing station in a U-shape around the room turns a spare bedroom into a genuine production line, letting you move from cutting to stitching to pressing without backtracking across the room constantly.
This works best in rooms with at least two full walls free of windows or doors, giving enough continuous counter space to make the U-shape functional rather than cramped. A rectangular room around 10×12 feet handles this layout comfortably.
Keep the sewing machine station at the center point of the U so it’s equidistant from both the cutting surface and the iron, cutting down on unnecessary steps during a project. Use a consistent counter height across all three stations, ideally around 36 inches, so sliding fabric from one station to the next doesn’t involve awkward lifting. The mistake most people make here is cramming the U too tight, leaving no room to actually stand and turn between stations — leave at least 30 inches of clearance in the open side of the U. Once this layout is dialed in, a project that used to take half a day of setup and teardown can genuinely move along in a single sitting.
2. Window-Side Cutting Table
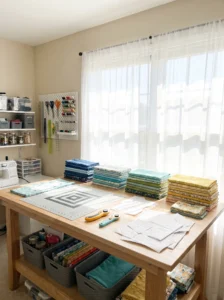
Placing your cutting table directly beneath or beside the room’s main window gives you the best natural light in the house for the task that benefits from it most — accurately reading fabric grain lines and seeing true color before you commit to cutting.
This works particularly well in rooms with a single large window rather than multiple small ones, since one consistent light source avoids confusing shadows across the fabric. South or east-facing windows tend to give the most even daylight through most of the day.
Size the cutting table to the window’s width where possible, so the whole surface benefits from the light rather than just one end. A table around 36 by 60 inches handles most pattern pieces without needing to shift fabric constantly. Avoid placing the table flush against the window if there’s any draft or direct harsh afternoon sun, which can fade fabric left out between sessions — a few inches of clearance and a sheer curtain solve this easily. People who switch to window-side cutting often mention catching fabric flaws, like printing misalignment or weave issues, that artificial light had been hiding for years.
3. Built-In Wall Shelving for Fabric Storage
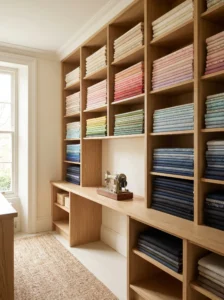
Floor-to-ceiling shelving along one wall, dedicated specifically to folded fabric, turns a sewing room’s biggest storage challenge into one of its most attractive features, since organized fabric by color or type genuinely looks good on display.
This suits rooms with at least one full uninterrupted wall, ideally the one without a window, since direct sunlight fades fabric over time even through curtains. Adjustable shelving works better than fixed shelves, since fabric bolts and folded yardage vary wildly in height.
Sort fabric by color family rather than fiber type for the shelving itself — it’s easier to find what you’re looking for visually, and it tends to look more intentional than a jumble of patterns stacked together. Keep frequently used fabric at eye level and seasonal or rarely used pieces higher up or lower down. The common mistake is stacking fabric too tightly, which crushes folds and makes pulling one piece out a wrestling match with everything around it — leave a little breathing room on each shelf. A well-organized fabric wall also does double duty as inspiration; seeing your whole stash at a glance tends to spark project ideas that staying buried in a closet never would.
4. Fold-Down Wall-Mounted Cutting Table
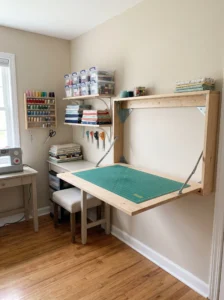
For smaller spare bedrooms where floor space is tight, a fold-down table mounted to the wall gives you full cutting surface when needed and gives the floor back the rest of the time.
This works especially well in rooms under 100 square feet, or in rooms doing double duty as a guest room, since the table folds flat against the wall when guests need the space. Position it along the longest open wall, ideally at standard counter height around 36 inches.
Choose a table with sturdy folding brackets rated for the weight of a cutting mat plus fabric, not just a decorative shelf bracket repurposed for the job — cutting with any wobble is frustrating and can throw off measurements. Paint the wall behind it a light, neutral color so the folded table doesn’t visually disappear into clutter when down. The one thing to watch for is clearance underneath when folded up — make sure nothing permanent sits directly below it, or the table won’t fold flush. This setup has quietly saved a lot of small sewing spaces from feeling like storage closets instead of workrooms.
5. Pegboard Tool Wall
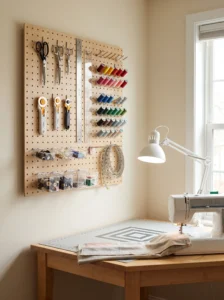
A pegboard mounted above your sewing machine or cutting table keeps scissors, rulers, rotary cutters, and thread spools visible and within arm’s reach, cutting down on the constant digging through drawers mid-project.
This works in any room but is especially useful in smaller spaces where drawer space is limited. Mount the pegboard at a height where the most-used tools sit at eye level or just above, roughly 48 to 60 inches from the floor depending on your own height.
Use a mix of hooks, small bins, and shelves rather than just hooks alone, since not every tool hangs well — thread spools in particular do better on a dowel rod than a single hook. Paint the pegboard to match the wall color if you want it to recede visually, or choose a contrasting color if you’d rather it function as a decorative focal point. Avoid overcrowding it with every tool you own; keep daily-use items on the board and store occasional-use tools elsewhere; a pegboard crammed edge to edge becomes just as hard to search as a drawer. Having tools visible rather than buried genuinely speeds up the small, repetitive tasks that eat time across a sewing session.
6. Closet Converted to a Thread and Notions Station
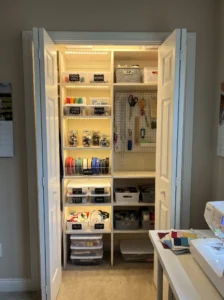
An underused closet in a spare bedroom can become a dedicated notions station, housing thread, bobbins, zippers, buttons, and pattern pieces in a contained space that closes off when not in use.
This works particularly well in rooms where the closet isn’t needed for clothing storage, since repurposing it avoids losing floor space elsewhere in the room. Remove the closet rod and replace it with adjustable shelving or a pull-out drawer system instead.
Install a strip of battery-powered LED lighting along the top of the closet interior, since most closets lack adequate overhead lighting for sorting small notions accurately. Clear bins or labeled drawers work better than open baskets for anything small enough to get lost — buttons and bobbins in particular benefit from dividers. Keep the closet door easy to open fully, ideally a bifold or sliding door rather than a swinging door that eats floor space when open. This conversion tends to be one of the more satisfying projects on this list, since it takes genuinely wasted space and turns it into some of the most organized storage in the whole room.
7. Design Wall for Pattern Layout
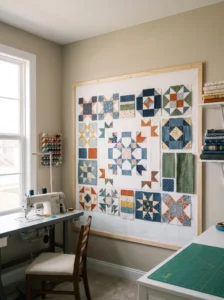
A large vertical surface covered in flannel or felt, mounted to one wall, lets you pin up fabric pieces, quilt blocks, or garment sections to step back and see the whole layout before committing to cutting or sewing.
This works especially well for quilters and anyone working on larger projects where seeing the full composition matters more than working piece by piece. A wall at least 6 feet wide gives enough room to lay out a reasonably sized quilt top or multiple garment pieces side by side.
Use a plain white or light gray flannel backing rather than a patterned one, so it doesn’t compete visually with whatever you’ve pinned up. Mount it with a simple frame or just pin the flannel directly to foam board sections attached to the wall, which keeps the whole setup removable if the room ever needs to revert to a bedroom. Natural light hitting the design wall at an angle, rather than straight on, shows true fabric color better than direct overhead lighting. This is one of those additions that feels unnecessary until you’ve used one — catching a color clash or spacing issue on the design wall before sewing saves considerably more time than fixing it after the fact.
8. Rolling Storage Cart for Flexible Organization
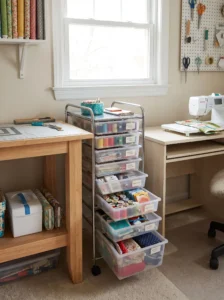
A multi-drawer rolling cart gives you mobile storage that can shift between your cutting table and sewing machine depending on what stage of a project you’re in, which matters more than fixed furniture in a room that needs to stay adaptable.
This suits smaller sewing rooms where a full wall of built-in storage isn’t practical, or for anyone who likes to reorganize their workflow project by project. A cart around 12 to 18 inches wide tucks beside a sewing table without crowding the workspace.
Use clear drawers rather than solid ones so you can see contents without opening each one individually — this matters enormously when you’re hunting for a specific color of thread or a particular size of needle. Label drawers by category even with clear fronts, since visual scanning still slows down once a cart has more than four or five drawers. Avoid overloading the cart to the point it’s difficult to roll, which defeats the entire purpose of mobility. People who switch from fixed drawers to a rolling cart often mention how much faster cleanup goes at the end of a session, since everything has a wheeled home rather than needing to be carried back across the room.
9. Natural Light Maximization with Sheer Curtains
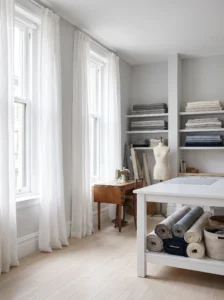
Swapping heavy curtains or blinds for sheer panels lets daylight flood the room throughout the day, which matters enormously for color accuracy and reduces eye strain from working under artificial light alone for hours at a time.
This works in any sewing room but makes the biggest difference in rooms that previously had blackout curtains left over from the space’s bedroom days. Sheer linen or voile panels filter harsh direct sun while still letting plenty of usable light through.
Choose a neutral white or soft gray sheer rather than a tinted or patterned one, since any color cast from the curtain fabric can subtly affect how you perceive fabric colors while working. Pair sheers with a simple tension rod rather than a full traverse rod if budget is tight — the functional difference is minimal for a sewing room. Keep the curtains at a length that doesn’t pool on the floor near a cutting area, since loose fabric near rotary cutters and pins is a genuine hazard. The shift from heavy curtains to sheers tends to be one of the cheapest upgrades on this list with one of the most noticeable day-to-day effects on how the whole room feels to work in.
10. Task Lighting at Every Station
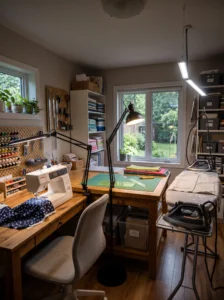
Relying on a single overhead fixture leaves shadows exactly where you need light most — under the sewing machine needle, across the cutting mat, along the ironing board — so layering in task lighting at each individual station solves a problem most spare-bedroom conversions overlook entirely.
This matters in every sewing room regardless of size, but becomes especially critical in rooms with only one central ceiling light, which was likely adequate for a bedroom but falls short for detailed handwork.
A clip-on LED lamp at the sewing machine, positioned to light the needle area directly rather than from directly overhead, cuts down on squinting during detail work. An adjustable floor lamp beside the cutting table fills in shadows an overhead fixture leaves across a large flat surface. Choose daylight-balanced bulbs, generally labeled around 5000K, rather than warm yellow-toned bulbs, since warm light shifts how fabric colors actually read. Skipping task lighting is one of the more common oversights in a first sewing room setup, and it’s usually the first thing people upgrade once they notice how much eye strain built up over a few months of working under one ceiling light alone.
11. Ironing Station Built Into a Corner
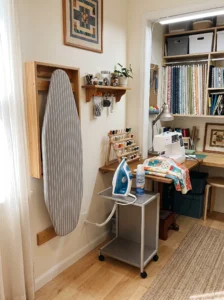
Dedicating a permanent corner to an ironing board, rather than pulling one out from a closet each session, removes one of the more tedious setup steps in any sewing workflow and keeps pressing genuinely part of the process instead of a hassle people skip.
This works well in any spare corner at least 2 feet square, ideally near an outlet so the iron’s cord doesn’t stretch across a walking path. A wall-mounted folding ironing board saves floor space compared to a freestanding one left permanently set up.
Add a small heat-resistant mat or a dedicated side table beside the board for setting the iron down safely between passes. Keep a spray bottle and a small fabric starch supply within arm’s reach rather than stored elsewhere, since walking away mid-press breaks concentration more than it seems like it should. The common misstep is placing the ironing station too close to fabric storage, where stray heat or steam can affect nearby fabric over time — a few feet of separation avoids this easily. Once pressing stops requiring a setup ritual, a lot of people notice they actually press seams as they go rather than saving it all for the end, which measurably improves finished project quality.
12. Compact Sewing Nook for Multi-Purpose Rooms
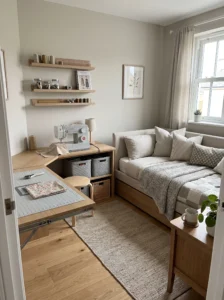
If the spare bedroom still needs to function as a guest room occasionally, a compact sewing nook built into one corner, rather than taking over the whole room, lets both uses coexist without constant rearranging.
This suits rooms where a daybed or sofa bed handles the guest function, freeing the opposite corner for a small desk-style sewing station. A corner desk with a fold-out or pull-out cutting surface maximizes the limited footprint.
Keep the sewing station’s footprint under about 6 feet wide so it reads as a nook rather than competing with the room’s primary function. Store supplies in closed bins or baskets that tuck under the desk, rather than open shelving, since a guest room benefits from looking tidy rather than clearly mid-project at all times. The genuine upside of this setup is flexibility — it lets a household avoid dedicating an entire room permanently to a hobby while still giving sewing a real, consistent home rather than the kitchen table.
13. Pattern and Pin Board Wall
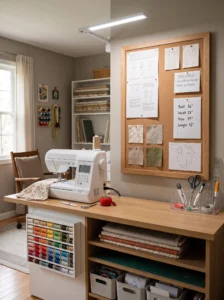
A cork or felt board mounted near the sewing machine gives you a spot to pin pattern instructions, fabric swatches, and measurement notes where you can glance at them without flipping through a pattern envelope mid-stitch.
This works well positioned directly at eye level beside or above the sewing machine, close enough to read without turning away from the work surface for long. A board around 2 by 3 feet handles a standard pattern sheet plus a few swatches comfortably.
Cork tends to hold pins and tacks more securely over time than felt, though felt looks tidier if you’re mainly pinning fabric swatches rather than paper. Frame the board simply, in a finish that matches nearby furniture, so it reads as an intentional feature rather than an afterthought stuck to the wall. Keep it current — swapping out notes and swatches as projects change rather than letting old pattern pages accumulate keeps the board actually useful rather than becoming background clutter. This small addition ends up doing a surprising amount of work in keeping a project organized without needing a separate planning space.
14. Dedicated Machine Embroidery Station
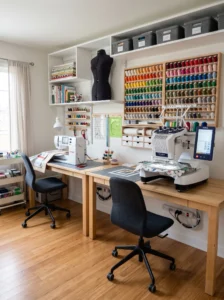
For anyone working with an embroidery machine alongside a standard sewing machine, giving each its own station rather than sharing one table avoids the constant unplugging and repositioning that otherwise eats into working time.
This suits sewing rooms with enough length to run two separate tables along one wall, each sized to its machine’s specific footprint plus a few inches of clearance on either side for hooping fabric. Embroidery machines in particular need extra depth behind the machine for the arm to move freely during stitching.
Keep embroidery thread storage directly beside its station rather than mixed in with general sewing thread, since embroidery thread collections tend to be larger and more color-specific. A dedicated outlet with a surge protector matters here too, since embroidery machines often run longer uninterrupted cycles than regular sewing. Avoid placing this station in a spot prone to vibration from foot traffic elsewhere in the house, since embroidery accuracy suffers more from movement than regular stitching does. Separating the two machines this way tends to cut down on the small frustrations that build up when one station is asked to serve two very different jobs.
15. Open Shelving for Project Bins
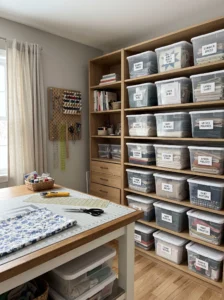
Open shelving dedicated to labeled bins, one per active project, keeps multiple works-in-progress from turning into a tangled pile on the cutting table, which is one of the more common ways a sewing room slides into disorganization.
This works particularly well for anyone who tends to have several projects going simultaneously rather than finishing one before starting the next. Shelving around 12 to 15 inches deep accommodates standard fabric bins without wasted depth.
Use uniform bins rather than a mismatched collection, since visual consistency makes the shelving read as organized storage rather than general clutter. Label each bin with the project name and current stage, which saves the mental overhead of remembering where each project left off. Keep bins for active projects at easy reach height and anything on pause further up or down. The habit this shelving tends to build is finishing projects faster overall, since seeing several unfinished bins lined up creates a bit of natural motivation to close one out rather than letting it linger indefinitely.
16. Color-Coded Thread Storage Wall
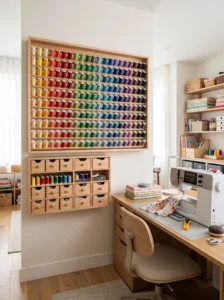
A wall-mounted thread rack, organized by color gradient rather than brand or type, turns thread storage into both a functional system and a genuinely attractive piece of the room’s decor.
This works well mounted near the sewing machine station, within easy reach while stitching, rather than tucked away in a drawer across the room. A rack sized for 100 to 150 spools covers most home sewists’ collections without needing to expand later.
Arrange spools in a rainbow gradient from light to dark within each color family, which makes finding the right shade almost instant compared to scanning an unsorted drawer. Keep bobbins stored separately but nearby, ideally in a small drawer unit directly beneath the thread rack, so both pieces of a color match are grabbed in one motion. Avoid overfilling the rack to the point spools are jammed too closely to pull out easily — leave a little space in each row. This is one of those additions that looks almost decorative on its own, which is a nice side benefit for a room that otherwise leans heavily functional.
17. Soundproofing for Late-Night or Early-Morning Sewing
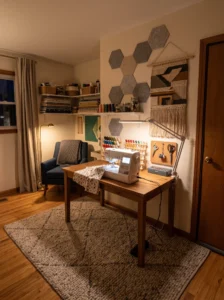
For anyone sewing at odd hours in a house where others are sleeping, some basic soundproofing in the spare bedroom keeps a sewing machine’s hum and a serger’s drone from traveling through shared walls.
This matters most in homes with bedrooms adjacent to the sewing room, or in apartments with shared walls where sound carries more than in a detached house. A thick area rug under the sewing station absorbs a surprising amount of vibration and sound compared to a bare floor.
Adding a layer of acoustic foam panels or even thick fabric wall hangings on the wall shared with an adjoining bedroom cuts down on sound transmission without requiring major construction. Weatherstripping around the door frame, the kind typically used for keeping out drafts, also blocks a meaningful amount of sound from leaking into the hallway. Avoid placing the loudest equipment, like a serger, directly against a shared wall if soundproofing is a priority — a few feet of distance helps even before adding any materials. This upgrade rarely gets planned for upfront, but anyone who’s tried to sew quietly at 6 a.m. without waking the household knows exactly why it belongs on this list.
Comparison Table: Sewing Room Setup Types at a Glance
| Type | Best Use | Material Focus | Style/Vibe | Difficulty Level |
|---|---|---|---|---|
| U-Shaped Workstation | Large rooms, frequent sewists | Laminate or wood counters | Functional, studio-like | Moderate to Difficult |
| Fold-Down Wall Table | Small or multi-purpose rooms | Wall-mounted brackets, plywood | Space-saving, minimal | Moderate |
| Pegboard Tool Wall | Any room needing tool access | Painted pegboard, metal hooks | Organized, utilitarian | Easy |
| Closet Notions Station | Rooms with underused closets | Shelving, clear bins | Tidy, concealed | Moderate |
| Design Wall | Quilters, garment sewists | Flannel, foam board | Visual, planning-focused | Easy to Moderate |
| Rolling Storage Cart | Flexible or smaller spaces | Metal frame, clear drawers | Mobile, adaptable | Easy |
How to Choose the Right Setup for Your Space
Start by measuring the room and being honest about how you actually sew, rather than how you imagine sewing in theory. Someone who works on one quilt at a time needs a different setup than someone juggling three garment projects simultaneously, and the room should reflect actual habits rather than an idealized version of them.
On sizing, leave more walking space than feels necessary at first — a sewing room gets used in bursts of movement between stations, and a cramped layout turns a simple project into an obstacle course. If the room needs to double as a guest space, plan storage that closes away completely rather than assuming open shelving will always look tidy.
Materials matter most for surfaces that take daily wear: a cutting table benefits from a self-healing surface or a removable cutting mat rather than a delicate finish that scratches with rotary cutter use. Storage furniture holds up longer in solid wood or quality laminate rather than particleboard, which sags under the weight of fabric bolts over time.
Durability concerns extend to lighting too — cheap clip lamps tend to loosen and droop within months of daily adjustment, so spending slightly more on a sturdy, adjustable fixture pays off in frustration saved later.
On budget, prioritize the sewing machine table and chair above all else, since these get used every session regardless of what else is in the room. Decorative elements like a design wall or a pattern board can wait, or be built cheaply with foam board and fabric rather than purchased pre-made.
A common expensive regret is buying a large cutting table that technically fits the room but leaves no space to move around it comfortably — always account for the walking clearance around furniture, not just the furniture’s footprint alone. Similarly, resist filling every wall with storage before living in the space for a few weeks; it’s easier to see what you actually need once you’re working in the room regularly rather than guessing upfront.
Final Thoughts
A good sewing room comes down to a handful of practical decisions rather than one big transformation — where the light falls, how far you have to walk between cutting and stitching, whether your tools are visible or buried in a drawer. Some of the ideas here solve very specific problems, like soundproofing for early risers or fold-down tables for shared-use rooms, while others are just solid defaults that improve almost any sewing space.
The best approach is picking two or three ideas that address your actual room’s limitations rather than trying to combine everything on this list at once. A small spare bedroom doing double duty as a guest room doesn’t need a full U-shaped workstation; a dedicated hobby room with plenty of space probably doesn’t need to compromise on a fold-down table. Match the solution to the real constraints of your space, and give the setup a few weeks of actual use before deciding what’s working and what still needs adjusting.
Frequently Asked Questions
How much space do I need for a functional sewing room?
A room as small as 80 to 100 square feet can work well with the right layout, particularly fold-down tables and vertical storage. Larger rooms give more flexibility for multiple stations, but a compact, well-organized space often functions better than a large, poorly planned one.
What’s the most important furniture piece to invest in first?
A sturdy, properly sized table for your sewing machine matters more than almost anything else, since it gets used every session. A wobbly or too-small table creates daily frustration that no amount of nice storage or decor can offset.
How do I keep fabric from fading in a sewing room?
Keep fabric storage away from direct sunlight, using sheer curtains or UV-filtering window film if the room gets strong afternoon light. Rotating stock occasionally and avoiding open shelving directly in a sun-exposed spot helps prevent noticeable fading over time.
Can a sewing room still work as an occasional guest room?
Yes, particularly with a daybed or sofa bed and storage that closes away fully rather than open shelving. Keeping the sewing footprint compact and tidy makes the dual-purpose setup far more comfortable for guests.
What lighting works best for detailed sewing work?
Daylight-balanced LED bulbs around 5000K paired with task lighting at each station give the clearest, most accurate light for color matching and detail work. Relying on a single warm-toned overhead bulb tends to cause both eye strain and color misjudgment over time.
How do I organize thread so it’s easy to find what I need?
A wall-mounted rack organized by color gradient, rather than brand or type, makes locating the right shade far faster than digging through a drawer. Keeping bobbins stored nearby completes the system without adding extra steps.
Is it worth soundproofing a sewing room?
It’s worth it specifically if you sew at odd hours near shared walls or sleeping family members. A rug, some wall padding, and door weatherstripping handle most of the noise reduction without requiring major construction work.
What’s the biggest mistake people make setting up a sewing room?
Filling every available wall and surface with storage before actually using the room for a few weeks. It’s far easier to see what storage and layout genuinely suit your habits once you’re working in the space regularly, rather than guessing based on inspiration photos alone.