Flat-pack furniture has a branding problem. Walk into almost any home and you can spot the untouched IKEA piece from across the room: the same white bookcase, the same birch-look dresser, the same side table that shows up in a thousand rentals. It’s sturdy, it’s affordable, and it looks like everyone else’s.
That sameness is the real problem most people run into. They like how the piece works but not how it looks, and replacing it with solid wood or custom cabinetry costs far more than the room’s budget allows. So the furniture stays, quietly disliked, for years.
Here’s the angle that changes things. IKEA pieces are built to a standard, which makes them predictable to modify. Sizes are consistent, surfaces take paint and veneer, and a whole ecosystem of legs, trim, and hardware exists because so many people have done this before. You’re starting from a reliable blank canvas instead of fighting a one-off piece.
Below are 20 IKEA DIY projects that change how ordinary furniture looks and works, from simple hardware swaps to full built-in effects. Each one covers where it fits, which materials to use, and the mistakes that waste a weekend. After the projects you’ll find a comparison table, a buying guide for choosing base pieces, and answers to common questions. Start with the easiest project that matches something you already own.
1. Turn a BILLY Bookcase Into a Built-In
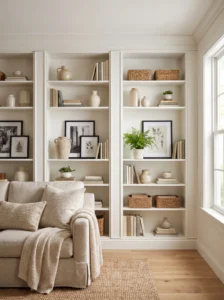
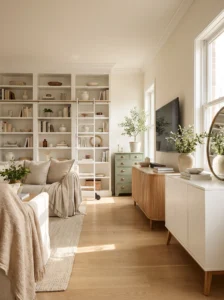
A plain BILLY bookcase becomes a built-in once it reaches the ceiling and the sides melt into the wall. That’s the whole trick, and it’s why this hack appears so often: the bookcase is cheap, and the trim does the expensive-looking work.
Line two or three units along a wall, then close the gaps with filler panels or a simple face frame. Crown molding at the top and a baseboard matching the room finish the effect. Paint everything, bookcase included, in one color so the seams vanish. Warm whites and deep greens both work well. Stark white tends to highlight every joint.
Measure the ceiling height before buying, since extension units come in set sizes and you may need a header board to fill the leftover gap. Anchor every unit to wall studs. Tall bookcases are tip hazards, and that step isn’t optional.
Resist the urge to fill every shelf. Leave a few partly empty, with baskets and framed pieces mixed in, or the whole thing reads as a storage wall instead of a built-in.
In daily use, the payoff is a wall that finally earns its keep: books, a reading lamp, and no more stacks on the floor.
2. A KALLAX Sideboard on Tapered Legs
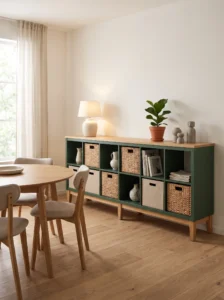
Tip a KALLAX on its side, add legs, and you have a low sideboard that looks far pricier than it is. The cube grid already suits storage, so the project is mostly about lifting and finishing it.
Tapered wooden legs with mounting plates are sold separately and attach to the underside in a few minutes. Use at least four, and add a fifth or sixth under long units so the middle doesn’t sag. Paint the frame a deep color like charcoal or forest green, or wrap the sides in wood veneer for warmth.
A flat top helps. A thin wood or butcher-block board cut to size and glued on gives you a surface for lamps and plants and hides the cube lines.
Entryways, dining rooms, and spots under windows are where this works best. Aim for a total height around 28 to 32 inches so it sits comfortably under wall art.
Baskets or fabric inserts in the cubes keep the clutter out of sight. The honest advantage here is flexibility: the same piece can hold dishes in a dining room or toys in a playroom, and you can change the look by swapping the inserts.
3. KALLAX Entryway Bench With a Cushion
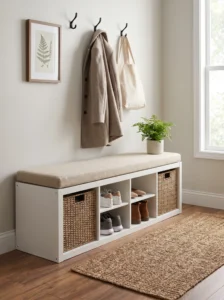
Shoe piles by the door are a design problem, not a discipline problem, and a bench with built-in cubes solves it. Lay a KALLAX on its side, and the lower cubes handle shoes while the top becomes a seat.
The seat needs padding. Cut a piece of plywood to the top’s footprint, glue on two inches of high-density foam, and wrap it in upholstery fabric, stapling underneath. Performance fabrics or outdoor-rated textiles survive muddy boots better than cotton.
Seat height should land near 18 inches, which is comfortable for pulling on shoes. If the unit sits lower, add short legs or a plinth base made from 2x4s.
Wall hooks above the bench complete the setup. Install them into studs, not just drywall, because coats get heavy.
Avoid putting open cubes directly at floor level if you have toddlers or pets, since small items disappear into them. Fabric bins with handles keep things tidy and easy to pull out.
What tends to happen after a few weeks is that the entry stops being the messiest spot in the house. That alone makes it worth the afternoon.
4. Repaint a RAST Chest With New Pulls
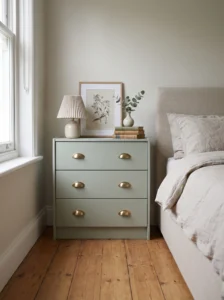
RAST is a modest three-drawer pine chest, and it has become a favorite for makeovers because the raw wood takes paint beautifully. Out of the box it looks plain and a little juvenile. With color and good hardware, it can pass for something from a boutique.
Sand lightly, apply a stain-blocking primer (pine knots bleed through otherwise), and use two thin coats of cabinet-grade paint. Thin coats matter. Heavy coats drip and show brush lines.
Colors that work: deep olive, muted terracotta, soft black, or a pale sage. Pair with brass or leather pulls. The hardware does most of the visual upgrade, so spend there instead of on paint.
Drill new holes carefully. Measure twice, use a template, and tape the spot before drilling to prevent splintering.
RAST fits narrow spaces beautifully: beside a bed, in a hallway, or under a wall mirror. It’s shallow, so don’t expect to store bulky items.
People often find a painted piece like this ends up leading the room’s color story. One bold chest can set the tone for the rest of a quiet bedroom.
5. Shaker-Style Trim on a Flat-Front MALM Dresser
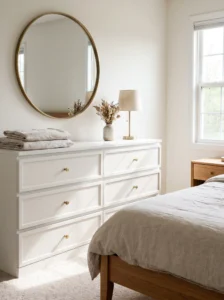
Flat drawer fronts are what make a MALM dresser feel like a dorm room. Adding thin trim to create a shaker-style frame changes that in an afternoon.
Use 1/4-inch by 1-1/2-inch poplar or pine strips. Cut mitered corners to form rectangles on each drawer, glue them on with wood glue, and clamp or weigh them down until set. Fill any seams with wood filler, sand smooth, and paint the whole dresser one color.
Spacing is the detail that separates polished from amateur. Keep the border an equal distance from the edge on every drawer, usually about an inch. A simple spacer block makes this quick.
Overlay or recessed trim both work, but overlay is easier for beginners.
Bedrooms and nurseries are the most natural fit, especially when paired with soft paint colors and simple knobs. Avoid ornate trim on a modern base. The simplicity is the point.
As a quiet bonus, thicker fronts feel more solid. People often comment that the dresser seems sturdier, even though the structure hasn’t changed at all.
6. Slatted Fluted Fronts for a BESTÅ Console
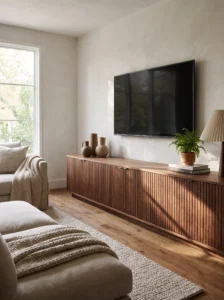
Fluted texture is everywhere in design right now, and a BESTÅ TV unit is a convenient canvas for it. The flat doors take half-round dowels or fluted trim strips easily, and the finished look resembles a high-end media console.
Cut the strips to door height and glue them side by side across each door, spacing them evenly with a thin spacer. Painting before gluing saves cleanup between the grooves. Walnut stain, warm white, or deep sage all look good.
Keep the lines running vertically. Horizontal fluting feels dated on larger pieces.
Plan for the hardware before gluing. Push-to-open mechanisms make the surface cleaner, but if you prefer handles, mark the drill points first.
Living rooms with a quieter style benefit most, especially those where the TV unit is the largest piece on the wall.
Lighting changes the result noticeably. A nearby lamp casts soft shadows into the grooves, which adds depth that a flat painted door never offers, particularly at night.
7. Cane Doors on an IVAR Cabinet
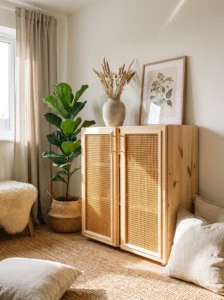
IVAR is raw pine, which makes it unusually friendly to modification, and cane webbing in the doors gives it a relaxed, slightly vintage feel. The pairing of natural wood and woven texture suits boho, coastal, and farmhouse rooms.
Cut the door panel opening (or use a frame-style door), staple natural cane webbing into the recess, and cover the edges with trim. Soak the cane in water first so it’s pliable, then let it dry tight. This trick prevents sagging later.
Stain or paint the pine to match the room. A light wash looks airy, while a dark walnut stain feels more traditional.
Cane works in dry areas best. Avoid it in kitchens or bathrooms, where humidity and grease degrade the weave.
Hallways and bedrooms are good spots. The open weave lets air through and hides a little clutter while still showing a hint of color behind it.
In everyday use, the cabinet stops looking like storage and starts looking like furniture, which is exactly the shift most people want from a budget base.
8. Faux Marble LACK Side Table
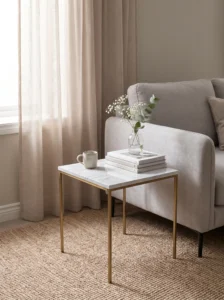
LACK tables are among the cheapest in the store, and they’re light enough to tip in a draft. A marble-look finish makes them feel substantial and costs very little.
Peel-and-stick marble film is the simplest approach. Clean the surface, cut the film slightly oversized, and apply it slowly with a squeegee, working from one edge to remove bubbles. Wrap the edges and trim with a sharp blade.
For a more convincing result, choose a film with soft gray veining rather than bold black lines. Real marble rarely has high contrast.
Pair with brass-painted legs or matte black ones. Paint the legs before applying film so you don’t stain the top.
These tables work best as a side table, plant stand, or small nightstand. Don’t use them where hot dishes land, since the film can warp under heat.
A tip people learn quickly: a coat of clear matte sealer on top makes the film resist rings and fingerprints, and it hides seams better than leaving the vinyl bare.
9. LACK Shelves as a Picture Ledge Gallery
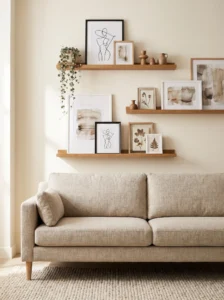
Wall shelves in the LACK line are narrow, which is a flaw for books but an advantage for framed art. Mounted in a row or staggered, they become a gallery wall you can rearrange without new nail holes.
Sand the front edge, stain or paint to match the frames, and add a small lip with a thin wood strip so pictures don’t slide. Mount into studs or use heavy-duty anchors, and check with a level after each shelf.
Stagger heights across a longer wall. A single line works in narrow hallways, while a pair or trio suits a sofa wall.
Lean frames in layers, with larger pieces behind smaller ones. Add a plant or small object between frames to break up the rhythm.
Avoid placing shelves too high. Eye level to just above is more comfortable, especially in hallways where people pass by closely.
The real convenience is swapping. Holiday art, kids’ drawings, and travel prints can change in seconds, so the wall never looks stuck.
10. Color-Blocked EKET Wall Cabinets
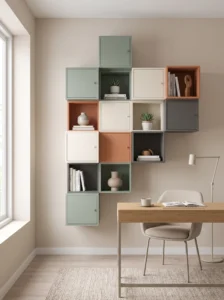
EKET cubes are small, wall-mounted boxes, and painting them in different colors turns a storage system into a piece of art. Each cabinet gets its own shade, arranged in a grid or a cluster.
Choose a palette of three or four related colors, such as sage, clay, cream, and charcoal. Sand lightly, prime, and spray or roll two coats. Spraying gives the smoothest finish on flat panels.
Arrange them before drilling. Lay the cabinets on the floor in the exact layout, photograph it, and transfer measurements to the wall with painter’s tape.
Kids’ rooms, home offices, and entryways benefit most, since the cabinets hold small items that otherwise live on surfaces.
Mixed open and closed units create rhythm. Closed doors hide the clutter, while open cubes show off a few chosen objects.
Avoid very bright primary colors on all pieces at once, which can feel chaotic. Let one or two stand out and keep the rest calm.
People often notice they actually use the storage more once it looks intentional, because nothing gets shoved in just to hide it.
11. New Wooden Legs for an IKEA Sofa
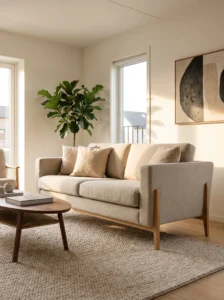
Sofas look heavy and a little generic when the base sits flat on the floor. Swapping the original feet for taller, tapered wood legs lifts the whole piece and gives it a mid-century feel.
Aftermarket leg makers sell replacements designed for popular IKEA sofa lines, with the correct mounting hardware. Check compatibility before ordering, since bolt sizes and mounting plates vary between models.
Height is the main decision. Add roughly three to six inches for a light, airy look, and keep proportions in mind. A leg that’s too tall makes the sofa look perched.
Finish options include natural oak, walnut, black, or brass. Match them to the other wood in the room, such as coffee table or shelving.
Lifting the sofa also helps cleaning. Robot vacuums can slide underneath, and dust no longer collects in an unreachable gap.
Another small advantage: visible floor beneath the sofa makes a small living room read as larger, since the eye travels farther across the space.
12. A Stained POÄNG Frame With a New Cover
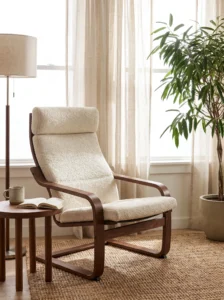
POÄNG is one of the most recognizable armchairs around, and its bentwood frame is a good candidate for restyling. Two changes, a new finish and a new cushion, give it a fresh identity.
Sand the frame lightly and apply a stain or paint. Walnut and black give a modern look, while a whitewash feels softer. Use a water-based sealer for durability.
Cushion covers can be sewn or bought from independent makers. Bouclé, linen, and textured wool are popular and feel more upscale than standard fabrics.
Place the chair near a window or in a corner with a small side table. It works best as an accent seat in a bedroom, reading nook, or living room.
Test the finish on a hidden spot first. Bentwood layers can absorb stain unevenly, and a pre-stain conditioner often helps.
Once restyled, the chair stops looking like a rental staple and starts looking chosen, which is a subtle difference guests notice without being able to explain.
13. Painted and Upholstered FROSTA Stool
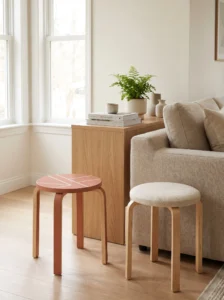
FROSTA stools are simple birch seats, but they take paint, stencil, and fabric well, which makes them handy small projects. Use them as extra seating, plant stands, or side tables.
For a painted version, sand, prime, and finish in a bold color or pattern. Painter’s tape creates clean stripes, color-blocking, or geometric shapes.
For an upholstered seat, cut foam and batting to the top’s size, wrap with fabric, and staple underneath. Choose tightly woven fabrics that resist snags.
Kids’ rooms are the obvious fit, but a pair of painted stools also works well under a console table or beside a sofa.
Seal painted surfaces with a durable topcoat, since stools take more abuse than shelves. Skipping it leads to chipped edges within months.
One thing that makes these a good first project is their size. Mistakes are cheap and quick to fix, and you build confidence before moving on to a larger piece.
14. Painted SKÅDIS Pegboard Wall
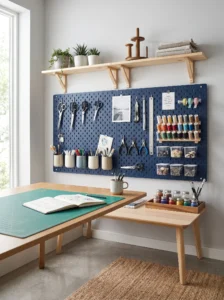
SKÅDIS is a perforated board designed for hanging tools and accessories, and it’s far more attractive when painted to match the room. Mounted on a craft room, office, or entry wall, it keeps small items visible and reachable.
Paint the board before mounting. Use a roller and light coats so the holes don’t fill. Dark colors such as navy or charcoal make accessories pop, while a soft white blends into the wall.
Combine with wood accents, such as custom shelves or hooks cut from scrap pieces, for a less industrial feel.
Plan the layout before hanging items. Lay everything on the floor in groups and photograph it. Move things around until the arrangement feels balanced, then transfer it to the board.
Avoid overloading with heavy items. The accessories have weight limits, and overcrowding looks messy.
What people tend to appreciate is the reconfigurability. As hobbies change or kids grow, the board adapts without new holes in the wall.
15. An ALEX Drawer Unit Turned Vanity or Desk
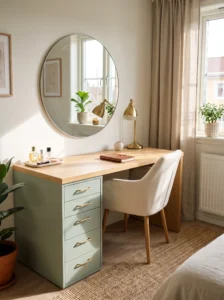
ALEX drawer units are tidy and practical but not exactly pretty. Add legs, a new top, and fresh hardware, and one becomes a vanity table or a compact desk.
Place the drawer unit on one side and a matching leg or panel on the other, then span them with a wood top. A butcher-block or solid-wood board gives warmth. Fix it securely and check that the weight is balanced.
Paint the unit to match the wood, or contrast it with a bold color. Swap the pulls for something metal and substantial.
Works well in bedrooms, dressing areas, and home offices. Leave knee room underneath and check chair height before finalizing the dimensions.
Add a mirror and good lighting for a vanity. A soft, warm light on both sides is more flattering than overhead lighting alone.
Drawers are where this project quietly shines. Makeup, cables, and paperwork disappear, and the top stays clear, which makes the space feel calmer every morning.
16. A Wood Slat Headboard for a Plain Bed
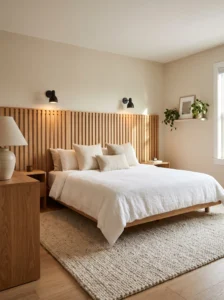
Plain IKEA bed frames often have minimal or no headboards, which leaves the wall behind the bed looking bare. A slat headboard adds texture, warmth, and a focal point without costing much.
Cut 1×3 or 1×4 boards to length and mount them vertically on a plywood backing, leaving even gaps. Sand, stain, or paint them and attach the finished panel to the wall using a French cleat, so it can be lifted off if needed.
Width should extend slightly beyond the bed on each side, around six inches, for a balanced frame. Height depends on the room. Taller feels dramatic, while lower feels cozy.
Pair with warm bedside lighting. Wall-mounted lamps look elegant and free up nightstand space.
Avoid very narrow slats in a large room, which can look fussy. Wider boards read as more confident.
Sleeping against a solid wood surface also adds a feeling of enclosure that some people find calming, and it protects the wall from pillows and scuffs.
17. A Wood-Framed IKEA Mirror
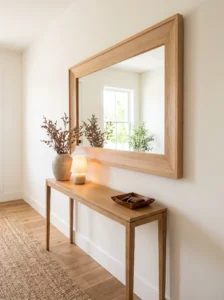
Frameless or thin-framed mirrors are cheap, but they can look unfinished. Wrapping one in a wood frame turns it into a statement piece.
Cut four pieces of trim or lumber with mitered corners, glue them around the edge, and secure the joints with corner brackets from behind. Stain, paint, or leave them natural. Oak, walnut, and black all look good.
Choose the frame width in proportion to the mirror. A wide frame suits a large mirror, while a slim one works for smaller sizes.
Hang it in entryways, over consoles, or in bathrooms with decent ventilation. Seal the wood well if moisture is expected.
Use strong mounting hardware rated well above the mirror’s weight, and anchor into studs where possible.
A large mirror across from a window bounces daylight into dim corners. Many people notice that rooms feel larger and brighter after hanging one, even before styling it.
18. METOD Cabinets Turned Into a Kitchen Island
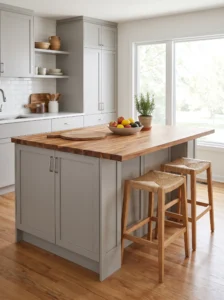
Base cabinets from IKEA’s kitchen line stack neatly into an island with a bit of extra work. The structure is already there, so the project focuses on the top, the back, and the finishing.
Place two or three cabinets back to back or side by side, secure them to each other and to the floor if the layout allows, and top with a butcher-block counter. Add a finished back panel so no raw edges face the room.
Leave about 12 inches of overhang on one side for stools. Plan for 36 inches of clearance around the island so people can move comfortably.
Paint or wrap the sides with trim or beadboard to match the surrounding cabinets. Add hardware in a consistent style.
Seal wood counters regularly with food-safe oil to prevent stains and cracking.
In practice, an island becomes the household’s default gathering point. Homework, coffee, and casual meals all end up there, which is more useful than any decorative upgrade.
19. Stain or Whitewash a TARVA Pine Dresser
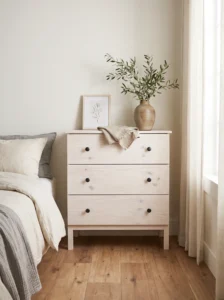
TARVA is unfinished pine, which means you decide how it looks. That’s rare for flat-pack furniture, and it opens up a range of finishes from deep walnut to a light, washed look.
Sand with fine-grit paper, apply a pre-stain conditioner, and stain in the direction of the grain. Wipe back excess to avoid blotches. For a whitewashed look, dilute white paint with water and wipe on.
Seal with a satin polyurethane to protect against wear.
Pair the finished dresser with hardware that suits the style: black bin pulls for a modern look, brass for a classic feel, or simple wooden knobs for a Scandinavian one.
Bedrooms, hallways, and dining rooms are good locations. The rustic grain looks lovely with linen, ceramics, and plants.
Mistakes to avoid include skipping conditioner and rushing between coats. Pine is forgiving but still shows shortcuts.
The result tends to age gracefully. Small dings and wear marks blend into the grain rather than looking like damage.
20. Wallpapered Back Panels on Open Shelving
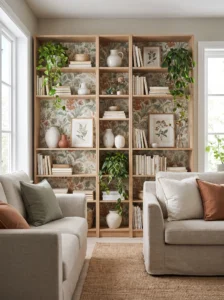
The cheapest way to make a bookcase look custom is to line the back panel. Peel-and-stick wallpaper or a fabric panel creates a surprising amount of depth behind the books.
Measure each section and cut the paper slightly larger. Apply from the top down, smoothing with a squeegee, and trim excess with a craft knife. For shelves that can’t be easily accessed, cut thin hardboard to size, cover it, and slot it in front of the original back.
Patterns work in small doses. A botanical, grasscloth, or subtle geometric design adds interest without overpowering objects.
Contrast helps. A dark paper behind light objects, or a light paper behind dark ones, makes display items stand out.
Bedrooms, home offices, and living rooms all benefit. Use the same paper on a nearby accent wall for a coordinated look.
A small detail that makes a big difference: when you rearrange the shelves, the colored back keeps the display looking finished even when it’s half empty.
Quick Comparison of Popular IKEA Hacks
| Type | Best Use | Material | Style/Vibe | Difficulty Level |
|---|---|---|---|---|
| BILLY built-in | Living room or office walls | Paint, trim, crown molding | Classic, tailored | Medium |
| KALLAX sideboard | Entryways, dining rooms | Wood legs, veneer, paint | Mid-century, modern | Easy |
| RAST painted chest | Bedrooms, hallways | Paint, metal pulls | Boutique, playful | Easy |
| BESTÅ fluted fronts | Media consoles | Half-round dowels, stain | Contemporary, textured | Medium |
| LACK faux marble | Side tables, plant stands | Vinyl film | Glam, minimal | Easy |
| IVAR cane doors | Bedrooms, hallways | Pine, cane webbing | Boho, coastal | Medium |
How to Choose the Right IKEA Piece to Modify
The base piece decides how the project goes, so choose it before you buy paint or legs. Start with scale. Measure the wall, the doorway the box has to pass through, and the ceiling height. Tall units like BILLY need an inch or two of clearance to tilt upright, and that detail catches people more often than any design choice.
Material matters because it controls what finish will hold. Solid pine pieces such as IVAR, RAST, and TARVA take stain and paint beautifully. Particleboard with a laminate or foil surface, which covers a lot of the range, needs sanding and a bonding primer before paint will stick. Skip that step and the finish peels at the edges within months. Honeycomb or hollow-core panels can’t hold heavy screws, so plan reinforcement before adding legs or hardware.
Durability depends on where the piece lives. Kitchen and bathroom projects need moisture-resistant finishes and sealed edges. Entryway pieces need tough topcoats because they get kicked, bumped, and dripped on. Bedroom and living room pieces can be more delicate.
Maintenance is light if you finish properly. Wipe painted surfaces with a damp cloth, re-oil butcher-block tops once or twice a year, and check anchored units for loose screws now and then.
Budget is where people stumble. The base piece is cheap, but paint, primer, hardware, legs, and trim add up quickly. Total the full cost before starting, because a heavily modified piece can approach the price of a basic ready-made one. Spend on what’s visible and touched daily, like hardware and tops, and save on what’s hidden.
The usual regrets are predictable: buying a discontinued item, skipping a test patch, and underestimating drying time. IKEA updates its range regularly, so check that the model is still sold in case you need a matching second unit. Test every finish on a hidden spot first. Give paint a full cure, not just a dry-to-touch window, before loading shelves or drawers.
Final Thoughts on IKEA DIY Projects
What these 20 projects share is that none of them depend on rare skills or specialized tools. Paint, trim, legs, hardware, and a few smart surface treatments do nearly all of the work. The structure underneath is already solid and consistent, which is exactly why flat-pack furniture suits this kind of makeover.
If you’re deciding where to begin, match the project to your comfort level. Hardware swaps, faux marble film, and stool makeovers are quick and forgiving. Built-ins, islands, and slat headboards take more planning but reward patience with a result that’s hard to tell from custom work. Test one small idea on a side table before tackling the dresser you really care about.
It also helps to treat the piece as part of a room, not a standalone project. A painted chest looks better when its color echoes something else nearby, and a built-in bookcase works best when its trim matches the baseboards. Consistency is what makes a modified piece look designed instead of improvised.
Expect imperfection, too. A slightly uneven seam or a nick in the paint rarely shows from across the room, and furniture you’ve reworked tends to feel more personal than something bought finished.
Pick one piece you already own, spend a weekend on it, and see how it changes the room. The next one will go faster.
Frequently Asked Questions
Can any IKEA furniture be painted?
Most pieces can, but the surface decides the prep. Solid pine takes paint easily with a light sanding and primer. Laminate, melamine, and foil surfaces need a scuff sand and a bonding primer first, otherwise the paint peels. Test a hidden area before committing to the whole piece.
How much does an IKEA hack usually cost?
The base piece plus materials, so it varies with the project. Hardware swaps and film wraps cost very little, while built-ins and islands add up through trim, counters, and paint. Add up every item before you start, since small supplies like primer, sandpaper, and screws are easy to forget.
Will modifying an IKEA piece make it weaker?
Not if you reinforce where needed. Adding legs, tops, or trim is generally fine on solid units. Hollow-core panels can’t hold heavy screws, so use wider mounting plates or add a wood backer. Anchor tall pieces to the wall, whatever you change.
What paint works best on IKEA furniture?
A cabinet-grade or furniture paint in satin or semi-gloss gives the most durable finish. Apply thin coats over a bonding or stain-blocking primer, and let each coat dry fully. Cheap wall paint scuffs easily on surfaces that get touched daily.
Can I do these projects in a rental?
Many of them, yes. Peel-and-stick films, swapped hardware, loose legs, free-standing built-in frames, and wallpapered shelf backs all avoid permanent changes. Anything that requires drilling into walls, such as wall cabinets or ledges, should be cleared with your landlord first.
How long do IKEA hacks usually last?
With good prep and a sealed finish, they last as long as the original furniture, often years. Failures usually trace back to skipped primer, thin sealing on edges, or heavy loads on lightweight panels. High-touch areas may need a quick touch-up now and then.
Do I need power tools?
Some projects need only a screwdriver, sandpaper, and a brush. Others, like fluted fronts, headboards, and islands, go faster with a drill, a miter saw, or a circular saw. Many home centers will cut lumber to size for you if you don’t own a saw.
What’s the easiest project for a first-timer?
A hardware swap or a painted stool is the safest start. Both are quick, low-risk, and teach you the basics of sanding, priming, and finishing. Once you’re comfortable, move up to a faux marble top or a KALLAX sideboard.