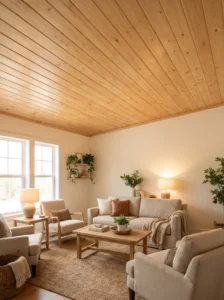
Look up in most rooms and you’ll see the same thing: a flat white expanse that nobody planned and nobody loves. The ceiling is the largest surface in the house, and it’s the one most people leave alone, mostly because wood ceilings have a reputation as an expensive contractor project.
That reputation is out of date. Plywood, pine boards, thin panels, and even peel-and-stick planks now make it possible to bring real wood warmth overhead for roughly what you’d spend on a decent area rug. The catch is that cheap doesn’t automatically mean easy, and some materials look far better in photos than they do in a room with a low ceiling and a single window.
People who get good results tend to do two things. They match the material to the room’s height and moisture level, and they treat the ceiling as part of the color scheme instead of an afterthought.
Below you’ll find 18 budget-friendly wood ceiling ideas, from whitewashed pine and beadboard to slatted plywood and mixed-tone planks. Each one covers where it works, what to watch for, and how to keep it from looking like a basement remodel from 1987. After the ideas there’s a quick comparison table, a buying guide, and answers to the questions that come up most. Pick one idea or mix two, but read the buying section before you load a cart.
1. Whitewashed Pine Planks for a Light, Airy Feel
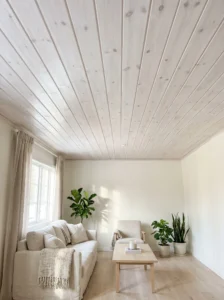
Whitewashed pine is the easiest way to get wood texture overhead without making a room feel heavy. The thin wash lets grain and knots show through while keeping the surface bright, which is why it suits bedrooms, sunrooms, and small living rooms where a full-strength stain would close things in.
Standard 1×6 pine boards or tongue-and-groove planks are the usual starting point, and both cost far less than hardwood. Mix roughly one part white paint with one part water, brush it on, and wipe back with a rag while it’s still wet. Test on an offcut first. Pine varies from board to board, and some pieces drink the wash while others resist it.
Pair the ceiling with warm white walls rather than stark white, otherwise the wood looks yellowish by comparison. A matte or satin sealer keeps the glow natural.
One mistake shows up constantly: skipping a stain-blocking primer on knotty boards. Knots bleed through pale finishes within a year, leaving brown spots that never match the rest.
Daytime is where this ceiling pays off. Light bounces around instead of dying against a dark surface, and rooms with one window feel noticeably less cave-like by late afternoon.
2. Birch Plywood Strips for a Clean, Modern Look
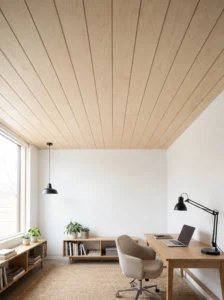
Walk into a café with a pale, striped ceiling and there’s a good chance it’s plywood ripped into strips. Birch ply is smooth, light in color, and sold in 4×8 sheets that can be cut to any plank width, which makes it one of the cheapest routes to a modern wood ceiling.
Six-inch strips suit most rooms. Go narrower in a small space so the lines don’t look chunky. Leave a gap of about an eighth of an inch between pieces, or fill the seams with a thin bead of caulk tinted to match. Either choice looks deliberate. Butting the edges tight usually ends in uneven lines once the boards expand and contract.
Seal with a water-based clear coat. Oil-based finishes amber over time and turn pale birch an odd orange.
Kitchens, home offices, and open-plan living areas wear this look well, especially with black or brushed-steel fixtures. Edges are the weak spot, so sand every cut side until it feels smooth, because raw ply edges show layers and fuzz.
After a few months the surface stops reading as a project and starts reading as a feature, mostly because the grain is so even.
3. Beadboard Panels for a Cottage Ceiling
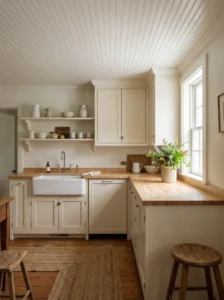
Beadboard gives a ceiling that cottage-and-farmhouse feeling in a single afternoon, and the panel version skips the hours of laying individual boards. Sheets typically come in 4×8 with the vertical grooves already milled in, so an average room needs only a handful of cuts.
Paint is the usual finish. White, soft cream, and pale blue are the traditional picks, and the blue has a long history on porches for a reason: it reads as sky. Use semi-gloss or satin so the grooves wipe clean.
Kitchens, laundry rooms, mudrooms, covered porches, and well-ventilated bathrooms are where it works best. Plywood-backed beadboard handles humidity better than MDF versions, which swell the moment water finds an exposed edge.
Glue and nail it to the joists or to furring strips, not just to drywall, and hide the seams under thin trim. Skip the trim and gaps appear after the first seasonal change.
Run the grooves along the longest wall. Crosswise grooves make a room look narrower, and the eye keeps tracking the lines instead of settling on the furniture.
4. Faux Box Beams on a Flat Ceiling
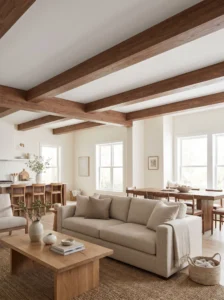
Real timber beams are costly and heavy, which is exactly why three-sided box beams exist. Built from 1×6 or 1×8 boards and construction adhesive, they look solid from the floor and weigh little enough for one person to hold up while a second nails them in place.
Spacing matters more than the wood. Beams set every three to four feet read as structure, while two lonely beams in a large room look like decoration. Keep the depth in proportion too: roughly four to six inches in a standard eight-foot room, deeper in a vaulted one.
Rough-sawn pine stained walnut gives a rustic look, while smooth poplar painted the wall color gives a quieter, tailored one. Both pair nicely with a plain white ceiling in between, so you aren’t covering the whole surface.
Sort out electrical early. Run any wiring or recessed-lighting plans before closing up a beam, and leave one end easy to reach.
Beams also fix a common issue in open layouts, where kitchen and living space blur together. A few lines overhead quietly mark where one zone ends.
5. Stained Tongue-and-Groove Pine for Cabin Warmth
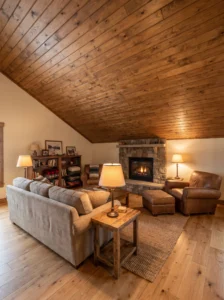
Warm honey wood overhead looks best when it has a purpose. Tongue-and-groove pine, stained a medium tone, gives a lodge feel to great rooms, dens, and sloped attic bedrooms where the ceiling is part of the architecture anyway.
The interlocking edges make installation forgiving. Boards slide together, hide the nails, and keep seams tight even as wood shifts through the seasons. Eight-foot or longer lengths cut down on end joints, so pick those if the room allows.
Stain choice shapes everything. Golden oak tones feel dated against modern furniture, while a neutral brown or gray-leaning stain sits comfortably next to both rustic and contemporary pieces. Always use a pre-stain conditioner on pine, which blotches badly without one.
Three or four coats of satin polyurethane make sense where the room gets steam or cooking smoke, since bare wood absorbs odors.
Avoid pairing a heavily stained ceiling with dark floors and dark walls. The room shrinks. Keep at least one of the three light, and the wood feels cozy rather than closed in.
6. Painted Shiplap When You Want Texture Without Grain
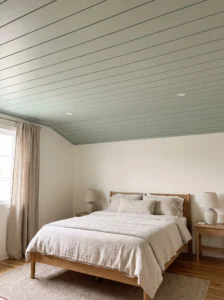
Not everyone wants visible grain, and painted shiplap solves that. The tight, overlapping joints create thin shadow lines, so even a plain white ceiling gains depth without any bare wood showing.
Pre-primed MDF shiplap boards cost less than solid wood and paint beautifully, though they belong in dry rooms only. For bathrooms or covered patios, choose primed pine or cedar instead.
Color goes beyond white. Soft sage, greige, and pale gray read calm, and a deep navy turns a small guest room into a snug retreat. Whatever you pick, use satin rather than flat paint, since it wipes clean and keeps the board lines crisp.
Plan the layout before nailing. Start from the center of the room and work outward so the last row on each side is the same width, instead of a thin sliver along one wall.
Caulk the gaps, fill the nail holes, and sand lightly between coats. That prep is what separates shiplap that looks intentional from shiplap that looks makeshift.
In low-light rooms, a pale shiplap ceiling bounces lamp glow back down, so evenings feel softer.
7. A Slatted Wood Ceiling Over a Dark Backdrop
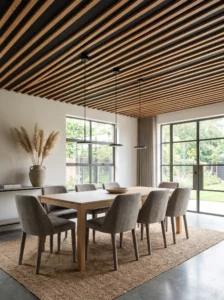
Slats suit anyone who finds full plank ceilings too heavy. Thin strips of wood, spaced evenly, create a rhythm that looks custom without needing expensive boards.
Common furring strips (1×2 or 1×3 pine) work well and cost very little. Fix them to the ceiling with a consistent gap, about the same width as the strip or a bit narrower, and paint the ceiling behind them charcoal or black. The dark backdrop makes the wood stand out and hides imperfections in the drywall.
Entryways, hallways, and dining areas are ideal because the pattern draws the eye along the room. In a bigger space, carry the slats down one wall for a continuous look.
Spacing is where people slip, so cut a scrap spacer block and use it at every board instead of eyeballing. A drift of even a quarter inch becomes obvious across ten feet.
If the room has recessed lights, mark their positions first so the slats can be cut around them.
Slats also take a little of the echo out of a room, especially with thin acoustic felt behind them. That’s a handy side effect in open-plan homes where sound bounces freely.
8. A Single Wood Panel Above the Bed

You don’t need to cover an entire ceiling to get the effect. A wood panel above the bed, roughly the size of the bed plus a foot on each side, frames the sleeping area like a canopy without any fabric or hardware.
Because the footprint is small, you can afford nicer materials, such as oak veneer plywood or cedar, while the total spend stays low. Painting the rest of the ceiling the wall color makes the panel look inset rather than stuck on.
Run the planks parallel to the headboard wall. This lengthens the bed visually and keeps the pattern calm. A thin trim border around the edge gives a finished look.
Lighting needs thought. A pendant or fan near the panel should be mounted before or during installation, not retrofitted later through freshly finished wood.
The same trick works over a dining table, a reading nook, or a kitchen island, anywhere a defined spot deserves emphasis.
Partial ceilings are also far easier to correct. If the stain turns out wrong, you’re redoing sixty square feet instead of three hundred, which takes the pressure off a first attempt.
9. A Coffered Grid Built From 1×4 Boards
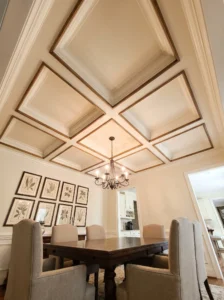
A coffered ceiling sounds fancy and looks expensive, yet it’s basically a grid of boards on a flat surface. Built from 1×4 or 1×6 pine, the grid creates recessed squares that make an ordinary dining room or study feel architectural.
Planning takes longer than building. Sketch the room, divide it into equal squares, and make sure the spacing lands evenly on all four walls. Squares between two and four feet usually look balanced in an eight- or nine-foot room, and bigger ones suit taller ceilings.
Paint the grid and the recessed centers the same color for a tonal look, or stain the grid and leave the centers white for contrast. Both avoid the busy look of too many colors.
Ceilings under eight feet don’t love this treatment. The boards drop the effective height by an inch or two, which can feel oppressive. A flatter relief made from thin lath strips is the safer route there.
Use a laser level, not a tape measure alone. Ceilings are rarely perfectly flat, and a level line hides that fact better than any filler.
Once finished, a coffered ceiling gives a dining room a settled, formal quality that plain drywall can’t.
10. Dark Stained Wood for a Moody Den
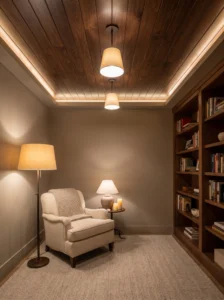
Dark ceilings sound risky, but a deep walnut or espresso stain on wood is a smart move in rooms used mostly at night. Think dens, home theaters, and libraries, where a lofty pale ceiling would work against the mood.
Pine or fir with a dark stain costs much less than real walnut. Apply pre-stain conditioner, then two coats, and seal with a satin finish. Gloss shows every roller mark and amplifies reflections from lamps.
Walls need to cooperate. Mid-tone or warm neutrals, like greige or soft terracotta, balance the weight overhead. Light floors help too. Without that contrast, everything blends into one dark box.
Lighting decides whether this style succeeds. Wall sconces, floor lamps, and warm-toned bulbs bounce enough light to keep the room comfortable, while a single overhead fixture leaves the corners murky.
Skip it in small, windowless rooms unless a cave is the goal.
What people tend to notice is how the ceiling seems to vanish at night. Edges soften, height becomes less obvious, and the room feels intimate instead of boxy, which is hard to get with white paint.
11. A Painted Wood Porch Ceiling
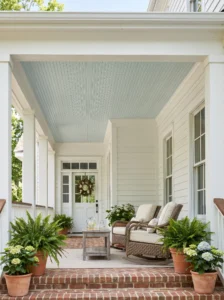
Porch ceilings are the easiest place to start with wood because mistakes are less visible and the payoff shows from the street. Tongue-and-groove cedar or pine, finished for outdoor use, gives a covered entry or back patio an immediate upgrade.
Haint blue, a pale blue-green with Southern roots, remains a favorite. Painted wood in that shade resembles sky, and tradition holds that it discourages wasps from nesting. Whether or not that’s true, the color looks great against white trim.
Use exterior-grade materials and seal every surface, including the backs and cut ends, before installing. Moisture sneaks in from behind, and unsealed boards cup within a season.
Leave small gaps or vent strips at the edges so humid air can escape. A fully sealed porch ceiling can trap moisture and invite mildew.
Choose screws or ring-shank nails rated for outdoor use, since standard fasteners rust and streak.
On a hot afternoon, a pale ceiling also reflects ambient light into the porch, so seating areas feel brighter without the glare of bare rafters. On a tight budget, paint outlasts stain on cheaper wood.
12. Reclaimed Boards and Pallet Wood
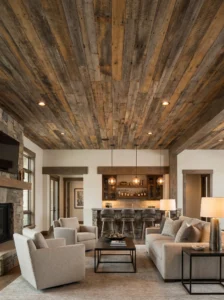
Reclaimed boards bring character that new lumber can’t fake: nail holes, color shifts, and weathered edges. They’re also among the cheapest wood options, especially if you can source them from salvage yards, local marketplaces, or demolition leftovers.
Pallet wood takes more effort. Look for a stamp indicating heat treatment (‘HT’) and skip anything marked ‘MB’, which signals methyl bromide treatment. Take pallets apart carefully, pull every nail, and sand thoroughly. Wood that looks clean can still hide splinters and grime.
Limit the use to one area, perhaps a bedroom accent or a bar nook. A whole ceiling of mismatched boards can look chaotic, while a defined section looks collected.
Brush on a light coat of clear sealer to lock in dust and keep the color. Heavy stain flattens the natural variation that makes reclaimed wood worth using.
Weight and fit matter. Uneven thickness means you’ll need to shim and nail into joists securely, because a loose piece overhead is a real hazard.
Rustic wood in a room with sleek, modern furniture often looks best. The contrast makes each element look more deliberate.
13. Herringbone Plywood for a Boutique Hotel Feel
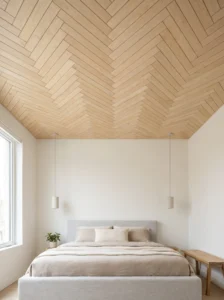
Herringbone on a ceiling feels like something from a boutique hotel, yet the materials are just plywood or thin plank offcuts. The zigzag adds movement, so it works best as a focal point in an entry, bedroom, or small dining area.
Cut strips to equal length with a 45-degree angle on each end. A miter saw makes it quick, and a simple template keeps pieces consistent. Strips about two inches wide and ten to twelve inches long suit most rooms.
Mark a centerline and build outward. The pattern needs to start straight, otherwise small errors multiply with every row. Dry-fit a section on the floor first if you’re nervous.
Finish with a clear or lightly tinted coat. A busy pattern shouldn’t also wear a loud color, and a natural tone keeps the focus on the geometry.
Time is the real cost. Expect a slow weekend even for a small room, though the material bill stays low.
Because the pattern is intricate, it works best with simple surroundings. Plain walls, minimal light fixtures, and sparse decor let the ceiling carry the room without competing with it.
14. Peel-and-Stick Wood Planks for Renters

Renters, and anyone who dislikes power tools, tend to love peel-and-stick wood planks. The lightweight panels have adhesive backing, cut with a utility knife, and go up in a few hours.
Quality varies widely, so order a sample and hold it overhead in the room’s actual light. Some look convincingly like wood grain, while others shine like plastic. Matte finishes with visible texture tend to read as more realistic.
Clean the surface first. Dust and grease are the main reasons panels peel, and textured popcorn ceilings need to be scraped or covered before application, since adhesive won’t grip bumps. Warm the panels slightly if the room is cold.
Stagger the seams the way you would on a floor. Straight, aligned seams look like tiles, while staggered ones look like boards.
Gravity is unforgiving overhead, so for heavier panels add a few finishing nails or staples in inconspicuous spots.
This method suits small spaces like closets, entry nooks, and rental bedrooms, and it’s one of the few that can be undone with careful heat and patience.
15. Lightweight Planks for a Low Basement Ceiling
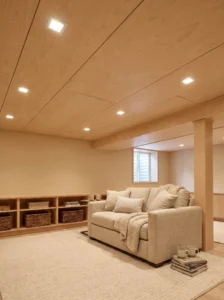
Basements are where a wood ceiling often makes the biggest visible difference, because exposed ductwork and joists leave the space feeling unfinished. Planks or panels hide the clutter and add warmth where concrete and drywall can feel cold.
Height is the limiting factor. Most basements have low ceilings, so choose thin materials such as quarter-inch plywood or lightweight tongue-and-groove, and avoid beams or heavy frames.
Install furring strips first, then attach boards across them. Leave access panels, or use removable sections, near plumbing shutoffs, junction boxes, and cleanouts. Sealing everything permanently becomes a headache the first time a pipe leaks.
Moisture control comes before decoration. Check for dampness, run a dehumidifier if needed, and use sealed or treated wood. Wood in a damp basement will warp, however nice it looks on day one.
Lighter tones keep the space open, and a whitewashed or pale birch finish makes a low ceiling feel higher than a dark one would.
Recessed lighting looks cleaner than surface-mounted fixtures here, since every inch counts. The result often turns a storage zone into a room people actually use.
16. A Moisture-Safe Wood Ceiling in the Bathroom
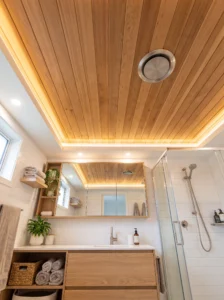
A wood ceiling in a bathroom is possible, but only if you respect the humidity. Treated cedar, marine-grade plywood, or properly sealed pine can handle steam, while untreated boards will darken and warp.
Seal all sides with a quality marine varnish or a water-resistant polyurethane, and add extra coats near the shower. Ventilation matters just as much. A working exhaust fan keeps moisture from settling into the grain.
Planks laid in a narrow pattern make a small bathroom feel like a spa, particularly with warm lighting and white tile. Cedar also carries a faint scent that many people enjoy.
Avoid putting wood directly above an enclosed steam shower. That’s a much harsher environment, and a tile or waterproof panel ceiling is the better choice there.
Small powder rooms see far less moisture, so even stained pine works well, and the dark wood adds drama without much risk.
Maintenance is simple. Wipe down occasionally with a damp cloth, check the finish for peeling once a year, and reseal when water no longer beads on the surface.
17. Wood Overhead in the Kitchen
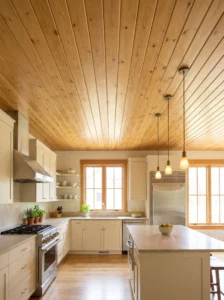
Kitchens handle wood overhead well because the warmth balances all the hard surfaces: stone counters, tile, steel appliances. A plank ceiling softens the room without touching the cabinets.
Choose a wipeable, durable finish. Cooking leaves a film of grease in the air, so semi-gloss or satin polyurethane over the wood makes cleaning easier. Painted beadboard or shiplap in white or soft sage stands up to this better than raw wood.
Run the planks in the same direction as the main workspace or island. It adds a sense of order and draws the eye through the room.
Position matters near the range. Keep wood well clear of high heat, and make sure the range hood vents outside rather than back into the room.
Pendant lights over an island look especially good against wood, since the warm tone catches the glow. Bulbs around 2700K keep it inviting.
Day to day, the biggest benefit is visual and acoustic softness. A plank ceiling takes the edge off a bright, noisy kitchen, so the space feels more like a place to linger and less like a utility room.
18. Mixed-Tone Planks for a Patchwork Effect
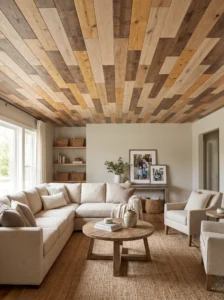
If a perfectly uniform ceiling feels too formal, try mixed-tone planks. Rather than staining everything the same shade, use three or four tones from light oak to deep walnut, laid in random order.
It’s also a clever use of leftovers. Offcuts from other projects, mismatched boards from a salvage yard, or a bargain bin of inexpensive pine can all work, since variety is the whole point.
Sort the boards by tone before installing, then scatter them so no two similar pieces touch. Step back every few rows to check the balance. Clusters of dark boards look like stains, so spread them out.
Keep widths consistent even if colors vary. Random colors with random widths turn busy fast.
This look suits family rooms, playrooms, and casual dining areas, where a bit of imperfection feels welcoming. It’s less successful in a very formal or minimalist space.
Seal with a single clear coat for a unified surface. The mixed tones hide scuffs, fingerprints, and minor installation flaws far better than a uniform finish, which makes it forgiving for first-time DIYers.
Wood Ceiling Types at a Glance
| Type | Best Use | Material | Style/Vibe | Difficulty Level |
|---|---|---|---|---|
| Beadboard panels | Kitchens, porches, laundry rooms | Plywood or MDF sheets | Cottage, farmhouse | Easy |
| Birch plywood strips | Offices, open-plan living areas | Birch plywood | Clean, modern | Medium |
| Faux box beams | Living rooms, vaulted spaces | Pine or poplar boards | Rustic, tailored | Medium |
| Tongue-and-groove pine | Dens, great rooms, attics | Solid pine | Cabin, lodge | Medium |
| Peel-and-stick planks | Rentals, closets, small rooms | Vinyl or thin composite | Casual, light wood look | Easy |
| Slatted ceiling | Entryways, hallways, dining areas | Pine furring strips | Contemporary | Medium |
How to Choose a Wood Ceiling on a Budget
Start with the room, not the material. Measure the ceiling height before anything else. Under eight feet, stick to thin, flat options such as plywood strips, beadboard, or peel-and-stick planks. Nine feet and up can carry beams and coffers without feeling heavy. Scale matters as well: wide planks suit big rooms, and narrow ones keep small rooms from feeling chunky.
Material comes next. Pine is the budget workhorse and takes paint or stain, though it blotches without a conditioner. Plywood is usually the cheapest per square foot and looks surprisingly good once the edges are finished properly. MDF products cost little but belong in dry rooms only. Cedar earns its higher price on porches and in bathrooms because it handles moisture and insects better than most woods.
Durability depends mostly on moisture and sunlight. Interior bedrooms and living rooms need little more than a clear coat. Kitchens and bathrooms call for washable, water-resistant finishes, and anything outdoors needs exterior-rated wood and fasteners. Maintenance stays light in every case: dust with a soft brush, wipe kitchen ceilings now and then, and expect to refresh the finish every several years in humid rooms.
On budget, order about ten percent more than your measurements to cover cuts and mistakes. Finish, fasteners, adhesive, and trim add up quickly. A cheap board that needs primer, two coats of paint, and extra trim can end up costing as much as a mid-range one, so compare the full installed cost, not the sticker price. Spend on what shows (finish, edges, trim) and save on what doesn’t (furring strips, backing).
The regrets people report most often are avoidable. Boards bought without a sample, then hated in the actual light. Wood installed the day it arrived, then shrinking and gapping as it dried out. Dark stain in a small room. Planks nailed in without finding the joists first. Give lumber a few days to settle in the room, test every finish on a scrap, and hold a sample board overhead before you commit. If the ceiling sits near stairwells, fireplaces, or fixtures, check local building rules too.
Final Thoughts on Budget Wood Ceilings
The thread running through all 18 ideas is simple: wood overhead works when the material fits the room. Thin plywood and beadboard keep low ceilings comfortable, cedar and sealed pine handle porches and bathrooms, and beams or coffers need some height to breathe. Lighter finishes open a space up, while dark stains reward rooms used mostly in the evening.
Budget shapes the choices, but it limits the result less than most people assume. A weekend of careful prep, a decent sample, and a finish suited to the room will do more than expensive boards installed in a hurry. Partial treatments, like a panel over the bed or slats in the entry, let you test a look on a small footprint before committing a whole ceiling.
If you’re stuck between two options, narrow it down by ceiling height, moisture, and how much time you’re willing to spend. Peel-and-stick planks and beadboard panels suit first-timers. Herringbone and coffered grids reward patience and a good level.
Whichever route you take, the ceiling tends to become the thing guests glance up at and ask about. That’s a solid return on a few sheets of plywood and a free weekend.
Frequently Asked Questions
What is the cheapest way to add a wood ceiling?
Plywood cut into strips or plank-style panels is usually the lowest-cost real wood option. Peel-and-stick planks are cheaper still in terms of tools and labor, though they’re thinner and less convincing up close. Beadboard sheets sit in the middle and cover a lot of area quickly.
Can I install wood planks over existing drywall?
Yes, in most cases. The planks should be fastened into ceiling joists or onto furring strips screwed into the joists, not just into the drywall. A stud finder and a chalk line make this much easier. Lightweight panels and peel-and-stick products can often go straight onto clean, smooth drywall.
Will a wood ceiling make my room look smaller?
Dark stains and heavy beams can lower the visual height, especially in rooms under eight feet. Light finishes such as whitewash, pale birch, or white-painted beadboard tend to do the opposite and make a ceiling feel higher. Running the planks along the longest wall also helps a narrow room feel wider.
How do I stop a wood ceiling from yellowing?
Switch to a water-based clear finish, since oil-based products amber over time. Using a stain-blocking primer under paint on knotty pine stops resin from showing through. Keeping direct sun off the boards with curtains or shades also slows color change.
Is a wood ceiling safe in a kitchen?
It can be, as long as it stays clear of high heat and the range hood vents outdoors. A washable satin or semi-gloss finish handles grease film, and painted beadboard or shiplap is easier to clean than raw wood. Check local rules if the ceiling sits close to a cooktop or open flame.
How much wood should I buy for a ceiling?
Multiply room length by width to get the square footage, then add about ten percent for cuts, defects, and mistakes. Add a bit more for patterns like herringbone, which produce more offcuts. Buy a box or two of extra material if the style might be discontinued.
Can I paint or restain a wood ceiling later?
Yes. Sand lightly, clean off dust, and prime if you’re going from dark to light. Going from light to dark is easier. Painted ceilings can usually be repainted without much prep, while stained ones need a thorough sanding if you want a noticeably different shade.