There’s a particular kind of guilt that comes with owning a box of mismatched teacups you can’t bring yourself to donate. Maybe they were your grandmother’s. Maybe you picked them up one by one at flea markets over the years, telling yourself you’d use them for tea parties that never quite materialized. Either way, they sit in a cupboard or a box in the attic, too pretty to toss and too impractical to use daily, taking up space without earning their keep.
What’s easy to miss is that a chipped saucer or a teacup with a hairline crack isn’t actually ruined — it’s just no longer suited for drinking tea. The porcelain itself, the delicate hand-painted florals, the gilded rims that caught the light decades ago, all of that is still intact and still beautiful. It just needs a new job. Once you start looking at teacups as small sculptural objects rather than strictly functional dishware, a surprising number of uses open up that let them sit out in daily view instead of hiding in storage.
This list runs through nine genuinely practical ways to give old teacups a second life around the house, from simple no-tool projects you can finish in an afternoon to slightly more involved ones worth the extra effort. Some work best with a full matching set, others shine specifically because the teacups don’t match at all. Pick based on what you actually have on hand and how much of a project you’re in the mood for.
1. Teacup Candles
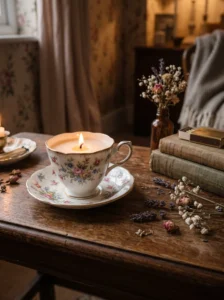
Turning a teacup into a hand-poured candle is one of the most popular upcycling projects out there, and for good reason — it transforms something purely decorative into a piece that fills a room with scent and soft light, giving it genuine daily function again.
This works particularly well with deeper teacups rather than shallow, saucer-like ones, since you need enough interior depth for the wax to hold a wick properly and burn evenly. A cup around 3 inches deep handles most standard candle wax pours without issue.
Use soy wax rather than paraffin if you want a cleaner, slower burn, and choose a wick sized specifically for the cup’s diameter — too thick a wick in a narrow cup causes uneven melting and soot buildup along the porcelain’s inner wall. Secure the wick to the base with a dab of hot glue before pouring, and keep the wax temperature around 185°F when pouring to avoid cracking a delicate or already-chipped cup. Place finished candles on a saucer or small plate when burning, since porcelain conducts heat and the base can get warm enough to mark wood furniture over a long burn. The best part of this project, genuinely, is watching the painted pattern glow softly from within once the candle’s lit — a detail that doesn’t show up in any photo nearly as well as it does in person.
2. Hanging Teacup Bird Feeders
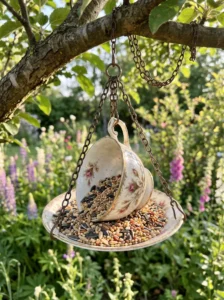
Mounting a teacup and saucer together as an outdoor bird feeder brings a bit of whimsy to a garden or porch, and it’s one of the few uses on this list that gets the teacup out of the house entirely, putting it to work somewhere new.
This suits gardens, porches, or any outdoor spot visible from a kitchen or living room window, since half the appeal is watching birds visit throughout the day. Choose a sturdy teacup without hairline cracks for this one specifically, since outdoor exposure to rain and temperature swings stresses already-weakened porcelain more than indoor use would.
Glue the teacup to its saucer at a slight tilt using a strong outdoor-rated epoxy, then attach a length of wire or chain through a drilled hole in the saucer for hanging. Fill the cup with birdseed suited to your region’s common visitors, and hang it from a tree branch or a shepherd’s hook at a height safe from easy cat access. Avoid using cups with heavily worn or flaking paint for this project, since the paint may contain old lead-based glazes not meant for repeated outdoor weather exposure. This project genuinely earns its keep daily — there’s something satisfying about looking out the window and seeing birds actually using the thing you made, rather than just admiring it from a distance.
3. Teacup Succulent Planters
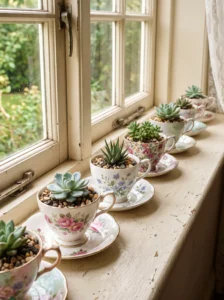
Small succulents fit perfectly inside a teacup’s shallow bowl, and the combination gives you a tiny, low-maintenance plant display that looks intentional on a windowsill, desk, or bathroom shelf rather than like a random pairing of unrelated objects.
This works especially well with wider, shallower teacups rather than tall, narrow ones, since succulents generally need more surface area for their shallow root systems than depth. A cup around 2.5 to 3 inches in diameter handles most small succulent varieties comfortably.
Drainage is the real challenge here, since teacups obviously aren’t designed with a hole in the bottom. Either drill a small drainage hole using a diamond-tip bit made for ceramics, going slowly to avoid cracking the cup, or skip drilling and instead layer a half-inch of small pebbles at the bottom before adding soil, which helps prevent root rot even without true drainage. Use a well-draining succulent-specific soil mix rather than standard potting soil, and water sparingly, since the lack of proper drainage means overwatering is the fastest way to lose the plant. Group several teacup planters together on a tray or windowsill rather than displaying just one, since a cluster of varying patterns and plant shapes reads as a deliberate collection rather than a single stray pot.
4. Stacked Teacup Jewelry Stand
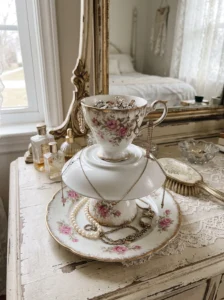
Gluing a teacup atop an inverted saucer, then that onto a small plate, creates a tiered stand perfect for holding rings, earrings, and small jewelry pieces on a dresser or vanity — genuinely useful storage disguised as decor.
This suits bedrooms and bathrooms with a dresser or vanity surface, particularly in rooms already leaning toward a vintage or cottage aesthetic where the mismatched, slightly fussy look of stacked china fits naturally. Three pieces of varying sizes, stacked largest to smallest from bottom to top, give the most stable and visually interesting result.
Use a strong ceramic epoxy rather than standard craft glue for the stacking joints, since jewelry stands get handled daily and need bonds sturdy enough to survive the occasional bump. Let each layer cure fully before adding the next, typically 24 hours per joint, rather than rushing the whole assembly in one sitting. Place small, flat jewelry like rings and studs directly in the top teacup bowl, while draping necklaces and bracelets over the stand’s tiered edges. The mistake worth avoiding here is choosing pieces that are too similar in size, which makes the tiers look unstable and squat rather than gracefully tapered — a noticeable size difference between each layer makes the final piece both sturdier and better proportioned.
5. Teacup Herb Garden Window Display
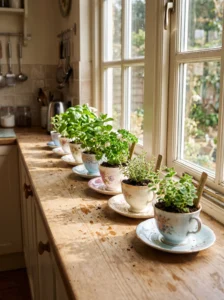
A row of teacups along a sunny kitchen windowsill, each holding a different herb, turns a purely decorative object into something genuinely useful every time you’re cooking and need a pinch of fresh basil or mint within reach.
This works best in kitchens with a south or east-facing window that gets decent direct light for at least a few hours daily, since most culinary herbs need more sun than a shaded spot can offer. Shallow to medium-depth cups suit most herbs better than very narrow, tall ones, giving roots enough lateral room to establish.
As with the succulent planters, drainage matters here too, though herbs are generally more forgiving of a slight pebble-layer workaround than true drainage holes. Use a lightweight potting mix rather than dense garden soil, and keep a small saucer or tray beneath each cup to catch any overflow during watering. Rotate the cups occasionally so all sides get even light exposure, since herbs reaching toward one direction consistently tend to grow lopsided. What makes this project worth the effort beyond the visual appeal is genuinely practical — snipping herbs straight from a windowsill display saves a grocery trip and tends to encourage cooking with fresh ingredients more often than herbs stored in the crisper drawer ever do.
6. Teacup String Light Luminaries
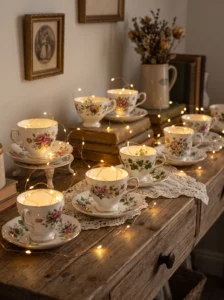
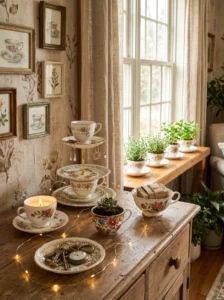
Threading a string of small battery-powered fairy lights through a cluster of teacups creates a soft, glowing display perfect for a shelf, mantel, or table centerpiece, especially appealing for anyone who loves the look of candlelight without the fire risk.
This works well in living rooms, bedrooms, or dining spaces for evening ambiance, and it’s a particularly good option for cups too delicate, cracked, or otherwise unsuited for actual candle wax, since no heat is involved at all.
Choose warm white micro LED lights rather than cool white or colored ones, since warm tones read as cozier and more flattering against aged porcelain patterns. Nestle the battery pack discreetly behind or beneath the teacup arrangement, using a small decorative box or fabric scrap to hide it from direct view. Arrange cups at varying heights using small stands or stacked books underneath some of them, which adds visual depth rather than leaving everything in a flat, single-level row. This is one of the lowest-effort projects on the list in terms of actual labor, and it has the added benefit of being completely reversible — unlike glued or drilled projects, you can disassemble this display and return the teacups to the cupboard without any permanent alteration if you ever change your mind about the arrangement.
7. Teacup Soap and Sponge Holder
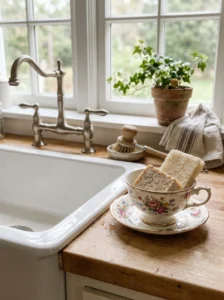
A single teacup by the kitchen or bathroom sink, holding a bar of soap or a scrub sponge, replaces a plastic dish with something that actually looks nice sitting out in plain view all day, every day.
This suits any sink area, though it works particularly well in kitchens and bathrooms leaning toward a farmhouse, cottage, or vintage style, where a patterned teacup fits the existing aesthetic rather than looking out of place next to modern fixtures. Choose a cup with a wider opening rather than a narrow one, since a standard bar of soap or sponge needs to sit without wedging in too tightly.
No modification is needed here at all beyond simply setting the cup by the sink, which makes this the easiest project on the entire list. Empty and rinse the cup every week or two, since standing water from a wet sponge or soap residue can leave a film on the porcelain over time if left unchecked. Avoid using teacups with extensive gold leaf trim for this particular use, since the frequent water exposure and occasional scrubbing to clean the cup itself will wear down delicate gilding faster than display-only uses would. This is a small change, but the daily visual upgrade from a plastic soap dish to a patterned teacup is more noticeable than its simplicity suggests.
8. Framed Teacup Wall Art
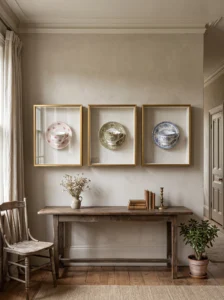
Mounting a teacup and saucer onto a shadow box or deep frame turns the piece into genuine wall art, giving it a permanent, protected display spot rather than risking daily handling on an open shelf.
This works particularly well for teacups with sentimental value — inherited pieces too precious to risk using or displaying loosely, or ones already too fragile for any project involving glue, drilling, or regular handling. A kitchen, dining room, or hallway gallery wall all suit this treatment nicely.
Use a shadow box with at least 3 inches of depth to accommodate the cup’s full dimensions, and secure the piece inside with museum putty rather than glue, which holds firmly without causing permanent damage or residue on the porcelain. Choose a frame finish that complements the cup’s colors — gold or brass framing echoes gilded rim details nicely, while a simple black or white frame lets a heavily patterned cup stand out as the clear focal point. Group two or three framed teacups together on a wall rather than displaying just one in isolation, which creates more visual interest and makes the collection read as deliberate curation. This approach genuinely protects pieces that matter most, keeping them visible and appreciated daily without the wear and risk that comes with projects requiring regular touching or use.
9. Teacup Trinket and Catch-All Dish
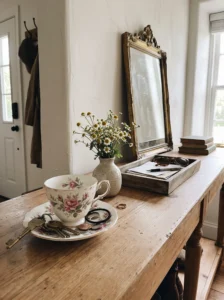
Placed on an entryway table, nightstand, or desk, a teacup becomes an effortless catch-all for the small daily items that otherwise end up scattered loose across a surface — keys, spare change, hair ties, a ring taken off before washing dishes.
This suits nearly any room with a flat surface near a doorway or frequently used spot, and it’s one of the most forgiving projects here since even a cracked or chipped cup works fine as long as it’s not actively shedding ceramic fragments. An entryway console or a bedside table are the two most common and genuinely useful spots for this.
No preparation is required beyond simply setting the cup out and using it, which makes this the second-easiest project on the list after the soap dish idea. Choose a cup with a pattern or color that complements the surface it’s sitting on, since this piece will be in frequent daily view rather than tucked into a corner. Empty and wipe it out occasionally, since small items like coins and keys carry more grime than people expect, which can dull a glossy glaze over time if left unaddressed. The genuine value in this one is almost entirely about function rather than looks — a designated spot for small daily items, dressed up as something pretty rather than a generic dish, tends to actually get used consistently in a way a plain plastic tray often doesn’t.
Comparison Table: Teacup Upcycling Projects at a Glance
| Type | Best Use | Material Focus | Style/Vibe | Difficulty Level |
|---|---|---|---|---|
| Teacup Candles | Living room, bedroom ambiance | Soy wax, cotton wick | Cozy, romantic | Moderate |
| Succulent Planters | Windowsills, desks, shelves | Potting soil, pebbles | Fresh, whimsical | Easy to Moderate |
| Stacked Jewelry Stand | Dresser, vanity storage | Ceramic epoxy | Vintage, feminine | Moderate |
| Hanging Bird Feeders | Gardens, porches, patios | Outdoor epoxy, wire | Charming, rustic | Moderate |
| Framed Wall Art | Hallways, dining rooms | Shadow box, museum putty | Sentimental, curated | Moderate |
| Catch-All Dish | Entryways, nightstands | None required | Practical, effortless | Easy |
How to Choose the Right Project for Your Teacups
Start by actually assessing the condition of each cup before deciding on a project. A cup with hairline cracks or chips shouldn’t go outdoors as a bird feeder or hold hot wax as a candle, since both uses add stress that can cause further damage or, in the case of candles, create an actual safety risk if the porcelain fails while lit. Those pieces are better suited to display-only uses like framed wall art or a simple catch-all dish that never involves heat or water exposure.
On materials, pay attention to glaze condition, especially with vintage or antique pieces. Older teacups, particularly those made before the 1970s, sometimes used glazes containing lead, which matters most for any project involving food, drink, or regular skin contact. Projects like candles, soap dishes, or herb planters are generally fine for display and light use, but avoid eating or drinking from vintage cups with uncertain glaze history, and skip any project putting the cup back into food contact if you’re not confident about its origins.
Durability varies a lot by project. Glued and stacked pieces, like the jewelry stand, need fully cured bonds and gentle handling to last, while simpler uses like the catch-all dish or soap holder need essentially no special care beyond normal cleaning.
Budget-wise, nearly everything on this list costs very little beyond the teacups themselves, which you likely already own. The main expenses come from candle wax and wicks, epoxy for stacking or outdoor projects, and the occasional shadow box frame for wall art — none of which run particularly high even for several projects at once.
A common mistake is rushing glued or stacked projects without letting adhesive cure fully, which leads to pieces coming apart with regular handling. Equally common is choosing a sentimental, irreplaceable teacup for a riskier project like outdoor use or drilling, when a less precious piece from the same collection would serve the purpose just as well without the emotional stakes if something goes wrong.
Final Thoughts
Old teacups carry more flexibility than most people give them credit for, mostly because we’re conditioned to think of them strictly as drinking vessels rather than small sculptural objects with real decorative range. Some of these projects, like the catch-all dish or soap holder, take minutes and require nothing beyond simply repositioning the cup somewhere new. Others, like the stacked jewelry stand or framed wall art, take a bit more time and care but turn a forgotten piece into something genuinely displayed and appreciated again.
The best approach is matching the project to the actual condition and sentimental weight of each cup rather than forcing every piece into the same use. A cherished inherited cup probably deserves the protection of a shadow box rather than the daily wear of an entryway catch-all, while a chipped flea market find is the perfect candidate for drilling a drainage hole without a second thought. Sort through your collection with that distinction in mind, and most teacups will find a project that suits them well.
Frequently Asked Questions
Can I still drink from a vintage teacup after choosing one of these projects for it?
If you’ve drilled it, glued it, or used it for soil or wax, no — it’s no longer suited for food or drink contact. If you’ve simply displayed it as-is in something like the catch-all dish idea, drinking from it occasionally is fine as long as you’re confident about its glaze history and condition.
Are old teacups safe to use for food-adjacent projects like herb planters?
Generally yes for display purposes, since the herbs and soil don’t come into direct contact with anyone’s mouth. The main concern with older glazes is ingestion, so planting in a vintage cup poses little risk even if you wouldn’t want to drink from the same piece.
How do I clean teacups with gold trim without damaging the gilding?
Hand wash gently with mild soap and a soft cloth, avoiding abrasive sponges or dishwasher cycles entirely, since both wear down gold leaf trim quickly. For projects like the soap dish that involve frequent water exposure, choose cups without heavy gilding to avoid this issue altogether.
What’s the easiest project for a complete beginner with no crafting experience?
The catch-all dish and the soap holder both require zero tools, glue, or preparation — you’re simply repurposing the cup as-is in a new spot. Both make excellent starting points before attempting anything involving drilling, stacking, or wax pouring.
How much does it typically cost to turn a teacup into a candle?
Costs stay low, generally just a few dollars per candle for wax and a wick if you’re buying supplies in bulk for multiple cups at once. The teacup itself is usually the only “expensive” part, and most people already have a few sitting unused before starting this project.
Will drilling a drainage hole in a teacup ruin it?
Not if done carefully with a diamond-tip ceramic drill bit and a slow, steady approach, keeping the cup wet while drilling to reduce cracking risk. Rushing or using the wrong bit type is the most common cause of cracked cups during this particular project.
Can mismatched teacups work together in the same display, or should they match?
Mismatched sets often look more intentional and collected than matching ones, especially for projects like framed wall art, hanging light displays, or windowsill herb gardens. A unifying thread, like similar color tones or a shared era of design, helps mismatched pieces feel cohesive without needing to match exactly.
Is it worth repairing a cracked teacup before starting a project, or should I just use it as-is?
For display-only projects like wall art or a catch-all dish, a crack generally doesn’t need repair and can even add character. For anything involving water, heat, or regular handling, repair the crack first with a food-safe ceramic adhesive, or choose a project that doesn’t stress the compromised area at all.