Laundry rooms and pantries have more in common than most people realize. Both tend to get shoved into whatever leftover corner of the house is available, and both end up either cramped or half-empty depending on how thoughtfully they’re planned. So it makes a certain kind of sense that combining them — turning one room into both a laundry station and a working pantry — has become such a popular fix for smaller homes.
The appeal isn’t just about saving square footage, either. A combined pantry-laundry room means fewer trips back and forth between the kitchen and the utility area, and it puts bulk goods, cleaning supplies, and backup groceries in one central, out-of-the-way spot instead of scattered across three different closets. The challenge, of course, is fitting both functions into a room that was probably designed with only one in mind.
That’s really what this list is about — real layout strategies for making a shared laundry-and-pantry space actually work, without the room feeling like a cluttered catch-all. Some of these ideas are simple shelving adjustments you could set up this weekend. Others involve rethinking the whole footprint of the room, better suited to a renovation. Either way, by the time you’re through this list, you’ll have a much clearer sense of which approach fits your own space, your budget, and how you actually use the room day to day.
1. Stacked Open Shelving Above the Washer and Dryer
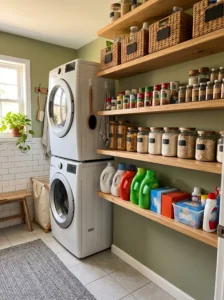
The flat wall space above a washer and dryer is one of the most underused areas in any utility room, and open shelving here does double duty holding both laundry supplies and pantry overflow. Stack three or four shelves, keeping laundry detergent and dryer sheets on the lower tiers within easy reach, and canned goods or bulk dry staples higher up.
This works best in rooms with at least seven feet of ceiling height, giving enough room for shelves without anyone having to duck. Wood shelving with a simple bracket system holds up well here, though a sealed or painted finish matters since the room deals with humidity from the dryer vent. Label baskets or bins on the upper shelves so pantry items don’t get mixed in with cleaning supplies.
Keep heavier items lower and lighter boxes up top, both for safety and ease of reach. The mistake most people make is loading the top shelf with jars and cans that are awkward to grab down safely — a small step stool nearby solves that instantly and keeps the whole system practical rather than frustrating.
2. Floor-to-Ceiling Pantry Cabinet at the Room’s End Wall
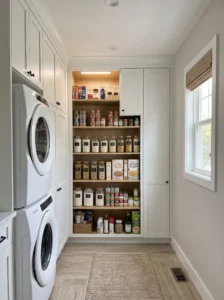
If the laundry room has an end wall that isn’t doing much beyond housing an outlet, a tall built-in pantry cabinet there can absorb a genuinely large amount of dry goods without eating into the working laundry zone. Full-height cabinets, roughly seven feet tall, make use of vertical space that a row of low shelves simply can’t match.
This layout suits rooms that are narrow but long, since a floor-to-ceiling cabinet doesn’t require much width — often just two to three feet. Choose adjustable shelving inside so you can customize the spacing for tall cereal boxes on one level and shorter cans on another. A door with a simple shaker or flat-panel front keeps the room looking tidy rather than like an open storage closet.
Lighting matters more here than people expect, since a deep cabinet without interior lighting means digging around blind for items at the back. A basic battery-powered puck light solves that cheaply. The payoff is real: one household I came across converted an awkward blank wall this way and said it replaced almost an entire kitchen cabinet’s worth of bulk pantry stock.
3. Pull-Out Pantry Cabinet Beside the Dryer
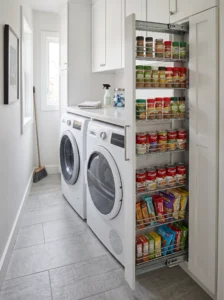
A narrow pull-out pantry cabinet, similar to the kind used in kitchens beside a fridge, fits neatly into the gap that often exists beside a dryer, especially in rooms where the appliances don’t run flush to the wall. These slim units roll or slide out on a track, revealing narrow shelves on both sides that hold spice jars, canned goods, or snack packets.
This works particularly well in rooms with limited floor space, since the cabinet’s footprint is usually under twelve inches wide when closed. Stainless steel or coated wire shelving resists the moisture and lint that tend to drift through a laundry room better than raw wood would. Keep the heaviest cans on the lower shelves to prevent the unit from feeling top-heavy when pulled out.
Leave enough clearance for the cabinet to fully extend without hitting the dryer door when it swings open — this is the most common measuring mistake people make with this layout. Done right, though, it turns a sliver of wasted space into genuinely useful storage that stays completely out of the way otherwise.
4. Countertop Over the Washer and Dryer with Cabinets Above
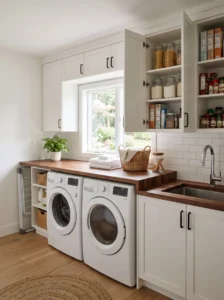
Installing a simple countertop that spans the top of a front-loading washer and dryer creates a folding surface at counter height, and mounting pantry cabinets directly above it stacks two functions into one wall. This is one of the more popular combined layouts because it mirrors a kitchen’s basic structure — counter below, storage above — which makes the room feel organized rather than improvised.
This setup requires front-loading machines rather than top-loading ones, since a countertop over a top-loader blocks access to the drum entirely. Butcher block or a laminate surface both hold up fine, though laminate resists moisture and scuffing a bit better over years of folding baskets of damp laundry on top of it.
Upper cabinets should sit high enough to clear the counter comfortably, usually around eighteen inches above the surface, matching standard kitchen cabinet spacing. Stock pantry items in the upper cabinets and keep laundry supplies in a lower cabinet or on open shelving elsewhere in the room, so the two categories don’t blur together and make finding things harder than it needs to be.
5. Galley Layout with Laundry on One Side, Pantry on the Other
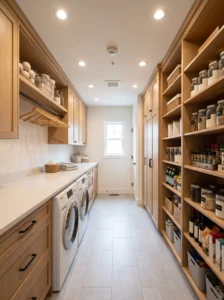
In a room long enough to fit two parallel walls of cabinetry, a galley-style layout dedicates one full wall to laundry — washer, dryer, folding counter — and the opposite wall entirely to pantry shelving or cabinets. This clean division keeps the two functions from visually competing with each other, even though they share the same room.
This layout needs at least four feet of clearance between the two walls so there’s enough room to move, open cabinet doors, and pull out a laundry basket without bumping into pantry shelving. Matching cabinet fronts across both walls, even though the contents are completely different, makes the room read as one cohesive space instead of two mismatched zones stitched together.
Good lighting down the center aisle makes a real difference in a galley layout like this, since a single overhead fixture often leaves the ends of the room dim. A run of two or three flush-mount lights spaced evenly solves that. The main misstep here is skimping on aisle width to fit more storage — a cramped walkway makes the room feel smaller, not more efficient.
6. L-Shaped Layout with Pantry Tucked in the Corner
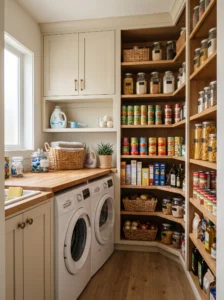
An L-shaped configuration places the washer and dryer along one wall and wraps pantry shelving around the corner onto the adjoining wall, making efficient use of a corner that would otherwise sit empty or collect clutter. This layout works especially well in rooms that aren’t quite big enough for a full galley setup but still have an awkward corner worth using.
Corner shelving units, either open or with doors, fit this space better than standard rectangular cabinets, since they follow the room’s actual geometry instead of leaving a gap. Light or neutral cabinet colors help a corner feel less boxed-in, especially in smaller laundry rooms where natural light is often limited to begin with.
Keep frequently used laundry items — detergent, stain remover, dryer balls — closest to the machines, and let the corner pantry hold less time-sensitive goods like bulk pasta or canned vegetables. The common mistake in L-shaped rooms is placing tall cabinets right at the inside corner where the two walls meet, which can make reaching into the back nearly impossible without contorting.
7. Sliding Barn Door Pantry Closet
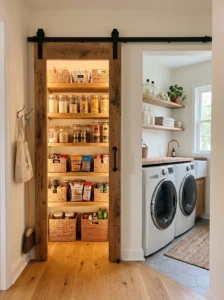
A dedicated pantry closet built into one end of the laundry room, fronted with a sliding barn door instead of a swinging one, solves a real spatial problem: swinging doors need clearance that a laundry room often can’t spare. A barn door slides flush against the wall, freeing up floor space that a hinged door would otherwise require.
This works particularly well in narrower laundry rooms where every foot of floor space matters. The closet interior can hold adjustable wire or wood shelving, and the barn door itself becomes something of a design feature, especially in a farmhouse or rustic-leaning laundry room. Choose a track rated for the door’s actual weight, since underrated hardware is the most common point of failure in DIY barn door installs.
Stick to a door style that complements the room rather than overwhelming it — a small laundry room with an oversized, heavily distressed barn door can feel more cluttered than charming. Test the door’s slide clearance against any nearby light switches or outlets before finalizing placement, since that’s an easy detail to miss during planning.
8. Open Shelving with Labeled Baskets Above a Folding Counter
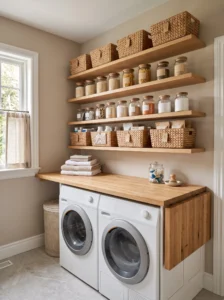
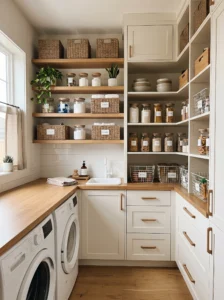
Open shelving stocked with matching baskets, positioned directly above a folding counter, keeps pantry goods visible and grabbable while still looking intentional rather than cluttered. This layout leans into open storage rather than hiding everything behind cabinet doors, which works well in laundry rooms that don’t have space for deep cabinetry.
Woven baskets or fabric bins in a consistent color palette make the biggest visual difference here, since open shelving without any containment tends to look messy fast, especially with mismatched cereal boxes and cans on display. Label each basket clearly, since baskets that all look identical from across the room create their own small daily frustration when you’re hunting for the right one.
This setup suits rooms with good natural or overhead lighting, since open shelving in a dim corner just reads as shadowy clutter rather than organized storage. Keep the shelf directly above the folding counter for lighter, frequently used items, and reserve anything heavy for lower, sturdier shelving elsewhere in the room.
9. Tall Cabinet Towers Flanking the Washer and Dryer
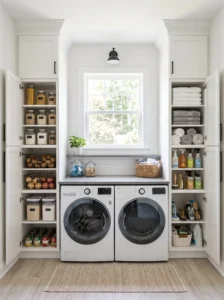
Placing a tall, narrow cabinet on each side of the washer and dryer — rather than one big block of storage — creates a symmetrical look that reads more like custom cabinetry than an afterthought. Each tower can serve a different purpose: one dedicated to pantry goods, the other to cleaning supplies, ironing equipment, or off-season linens.
This layout works well in rooms with washer and dryer units centered on one wall, since the towers naturally frame the appliances rather than competing with them. Matching cabinet fronts and hardware across both towers ties the look together, even though what’s stored inside each one is completely different. Interior shelving should be adjustable, since pantry goods and cleaning supplies rarely need the same shelf spacing.
Ventilation is worth considering if either tower sits close to the dryer vent, since trapped heat and moisture can affect stored goods over time — a small gap or vented panel on the back of the cabinet helps. This is a layout that rewards a bit of extra planning upfront, but the finished look tends to feel far more polished than mismatched storage pieced together after the fact.
10. Under-Counter Pull-Out Pantry Drawers
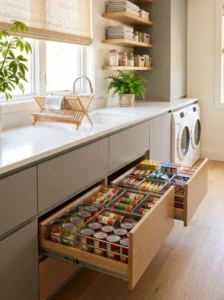
Rather than open shelving or swinging cabinet doors, deep pull-out drawers installed beneath a laundry counter keep pantry goods completely hidden while still being easy to access. This layout borrows directly from kitchen pantry drawer systems, adapted for a laundry room’s slightly different proportions and needs.
This works best in rooms with at least fifteen inches of clearance beneath the counter for the drawer boxes and slides. Soft-close hardware is worth the extra cost here, since a laundry room sees frequent daily use and cheap slides tend to wear out faster under that kind of traffic. Divide the drawers by category — one for canned goods, one for snacks, one for cleaning supplies — so the system stays organized rather than becoming one deep, jumbled bin.
Avoid overloading a single drawer with too much weight, which strains the slides and can cause sticking over time. This is a layout that costs more upfront than open shelving, but it keeps the room looking streamlined, which matters a lot in a laundry space that’s often visible from a hallway or mudroom entrance.
11. Corner Pantry with Lazy Susan-Style Shelving
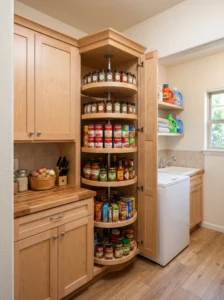
A rotating, lazy Susan-style shelving unit tucked into an unused corner solves the classic problem of corner storage being hard to reach. Instead of digging into a dark, awkward space, you spin the shelf around to bring items to the front, which works especially well for smaller pantry goods like spice jars, canned soups, or snack boxes.
This layout suits laundry rooms with an underused corner that isn’t quite large enough for standard shelving or a full closet. Circular or D-shaped rotating trays fit most corner cabinet frames, and a smooth bearing mechanism matters more than people expect — a cheap, sticky rotation defeats the entire purpose fairly quickly.
Keep heavier jars closer to the center of the rotating tray rather than the edges, since edge-weighted loads can throw off the spin over time. This isn’t a huge-capacity solution compared to full shelving, but for an oddly shaped corner that would otherwise sit empty, it’s a genuinely clever way to reclaim function from awkward geometry.
12. Butler’s Pantry Style Layout with a Prep Counter
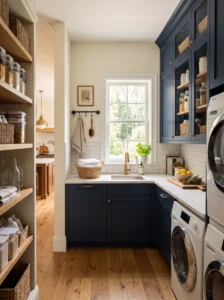
For larger laundry rooms, a butler’s pantry approach adds a small prep counter alongside the pantry shelving, creating a secondary workspace that can double for folding laundry, wrapping gifts, or prepping food overflow from a busy kitchen. This layout treats the room less like a utility closet and more like a genuine extension of the kitchen.
This works best in homes with a laundry room directly adjacent to the kitchen, since the butler’s pantry concept relies on that close connection to feel useful rather than redundant. A stretch of counter, ideally three to four feet long, paired with upper and lower cabinets, gives the room real functional depth. Choose a countertop material that matches or complements the kitchen’s finishes so the two spaces feel connected rather than mismatched.
A small sink is a nice addition if plumbing allows, though it’s not essential. The biggest mistake in this layout is trying to cram in too much cabinetry and losing the open counter space that makes the butler’s pantry concept work in the first place — restraint matters here more than maximizing storage.
13. Vertical Pull-Out Cabinet for Spices and Canned Goods
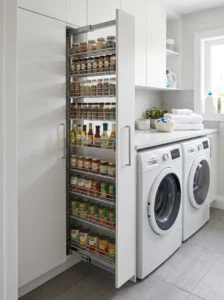
A narrow, vertical pull-out cabinet — sometimes called a spice pantry or canned goods tower — fits into gaps as slim as six inches, making it one of the most space-efficient pantry solutions available for a tight laundry room. Shallow shelves on both sides of the pull-out hold small jars and cans that would otherwise need a much bulkier cabinet to store properly.
This layout works particularly well next to a washer or dryer where a few inches of leftover space exist but aren’t wide enough for anything else. Full-extension slides matter a lot here, since a partial pull-out leaves items at the back nearly impossible to reach without removing the whole unit.
Keep the heaviest cans toward the bottom to prevent tipping when the cabinet is pulled fully open. This is a layout best suited to smaller pantry categories — spices, canned goods, small condiment jars — rather than bulkier boxed goods, which simply don’t fit the narrow shelf depth. For the right items, though, it’s a remarkably efficient use of a sliver of space.
14. Glass-Front Cabinets for a Display-Style Pantry
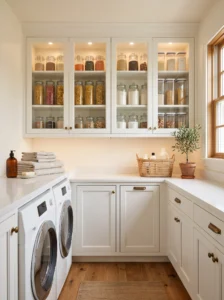
Swapping solid cabinet doors for glass-front ones turns pantry storage into something closer to a design feature, letting neatly arranged jars and canisters double as visual interest in an otherwise purely functional room. This layout leans decorative, and it works best when the pantry goods themselves are transferred into matching containers rather than left in their original packaging.
This suits laundry rooms that get regular foot traffic or visibility from an adjoining hallway, since a glass-front pantry wall becomes something of a focal point rather than staying hidden away. Frosted or seeded glass offers a middle ground for anyone who likes the look but doesn’t want every can and box fully visible at all times.
Consistency is everything here — mismatched jars and half-used boxes behind glass look cluttered fast, while uniform canisters look intentional. The real investment in this layout isn’t the cabinetry itself but the matching storage containers, which can add up in cost. It’s a layout that rewards a bit of ongoing tidiness more than most others on this list.
15. Mudroom-Laundry-Pantry Combo Layout
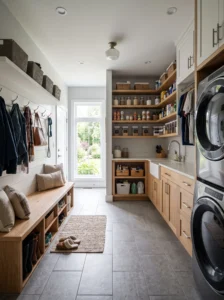
In homes with a mudroom directly connected to the laundry area, extending pantry storage into that shared space creates one continuous, multi-purpose zone near the back or side entrance. This layout works well for households that come in from outside carrying groceries, since the pantry ends up right along the natural path from the car to the kitchen.
Bench seating with cubbies below for shoes and bags can sit alongside open pantry shelving above, splitting the wall into practical zones without needing separate rooms for each function. Durable flooring — tile or sealed concrete rather than carpet — matters here since mudrooms deal with more dirt and moisture than a typical laundry room alone.
Keep pantry shelving a reasonable distance from the entry door itself, since direct exposure to outdoor temperature swings when the door opens can affect certain stored goods over time. This layout takes real planning since three functions are sharing one footprint, but for households that use a mudroom entrance daily, it cuts down dramatically on extra trips through the house.
16. Narrow Reach-In Closet Converted Beside the Laundry Area

A shallow reach-in closet adjacent to the laundry machines, even one as narrow as eighteen inches deep, can be converted into a compact pantry with a few coats of paint and some adjustable shelving. This is one of the more budget-friendly layouts on this list since it typically reuses an existing closet rather than building new cabinetry from scratch.
This works well in older homes where a small linen or coat closet already sits near the laundry area but isn’t being used efficiently. Removing the existing door and replacing it with a curtain, a folding door, or nothing at all can make the space feel more open, especially in a laundry room that’s already tight on floor area.
Adjustable wire or wood shelving lets you customize spacing for everything from tall cereal boxes to short spice jars. The common mistake with a converted closet like this is leaving the original single center shelf in place, which wastes most of the closet’s vertical potential. A few extra shelves make a disproportionate difference in how much this small space can actually hold.
17. Open Shelving Ladder Unit Against a Blank Wall
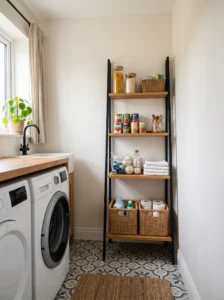
A freestanding ladder-style shelving unit, leaned against a blank wall rather than mounted, offers a flexible pantry solution for laundry rooms where drilling into the wall isn’t an option — a common situation in rentals. These units typically hold three to five shelves and can be moved or repositioned without any permanent installation.
This layout suits smaller laundry rooms with just enough floor space for a narrow footprint, usually under two feet wide. Wood or metal frames both work, though metal tends to hold up better against the occasional splash or humidity a laundry room sees. Because these units are freestanding, anchoring them to the wall with a simple safety strap is worth doing, especially in homes with kids or pets moving through the space.
Keep bulkier items on the lower shelves for stability, since a top-heavy freestanding unit is more prone to tipping than a wall-mounted one. This is a genuinely practical option for renters or anyone not ready to commit to built-in storage, and it can move with you if you relocate.
18. Rolling Cart Pantry Storage for Maximum Flexibility
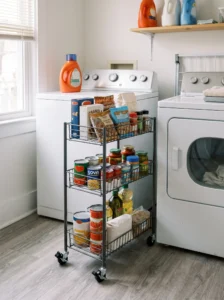
A slim rolling cart, similar to the type used beside a kitchen fridge, works just as well tucked beside a washer or dryer in a laundry room, holding overflow pantry goods that don’t fit in the main kitchen storage. Because it’s on wheels, it can be repositioned depending on what the room needs that day — pulled closer during meal prep, tucked away otherwise.
This layout is ideal for households still figuring out their storage needs or those in a rental where permanent fixtures aren’t an option. Multi-tier wire carts with a locking wheel mechanism keep the unit stable once it’s in place, which matters in a laundry room where foot traffic and moving baskets can otherwise nudge it out of position.
Keep lighter items on top and heavier canned goods on the bottom tier to keep the cart from tipping when rolled over an uneven threshold. This is one of the lowest-commitment options on this list, and it’s a smart way to test whether combining laundry and pantry storage actually suits your routine before investing in anything built-in.
19. Built-In Bench with Hidden Pantry Storage Underneath
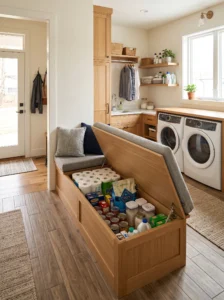
A built-in bench along one wall of the laundry room, with a hinged or lift-top seat, hides pantry storage beneath a spot that also functions as seating for folding laundry or pulling on shoes near a connected entryway. This dual-purpose layout works well in rooms tight on square footage, since the bench isn’t adding bulk beyond what a normal seat would take up anyway.
This suits laundry rooms with at least a few feet of unused wall space, ideally near a window or entry point where a bench feels natural rather than forced. A padded cushion on top makes the seating functional day to day, while the storage beneath handles bulkier, less frequently accessed pantry items like backup paper goods or large bags of pet food.
Line the interior with a breathable material to prevent musty smells building up in an enclosed space. The main drawback is accessibility — lifting a cushion and bench lid repeatedly isn’t ideal for items you need daily, so this layout works best for occasional-use backup stock rather than everyday pantry staples.
20. Appliance Garage Repurposed as a Pantry Nook
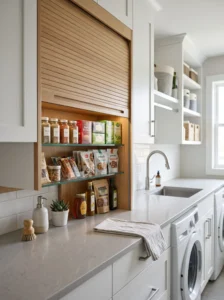
An appliance garage — the small cabinet with a roll-up or tambour door originally meant to hide a stand mixer or toaster — can be repurposed in a laundry room as a compact pantry nook for snacks, small jars, or single-serve items. The roll-up door keeps contents hidden without taking up the swing space a full cabinet door would need.
This layout works well on a countertop section, similar to the one built over a washer and dryer, giving quick access to grab-and-go pantry items without opening a full cabinet. Because the interior space is fairly shallow and compact, it’s better suited to smaller items than bulk boxes or large cans.
Choose a tambour door with smooth-rolling slats, since a stiff or sticking door becomes an annoyance fast in a space you’re opening daily. This is a smaller-scale layout compared to most on this list, but it’s a smart way to repurpose a cabinet style that’s often sitting unused or underused in a laundry room’s counter setup.
21. Peninsula Layout with Pantry Cabinets on the Reverse Side

In larger laundry rooms, a peninsula — a short run of cabinetry that juts out from the wall rather than lining it — can house laundry supplies and a folding counter on the front-facing side, while the reverse side, facing into the room, holds open or closed pantry shelving. This creates two distinct storage zones without needing two full walls.
This layout requires a genuinely spacious room, generally ten feet or wider, to accommodate a peninsula without making the space feel tight. Cabinetry on the reverse side should be shallower than the working laundry side, since a peninsula that’s too deep starts eating significantly into the room’s walking path.
Match the cabinet finish on both sides for a cohesive look, even though the contents and shelf spacing differ. The biggest planning mistake here is underestimating how much floor space a peninsula actually removes from the room — measure the full footprint, including door swings and appliance clearances, before committing to this layout.
22. Half-Wall Divider with Pantry Shelving Built In
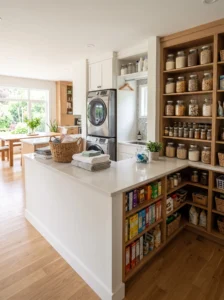
A half-wall, roughly counter height, dividing the laundry machines from a pantry zone on the other side creates a visual and functional separation without fully closing off either area. Shelving built into the divider itself — facing the pantry side — adds storage while the wall’s top surface can double as a folding or staging counter.
This layout suits open-concept laundry rooms connected to a mudroom or hallway, where a full wall would feel too closed-in but some separation is still useful. Open shelving on the divider works well for frequently grabbed pantry items, while the laundry side stays dedicated purely to the washer, dryer, and related supplies.
Keep the divider’s shelving shallow, generally under a foot deep, so it doesn’t intrude too far into either side’s usable floor space. This is a layout that photographs well and tends to appeal to anyone who wants a laundry room that still feels open and connected to adjacent spaces rather than boxed off.
23. Walk-Through Layout Connecting Kitchen and Pantry Zones
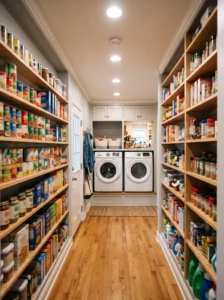
In homes where the laundry room sits directly between the kitchen and a garage or back entrance, a walk-through layout uses both side walls of that connecting hallway-like space for pantry storage, turning a simple pass-through into genuinely useful square footage. Shelving runs along both walls, with the washer and dryer typically at one end.
This works specifically in homes with that in-between architectural layout already in place — it’s not something you can create from scratch without a larger renovation. Shallow shelving, often no more than ten inches deep, keeps the walkway clear enough to pass through comfortably while still holding a meaningful amount of canned and boxed goods.
Good lighting along the full length of the walkway matters more here than in a typical laundry room, since this space often lacks natural light entirely. A row of flush ceiling fixtures spaced every few feet solves that evenly. Done well, this layout turns a purely functional hallway into one of the most efficient storage stretches in the whole house.
24. Stacked Washer and Dryer Freeing Floor Space for Pantry Shelving
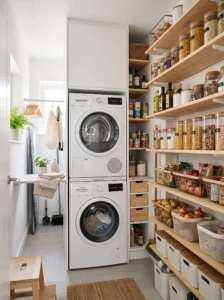
Switching from side-by-side machines to a stacked washer and dryer unit frees up an entire footprint of floor space, roughly two to three feet wide, that can be redirected entirely to pantry shelving. This layout is one of the more transformative options on this list since it fundamentally changes the room’s proportions rather than just rearranging what’s already there.
This works best when replacing older, non-stackable machines during a planned upgrade, since retrofitting a stacked unit into a space built for side-by-side machines sometimes requires electrical or venting adjustments. Once the floor space opens up, floor-to-ceiling shelving or a full cabinet run can go in without competing for room with the appliances at all.
Ventilation clearance around a stacked unit needs careful attention, since manufacturers specify minimum spacing that’s easy to overlook when you’re excited about the newly freed-up space. This layout involves a bigger upfront investment than most others here, but for a genuinely cramped laundry room, it can be the single change that makes a combined pantry layout actually feasible.
25. Hidden Pantry Behind the Laundry Room Door
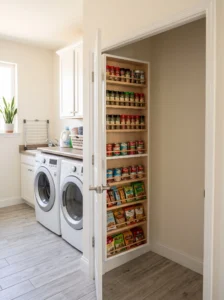
The wall space directly behind a laundry room’s entry door, once it’s swung open, is almost always empty — and a shallow pantry cabinet mounted there, sized to clear the door’s full swing, adds storage that’s essentially invisible until you walk into the room. This layout works in nearly any laundry room with a standard swinging door.
Shallow cabinets, no more than six to eight inches deep, fit this space without interfering with the door’s motion. This depth suits smaller items best — spice jars, canned goods, snack packets — rather than bulky boxes. A cabinet with a slim profile and simple hardware keeps the look clean rather than bulky.
Measure the door’s full swing arc carefully before mounting anything here, since even an inch of miscalculation means the door catches on the cabinet every time it opens. This is a small-capacity layout compared to most others on this list, but it makes use of space that would otherwise sit completely empty, which counts for something in a smaller home.
26. U-Shaped Layout with Pantry Wrapping Three Walls
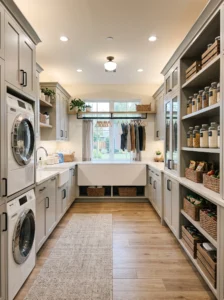
For laundry rooms large enough to support it, a full U-shaped layout wraps cabinetry and shelving around three walls, dedicating one wall to the washer and dryer, a second to a folding counter and hanging rod, and the third entirely to pantry storage. This is the most comprehensive layout on this list, functioning almost like a small combined utility room and walk-in pantry.
This requires a genuinely large footprint, typically at least eighty square feet, to avoid the room feeling closed in with cabinetry on every side. Consistent cabinet styling across all three walls keeps the room feeling unified rather than like three separate storage systems crammed together. A center light fixture, paired with under-cabinet lighting along the pantry wall, keeps every corner usable rather than shadowed.
The biggest risk in a U-shaped layout is over-cabinetizing the room to the point where it feels more like a storage closet than a functional space to move through. Leaving a clear walking path, generally at least four feet across the open end of the U, keeps the room feeling spacious even with three walls of storage surrounding it.
Comparison Table: Combined Pantry-Laundry Layout Options
| Type | Best Use | Material | Style/Vibe | Difficulty Level |
|---|---|---|---|---|
| Countertop over washer/dryer | Everyday folding plus upper pantry storage | Butcher block or laminate | Streamlined, kitchen-like | Moderate |
| Sliding barn door closet | Dedicated pantry in a space-tight room | Wood door with metal track | Farmhouse, rustic | Moderate |
| Rolling cart storage | Flexible, movable overflow storage | Coated wire or metal | Casual, practical | Easy |
| Floor-to-ceiling built-in cabinet | Maximum vertical dry goods storage | Wood or laminate cabinetry | Custom, polished | Hard |
| Glass-front display cabinets | Visible, styled pantry storage | Wood frame with glass panels | Decorative, curated | Moderate |
| U-shaped three-wall layout | Full combined utility and pantry room | Mixed cabinetry and shelving | Comprehensive, built-in | Hard |
How to Choose the Right Combined Layout for Your Space
The right layout depends less on which idea looks best in photos and more on the actual dimensions and daily habits of your household. Start by measuring the room honestly — not just the floor area, but ceiling height, door swings, and appliance clearances, since several of the layouts above only work with specific minimum measurements. A U-shaped layout that needs eighty square feet simply won’t work in a six-by-eight room, no matter how appealing it looks.
Material choice matters more in a laundry room than in a typical kitchen pantry, since humidity and heat from the dryer are constant factors. Sealed wood, laminate, and metal all hold up better than raw or unfinished materials, which can warp or develop a musty smell over time in a room that regularly deals with moisture. Ventilation around any storage near the dryer vent is worth double-checking, since trapped heat can affect certain pantry goods stored too close.
On durability, hardware quality is often the deciding factor between a system that lasts and one that starts failing within a year. Soft-close drawer slides, sturdy shelf brackets, and a properly rated barn door track all cost a bit more upfront but save you from dealing with sagging shelves or sticking doors down the line.
Budget realistically, and don’t assume the most expensive option is automatically the best fit. A rolling cart or a converted reach-in closet can solve the same basic problem as a full built-in system for a fraction of the cost, and both are reversible if your needs change. The real mistake to avoid is committing to a large built-in layout before living with the room for a while and understanding how you actually use it day to day — plenty of homeowners regret going big before testing a smaller, flexible setup first.
Final Thoughts
Combining a pantry with a laundry room comes down to matching the right layout to the room you actually have, not the room you wish you had. A tiny galley-style space calls for a very different approach than a larger room with room to spare for a full U-shaped build-out, and trying to force a big layout into a small footprint usually backfires.
Start with the low-commitment options if you’re not sure yet — a rolling cart, open shelving, or a converted closet can all be adjusted or undone easily if the setup doesn’t end up working the way you hoped. Save the bigger investments, like built-in cabinetry or a stacked washer-dryer conversion, for once you’ve got a clear sense of how the combined space actually functions in daily life. Either way, a laundry room doing double duty as a pantry can genuinely simplify a household’s routine, cutting down on extra trips and keeping bulk goods somewhere sensible instead of scattered across the house.
Frequently Asked Questions
Is it sanitary to store food in a laundry room?
Yes, as long as the storage area stays reasonably dry and isn’t directly exposed to detergent spills or dryer lint. Sealed containers and a bit of distance from the washer and dryer themselves are enough to keep pantry goods perfectly safe in most laundry rooms.
How much does a built-in pantry cabinet in a laundry room typically cost?
Costs vary widely depending on materials and size, but a basic built-in cabinet often starts around a few hundred dollars for materials alone if installed by a confident DIYer, while a fully custom cabinetry run installed by a professional can run well into the thousands.
Will humidity from the dryer damage stored pantry items?
Sealed containers largely protect against this, but items stored in cardboard boxes directly beside the dryer over long periods can be affected by heat and occasional moisture. Keeping a few inches of clearance from the dryer vent and using airtight bins solves most of this concern.
What’s the easiest layout to try without a big investment?
A rolling cart or an open shelving unit are both low-cost, low-commitment options that require no permanent installation. They’re a smart way to test whether a combined pantry-laundry setup actually fits your routine before investing in built-in cabinetry.
How do I keep laundry supplies and pantry goods from getting mixed up?
Dedicating separate zones — different shelves, cabinets, or baskets — for each category, and labeling clearly, keeps the two from blending together. Mixing detergent pods and canned goods on the same open shelf is a common and avoidable mistake.
Can a small laundry room realistically fit a pantry too?
Yes, though the smaller the room, the more it matters to choose a compact, space-efficient layout like a pull-out cabinet, a narrow vertical unit, or shelving above the machines rather than a full built-in wall of cabinetry.
How often should pantry shelving in a laundry room be cleaned?
A quick wipe-down every month or two helps manage the dust and occasional lint that drifts through a laundry room more than it would in a kitchen. Checking for expired goods on the same schedule keeps the pantry side of the room from becoming forgotten storage.
What’s the biggest mistake people make combining these two spaces?
Underestimating how much clearance is needed for both appliance doors and cabinet or drawer fronts to open at the same time. A room that looks fine on paper can end up feeling cramped in practice if walking space and door swings weren’t accounted for during planning.