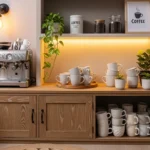
If your kitchen barely has room for a coffee maker, let alone a proper pantry, you already know the daily headache: cans sliding off shelves, snack bags crammed behind cereal boxes, and that one drawer nobody wants to open because something might fall out. Small kitchens don’t come with small grocery lists, and that mismatch is where most storage frustration starts.
Here’s the part most articles skip: a tight kitchen doesn’t actually need less storage design, it needs smarter storage design. A galley kitchen with 4 square feet to spare can hold more usable pantry space than a mid-size kitchen with a wasted corner cabinet — the difference comes down to how the vertical space, door space, and awkward gaps get used. Most homes are sitting on unused storage real estate without realizing it.
This list pulls together ideas that actually hold up in daily use, not just in styled photos. Some are quick weekend projects, others are simple habit shifts, and a few involve buying the right organizer instead of a random one from a big-box store aisle. By the end, you’ll have a practical menu of options to match your kitchen’s specific pinch points, along with a comparison table, a short buying guide, and answers to the questions people ask most before they commit to any of these.
1. Turn Your Pantry Door Into Storage Real Estate
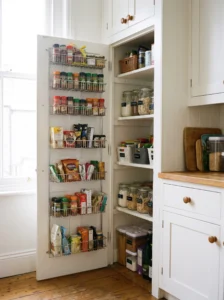
The back of a pantry or cabinet door is one of the most overlooked spaces in any kitchen, and it’s usually sitting there completely empty. Over-the-door racks with multiple tiers can hold spice jars, packets, foil boxes, or even small canned goods, instantly freeing up shelf space for bulkier items.
This works best on solid pantry doors or the inside of a broom closet, since flimsy cabinet doors can sag under too much weight over time. Stick to lightweight racks made of wire or thin metal, and avoid loading them with heavy glass jars — plastic containers or lightweight boxes are safer long-term. Measure the door’s clearance before buying, since some racks stick out far enough to block shelves from closing properly.
A wire rack in a soft white or matte black finish tends to disappear visually against most door colors, which matters if your pantry door is visible from the kitchen. One practical note from actual use: label the bins on door racks, because items stored at eye level get forgotten just as easily as items stored in the back of a deep shelf. This single change often reclaims 10 to 15 percent of a small pantry’s total capacity without touching a single existing shelf.
2. Install Adjustable Shelving Instead of Fixed Shelves
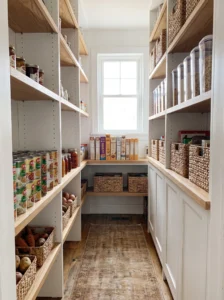
Fixed shelves are the biggest reason small pantries feel inefficient. A shelf built for cereal boxes wastes half its height when you’re storing canned soup, and a shelf sized for cans leaves cereal boxes toppling over on the shelf above.
Adjustable shelving — whether it’s a full shelving unit or simple pegboard-style shelf tracks — lets you reconfigure the space as your grocery habits change. This matters most in narrow reach-in pantries where every inch of vertical space needs to earn its keep. Look for shelving in melamine, coated wire, or solid wood depending on your budget; wire shelves are lighter and cheaper but show gaps between items, while solid shelves look cleaner but need more support brackets.
Install shelf pins or shelf track systems rather than relying on cheap plastic clips, which tend to give way under the weight of stacked cans. Keep shelf spacing tighter near the bottom for heavy items and looser toward the top for tall boxes and bins. Anyone who’s rearranged a pantry around a new air fryer box knows the relief of having a shelf that can simply move up two inches instead of forcing a full reorganization. This is one of those upgrades that pays off every single week, not just on move-in day.
3. Use Stackable, Uniform Storage Bins
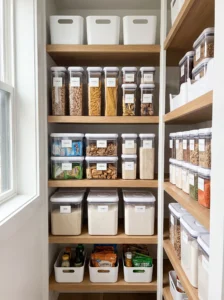
Mismatched cereal boxes, snack bags, and grocery packaging are the real reason small pantries look cluttered even when they’re not overstuffed. Transferring dry goods into uniform bins or canisters instantly creates visual order and often frees up real physical space, since bins stack far more efficiently than boxes.
This idea earns its keep in pantries where shelf depth is limited, since uniform containers can be pushed flush against the back wall without wasted air pockets. Clear acrylic or glass bins let you see contents at a glance, while opaque bins in white or bamboo tones create a calmer, less busy look if your pantry doors stay open often.
Choose bins based on your actual grocery habits rather than what looks nice — a household that buys in bulk needs taller, wider bins, while a smaller household does better with a mix of sizes. Label everything, since identical bins without labels create a new kind of confusion. A common mistake is buying bins before measuring shelf height, which leads to lids that won’t close or bins that don’t fit under the shelf above. Once dry goods are decanted, refilling becomes a five-minute task instead of a drawer-digging search every time you cook.
4. Add a Pull-Out Pantry Cabinet Next to the Fridge
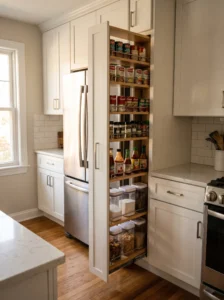
That narrow, often-wasted gap next to a refrigerator is a quietly overlooked secret in small kitchen design. A slim pull-out pantry cabinet, sometimes just 6 to 10 inches wide, can slide into that space and hold an entire shelf’s worth of canned goods, spices, or snack items.
This works especially well in kitchens where a full pantry closet isn’t an option and cabinet space is already maxed out. Choose a unit with multiple wire or wood shelves and smooth-gliding drawer slides rated for at least 100 pounds, since a flimsy slide mechanism will fail within a year of daily use. Measure the gap carefully, accounting for baseboards and any trim, before ordering.
Because these units are narrow and deep, organize them by category from front to back rather than side to side, so nothing gets lost at the rear. A soft-close mechanism is worth the extra cost here, since a narrow cabinet slammed shut repeatedly will loosen over time. People who’ve added one of these often say the same thing: it barely looks like storage until you open it, and then it’s obvious how much dead space was sitting there unused. It’s a strong option for kitchens where floor space is the real constraint, not wall space.
5. Mount Magnetic Spice Tins on the Fridge or Cabinet Side
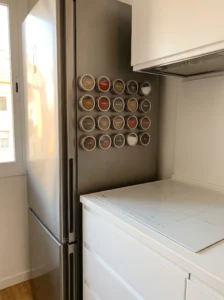
Spice storage eats up a disproportionate amount of shelf space for how little it actually holds. Magnetic spice tins solve this by moving spices off the shelf entirely and onto the side of a refrigerator, a cabinet, or a metal backsplash panel.
This idea works best in kitchens where the fridge sits close to the stove, keeping spices within arm’s reach while cooking. Choose tins with a secure magnet strength — cheaper ones tend to slide down or fall off over time, especially once they’re full. Stainless steel or matte-painted tins tend to look intentional rather than makeshift, and clear tops let you identify spices without lifting the lid.
Avoid placing tins near direct stove heat, since prolonged heat exposure degrades spice flavor faster than normal shelf storage. Label the tops rather than the sides, since side labels disappear once tins are packed close together. This is a low-cost fix, often under the price of a single organizer bin, and it solves two problems at once: shelf clutter and the annoying habit of losing small spice jars behind larger pantry items. It won’t work for households with a large spice collection, but for a starter set of 10 to 15 spices, it’s hard to beat.
6. Use Tiered Shelf Risers for Canned Goods
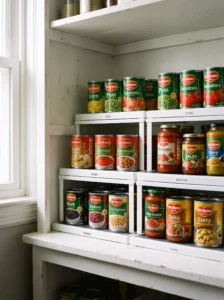
Canned goods are notorious pantry space-wasters because most people stack them in rows that hide everything behind the front can. Tiered shelf risers solve this by angling rows upward so every can is visible and reachable without digging.
This works particularly well on lower pantry shelves where cans tend to accumulate, and it prevents the common problem of forgotten cans expiring in the back row. Metal risers hold up better than plastic ones under the weight of multiple canned rows, and a slightly textured surface prevents cans from sliding forward unexpectedly when the shelf is bumped.
Measure shelf depth before buying, since risers designed for deep shelves will leave a gap at the front on shallower ones, and vice versa. Group cans by type on each tier — vegetables on one level, soups on another — so meal planning doesn’t turn into a can-by-can inventory check. One thing worth mentioning from real use: risers make it obvious at a glance when you’re running low on something, which cuts down on duplicate grocery purchases far more than any labeling system does on its own.
7. Build a Vertical Baking Sheet and Tray Divider
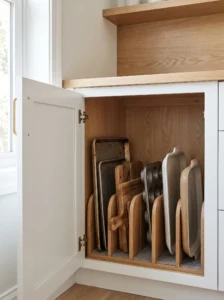
Baking sheets, cutting boards, and trays are some of the most awkward items to store in a small kitchen because they’re flat, oversized, and don’t stack cleanly with anything else. A vertical divider — either a dedicated organizer or a simple tension rod setup — lets these items stand upright instead of forming a leaning tower that topples every time you reach for the bottom sheet.
This idea is best suited to a base cabinet near the oven or a narrow gap between the pantry and a wall. Wire dividers are cheap and easy to install, while wood or bamboo dividers look more finished if the cabinet is visible. Space the dividers no more than 2 inches apart for thin sheets and trays, and slightly wider for cutting boards or muffin tins.
Avoid mixing extremely heavy cast iron pans into the same vertical slots as lightweight trays, since the imbalance can cause tipping. A rubber or felt strip on the base of each slot prevents metal-on-metal scraping noise, which matters more than people expect once it’s a daily annoyance. Once trays are stored vertically, grabbing the right one takes seconds instead of the usual cabinet excavation, and it noticeably reduces dents and scratches from stacking.
8. Install a Slim Rolling Cart as a Mobile Pantry
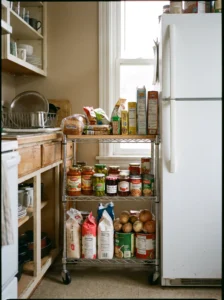
When there’s no room for a built-in pantry at all, a slim rolling cart can function as a movable overflow pantry that tucks into whatever gap is available — beside the fridge, at the end of a counter, or in a corner near the table. Its mobility is the real advantage here: it can be pulled out for full access and pushed back into a tight footprint the rest of the time.
This solution shines in apartments, rental kitchens, or older homes where a pantry closet was never part of the original layout. Look for a cart with 3 to 4 tiers and locking caster wheels, since carts that roll unexpectedly become a hazard in a busy kitchen. Metal wire carts are more affordable and better ventilated, which matters for items like bread or potatoes, while wood carts offer a warmer look but hold less airflow.
Keep heavier items on the bottom tier to lower the center of gravity, and reserve the top for items used daily. A common mistake is overloading the top shelf, which makes the cart tip-prone when rolled over an uneven floor transition. For renters especially, this idea offers real pantry function without a single drilled hole, and it moves with you when you move out.
9. Use Clear Stackable Drawers Inside Deep Cabinets
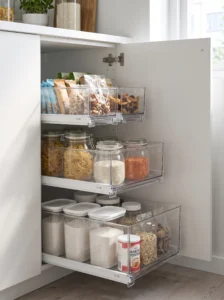
Deep cabinets without shelves are notorious for swallowing items whole — you can see the front row, but everything behind it might as well not exist. Clear stackable drawers solve this by breaking that deep void into individual, sliding-access compartments that pull forward like a filing cabinet.
This idea works best in base cabinets that currently hold snack bags, small boxes, or bulk dry goods in loose piles. Acrylic drawers let you see contents without opening anything, which saves real time during meal prep. Choose drawers with a weight rating suited to what you’re storing — flour and sugar are heavier than they look, and cheap drawers can bow or crack under sustained weight.
Stack no more than three drawers high unless the cabinet includes shelf supports, since an unsupported stack of filled drawers can become unstable. Label the drawer fronts rather than relying on visibility alone, since stacked clear drawers can create a slight visual blur when viewed from an angle. Anyone who has clawed through a deep cabinet looking for taco seasoning knows exactly how much friction this idea removes from an ordinary Tuesday dinner.
10. Add a Fold-Down Table Shelf for Prep and Storage Overlap
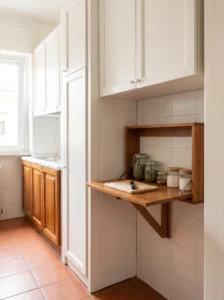
Small kitchens often force a choice between counter space and storage space, but a fold-down shelf mounted to a pantry wall or cabinet side can serve both roles at different times of day. Folded up, it holds small jars or canisters like a mini shelf; folded down, it becomes an extra prep surface.
This works well in narrow kitchens where counter space runs out fast during cooking, particularly near a pantry or utility closet wall. Choose a shelf with a sturdy folding bracket rated for at least 20 pounds if you plan to use it as a working surface, not just light storage. Wood shelving in a stained or painted finish blends more naturally into a kitchen wall than raw plywood, which can look unfinished.
Mount it at counter height so it lines up visually with existing surfaces, and avoid placing it directly above a walkway path where it could become a bump hazard when folded down. This idea rewards kitchens that need flexibility more than fixed storage, and it’s one of the few pantry solutions that actively helps during active cooking rather than just before or after.
11. Use Under-Shelf Wire Baskets for Bagged Snacks
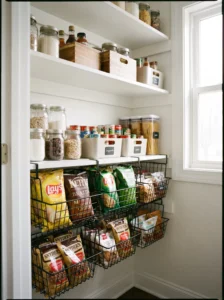
Bagged items — chips, pretzels, dried fruit — are some of the hardest things to store neatly because they don’t stand up on their own and tend to slump into a shapeless pile. Wire baskets that hook underneath an existing shelf create a second storage layer without giving up any existing shelf space.
This idea is ideal for pantries with tall gaps between shelves, since it fills otherwise wasted vertical air with almost no installation effort. Choose baskets with a slide-out or pull-forward design so bags in the back aren’t hidden behind bags in the front. Coated wire in black or bronze tones tends to look more deliberate than raw galvanized wire, which can look unfinished in an open pantry.
Check the shelf thickness before buying, since some hook-style baskets only fit shelves within a specific thickness range. A minor but real annoyance to avoid: overfilling one basket while leaving another empty, which throws off the shelf’s balance and can cause the basket to swing slightly when items are removed. Households with kids often find this one of the fastest wins on the list, since snack access becomes obvious and self-serve almost immediately.
12. Convert a Coat Closet Into a Pantry Extension
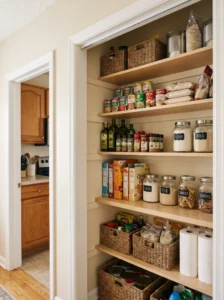
If your kitchen pantry is maxed out but there’s a hall closet or coat closet nearby, converting even part of it into overflow pantry space can solve a storage shortage without any construction. This works especially well in older homes where kitchens were built small relative to modern grocery habits.
The best candidates are closets within a few steps of the kitchen, since anything farther defeats the convenience of pantry storage. Install adjustable wire or wood shelving rather than relying on a single closet rod, and consider removing the door entirely or swapping it for a curtain if space is tight enough that a swinging door becomes an obstacle.
Keep frequently used items on shelves at eye level and reserve the floor and top shelf for bulk or rarely used goods. A mistake worth avoiding: converting the whole closet without keeping any coat or utility storage elsewhere, since that often creates a new problem to solve six months later. This idea takes more effort than most on this list, but it can add 30 to 50 percent more storage capacity in homes where the kitchen itself has hit a hard physical limit.
13. Use a Lazy Susan in Deep Corner Cabinets
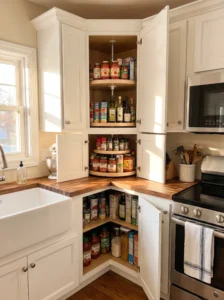
Corner cabinets are some of the most poorly used spaces in any kitchen, small or large, because their depth makes it nearly impossible to reach items stored toward the back. A lazy Susan solves this by rotating everything into reach instead of requiring a full-arm reach into a dark corner.
This idea is best suited to base cabinets in an L-shaped kitchen layout, where a blind corner often exists behind the sink or stove run. Choose a two-tier lazy Susan for taller cabinets to maximize vertical use, and pick a material — wood, melamine, or wire — based on what you’re storing; wire suits cans and jars better since it’s easier to wipe clean of spills.
Measure the cabinet’s interior diameter carefully, since an oversized lazy Susan will scrape the cabinet walls and eventually stick or wobble. Keep taller items like oil bottles toward the center rotation point rather than the outer edge, where they’re more likely to tip during rotation. Anyone who’s used one after years without it usually says the same thing: the corner cabinet stops feeling like storage you forget exists and starts feeling like actual usable space.
14. Add Adhesive Hooks Inside Cabinet Doors for Small Tools
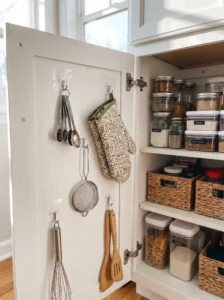
Small tools and accessories — measuring spoons, oven mitts, small strainers — often end up loose in a drawer, taking up space that could hold something bulkier. Adhesive hooks mounted inside a cabinet or pantry door give these items a fixed spot that doesn’t require a single screw or drill hole.
This works well in rental kitchens or for anyone hesitant to modify cabinetry permanently. Choose hooks rated for the actual weight of what you’re hanging — a heavy mitt or trivet needs a stronger adhesive strip than a lightweight spoon. Stick to matte black, white, or clear hooks depending on the door color, since shiny chrome hooks can look out of place on a painted door.
Clean and dry the surface thoroughly before applying adhesive hooks, since any residual grease from cooking splatter will cause early peeling. Avoid clustering too many hooks close together, since hung items can knock into each other when the door opens and closes. This is a five-minute fix that solves a surprisingly common drawer overflow problem, and it costs less than almost anything else on this list.
15. Use Label-Forward Glass Canisters for Baking Staples
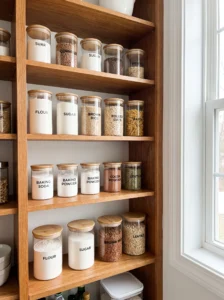
Flour, sugar, rice, and other baking staples take up a strange amount of pantry space when left in their original bags, which slump, tear, and rarely seal properly after the first use. Glass canisters solve the mess and also extend freshness by sealing out air and pantry moths far better than a folded-over bag ever will.
This idea earns its place on shelves at eye level or just below, where the visual order actually gets noticed and appreciated daily. Choose canisters with a wide mouth for easy scooping, and check the seal type — silicone gaskets outperform simple screw lids for keeping staples fresh over several months. Glass adds weight, so reinforce or check that shelf brackets can support a full set of five or six filled jars.
Group similar staples with matching canisters, but don’t force uniformity where it doesn’t fit your groceries — a household using specialty flours may need more variety in size than a set of six identical jars allows. A small caution here: never transfer flour into a canister without emptying and washing it between refills, since old residue can turn rancid and affect the new batch. Once set up, this idea makes baking prep noticeably faster since nothing needs to be untwisted, torn open, or wrestled with mid-recipe.
16. Install a Narrow Pull-Out Drawer Under a Cabinet’s Toe Kick
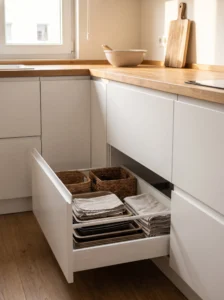
The toe kick — that recessed space at the very bottom of base cabinets — is almost always empty air, yet it runs the full width of a kitchen in most homes. A shallow pull-out drawer installed into this space can hold flat items like baking sheets, table linens, or even a step stool, all without touching existing cabinet storage.
This works best in kitchens that already have solid, non-cosmetic toe kicks, since some older cabinets have structural elements in that space that block installation. Professional installation is usually worth the cost here, since cutting into a toe kick incorrectly can affect cabinet stability. Choose a shallow drawer, typically no more than 4 inches tall, matched to your cabinet’s actual toe kick height.
Avoid using this space for heavy items like canned goods, since the drawer mechanism isn’t built for the same load capacity as a standard cabinet drawer. It’s best reserved for lightweight, flat, or rarely used items. This is one of the more involved projects on this list, but for kitchens that have exhausted every other option, it can unlock storage that most homeowners never even consider exists.
17. Use a Wall-Mounted Wire Grid for Frequently Used Jars and Tools
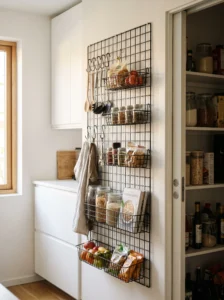
An empty stretch of wall near the pantry or stove is an easy target for a wall-mounted wire grid, which holds S-hooks, small baskets, and clipped-on jars for frequently used items. Unlike closed storage, this puts everyday ingredients on visual display, which works surprisingly well for households that cook often and want quick access over tidy concealment.
This idea suits kitchens with at least one open wall segment near the cooking or prep zone, since distance from the stove defeats the convenience factor. Choose a grid in a finish that matches existing hardware — matte black and brushed steel are the most common choices that blend into most kitchen palettes. Keep the grid’s mounting hardware rated for the combined weight of everything you plan to hang, since grids overloaded with heavy jars can pull away from drywall over time.
Reserve this space for items used several times a week, not for long-term storage, since visual clutter builds quickly if the grid becomes a catch-all. A small but real consideration: grease and cooking splatter reach open storage faster than closed cabinets, so anything hung here needs more frequent wiping down. Done well, this idea turns a blank wall into genuinely functional storage that also adds visual texture to a plain kitchen.
18. Hang Wire Baskets for Fresh Produce
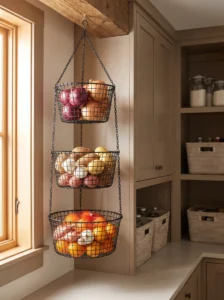
Onions, potatoes, and garlic don’t belong in a sealed bin — they need airflow, and a stacked wire basket system solves that while keeping counters clear. Tiered hanging baskets mounted under a shelf or bolted to a pantry wall give produce its own ventilated zone instead of letting it roll around a drawer or sprout in a dark cabinet corner.
This idea works best near the bottom of a pantry, since produce is heavier than most dry goods and benefits from staying close to the floor rather than swinging from an upper shelf. Choose baskets with a coated wire finish to prevent rust from occasional moisture, and space the tiers far enough apart that taller items like sweet potatoes aren’t crushed against the basket above.
Avoid hanging these near a heat source or in direct sunlight, since both speed up spoilage. Keep onions and potatoes in separate baskets rather than mixed together — stored side by side, they actually make each other spoil faster. A galvanized or black metal finish tends to suit most kitchens without clashing, and swing-style baskets that tilt forward make checking for spoiled items far easier than digging through a static pile. Once produce has a dedicated spot, it’s noticeably less likely to get forgotten and tossed later.
19. Set Up a Simple Labeling System Across Every Container
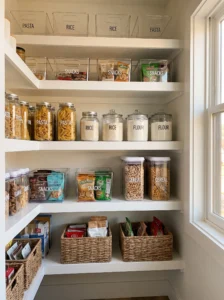
A pantry can be perfectly organized and still frustrate you daily if nothing is labeled, since identical bins and jars force a guessing game every time you reach for an ingredient. A basic label maker or a set of chalkboard tags fixes this fast, and it’s one of the cheapest upgrades on this entire list.
This works everywhere in a small pantry, but it matters most on bins, canisters, and any storage that isn’t naturally see-through. Stick to a consistent label style — same font, same placement, same size — rather than mixing handwritten notes with printed ones, since visual consistency is part of what makes a labeled pantry feel organized rather than makeshift.
Place labels on the front of containers at a slight downward angle if shelves sit above eye level, so they’re readable without tilting your head back. Avoid labeling only the lids, since lids get swapped or misplaced more often than people expect. A small but real payoff shows up during grocery trips: a labeled pantry makes it obvious at a glance what’s actually running low, which cuts down on the guessing that leads to duplicate purchases sitting unused in the back of a cabinet.
20. Add Battery-Powered LED Puck Lights to Dark Corners
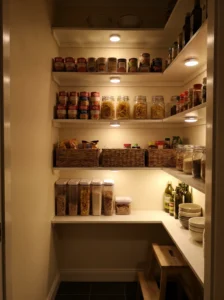
Even a well-organized pantry becomes hard to use if you can’t actually see what’s on the shelf, and small pantries are notorious for at least one dim corner that never gets enough light from a single overhead bulb. Battery-powered LED puck lights solve this without any electrical work, since they stick on with adhesive backing and run on replaceable batteries.
This idea is most useful on the underside of upper shelves, lighting directly down onto the shelf below rather than relying on light bouncing off a ceiling fixture. Motion-sensor versions are worth the small price difference, since they turn on automatically when the pantry door opens and switch off on their own, which matters in a space people tend to forget to light manually.
Choose a warm white tone rather than a stark blue-white light, since warm lighting tends to feel more natural in a food storage space and shows true colors on packaging better. Avoid placing lights directly behind tall items that will block the beam, and test placement before committing to adhesive, since repositioning later can damage paint or shelf finish. Anyone who’s fumbled for a can of beans in a dim corner knows how much friction this small fix actually removes from daily cooking.
21. Use Tension Rods to Divide a Narrow Cabinet for Trays
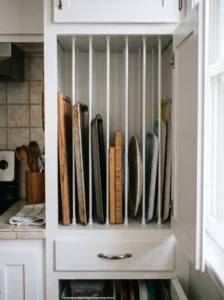
A cheap spring tension rod, the kind normally used for curtains, can be wedged vertically inside a narrow cabinet to create instant slots for baking sheets, cutting boards, and trays. It’s one of the lowest-cost fixes on this list, and it solves the same leaning-stack problem as a dedicated tray divider without requiring any hardware installation.
This works best in a narrow upper or lower cabinet that’s otherwise too shallow for regular shelving to be useful. Measure the cabinet’s interior width before buying a rod, and choose one rated to stay taut under light pressure, since a rod that slips will let trays lean and clatter against each other.
Position two or three rods with roughly two inches of space between each, adjusting based on how thick your trays and boards actually are. Rubber-gripped rods hold their tension better over time than smooth metal ones, which can slide loose after repeated use. A minor caution: don’t rely on this setup for heavy cast iron, since tension rods aren’t built for serious weight. For lightweight trays and boards, though, this is a five-minute fix that turns a chaotic, sliding stack into an organized, upright row.
22. Mount a Command Hook Organizer for Bags and Foil Rolls
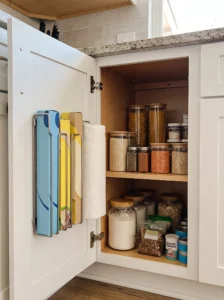
Boxes of foil, plastic wrap, and parchment paper are awkward shapes that rarely sit neatly on a shelf, and they tend to end up sliding around loose or getting crushed under heavier items. A small hook-and-bracket organizer mounted inside a cabinet door holds these rolls upright and out of the way, using door space that would otherwise sit empty.
This idea fits well inside a lower cabinet door near the stove or prep area, where foil and wrap get used most often. Choose an organizer with adjustable-width slots, since box sizes vary more than people expect between brands, and a fixed-width rack can leave narrower boxes rattling loose.
Adhesive-backed mounting works fine for lighter setups, but a couple of small screws hold up better over months of a door swinging open and shut daily. Keep the organizer low enough on the door that it doesn’t interfere with shelves inside the cabinet when the door closes. A small but genuine improvement here: once these rolls have a fixed spot, you stop buying a second box of foil because you couldn’t immediately find the first one buried behind a stack of dish towels.
23. Add a Small Turntable for Oils, Vinegars, and Condiments
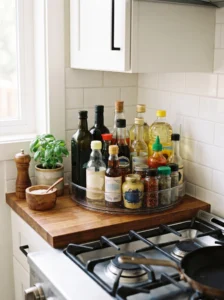
Bottles of oil, vinegar, and other condiments tend to multiply quietly until there’s a cluttered row blocking whatever’s behind them. A small countertop or shelf turntable keeps this cluster contained and spins the entire group into reach with one motion, instead of requiring you to move four bottles to get to the fifth.
This works well on a mid-height shelf or directly on a counter near the stove, wherever bottles get grabbed most during actual cooking. Choose a turntable sized to the shelf depth it’s sitting on — an oversized one will hang off the edge, while a too-small one won’t hold your full bottle collection without stacking.
A clear acrylic or stainless finish tends to look tidier than a plastic one that yellows over time, and a slightly raised lip around the edge keeps bottles from sliding off during rotation. Avoid loading a single turntable with drastically different bottle heights, since tall bottles can tip when the platform spins past an uneven load. This is a small addition, but it removes one of the more common daily annoyances in a working kitchen — the slow bottle shuffle that happens every time you reach for the one condiment stuck in back.
24. Repurpose a Bookshelf or Bar Cart as a Standalone Pantry
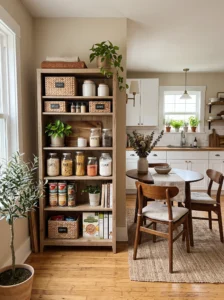
When there’s genuinely no more room to add storage inside the kitchen itself, a bookshelf or bar cart placed in an adjacent dining nook or hallway can function as an overflow pantry without needing any built-in installation. This works because it borrows square footage from a room that isn’t being fully used, rather than trying to squeeze more out of the kitchen.
This idea suits homes with an open-concept layout where a dining area or hallway sits within a few steps of the kitchen, since distance matters for daily convenience. A short, wide bookshelf holds canned goods and boxed items well, while a narrower bar cart suits bottles, snacks, or baking supplies better, depending on what’s overflowing.
Choose a finish that matches nearby furniture rather than kitchen cabinetry, since this piece is living outside the kitchen and should read as furniture, not as a mismatched appliance. Use baskets or bins on open shelves to keep the look tidy from the dining side of the room, and avoid overloading a cart’s wheels with anything too heavy to roll safely. This is one of the more visible solutions on the list, but for kitchens that have truly run out of internal space, it’s often the difference between constant overflow and a household that finally has enough room to breathe.
Comparison Table: Small Pantry Storage Options at a Glance
| Type | Best Use | Material | Style/Vibe | Difficulty Level |
|---|---|---|---|---|
| Over-the-door rack | Spices, packets, small cans | Wire, coated metal | Practical, minimal | Easy |
| Pull-out slim cabinet | Narrow gaps beside appliances | Wood, laminate | Built-in, seamless | Moderate |
| Stackable bins/canisters | Dry goods, bulk staples | Acrylic, glass | Clean, uniform | Easy |
| Rolling pantry cart | Overflow storage, rentals | Wire, wood | Flexible, casual | Easy |
| Lazy Susan | Deep corner cabinets | Wood, wire, melamine | Functional, tidy | Moderate |
| Toe kick drawer | Flat, lightweight items | Wood, metal slides | Hidden, space-saving | Advanced |
How to Choose the Right Pantry Storage for Your Kitchen
Start with scale before style. Measure the actual space you’re working with — shelf depth, door clearance, and cabinet height — before buying anything, since the single most common regret in pantry organizing is buying an organizer that almost fits. A half-inch miscalculation can mean a drawer that won’t close or a bin that leaves a shelf half-used.
Material choice matters more for pantries than most people expect. Wire holds up well in humid or splash-prone areas since it doesn’t trap moisture, but it shows gaps and doesn’t hide mismatched packaging. Solid wood or melamine looks more finished and hides clutter better, but it costs more and can warp if installed near a stove or dishwasher vent. Acrylic and glass containers offer visibility and a clean look, but they’re heavier and less forgiving if dropped.
Durability usually tracks with price, but not in a straight line — a mid-range wire shelf with a good weight rating often outlasts an expensive but flimsy decorative unit. Check weight capacity specifically for anything holding canned goods or glass jars, since this is where cheaper products fail first. Maintenance is worth thinking about too: open wire shelving needs more frequent wiping, while closed bins need occasional full washes to prevent buildup at the bottom.
On budget, spend where daily friction is highest — a well-built pull-out drawer or lazy Susan in your most-used cabinet is worth more than a full set of decorative bins that just look nice. Common buying mistakes include purchasing a full matching organizer set before testing whether the format suits your actual groceries, and choosing based on photos without checking real dimensions. A slower, more measured approach — solving one frustrating spot first — tends to avoid the expensive regret of a garage full of unused organizers that never quite fit.
Final Thoughts
Small pantries rarely need more square footage — they need better use of the footage already there. The ideas covered here range from five-minute fixes like adhesive hooks and magnetic spice tins to bigger weekend projects like toe kick drawers and closet conversions, and most kitchens will benefit from a mix rather than a single overhaul.
The best approach is usually to start with whatever frustrates you most on a daily basis. If you’re constantly digging through a deep, dark cabinet, a lazy Susan or stackable drawer system solves that specific pain point faster than a full pantry remodel would. If snacks are the daily chaos point, an under-shelf basket or door rack fixes that in under an hour.
None of these ideas require a full kitchen renovation, and most can be undone or adjusted if your household’s habits change. The goal isn’t a picture-perfect pantry — it’s a pantry that works without a daily fight to find what you need. Once the vertical space, door space, and awkward gaps are put to use, even a genuinely small kitchen can hold more than you’d expect, and it stops feeling like the space is working against you.
Frequently Asked Questions
How much weight can pantry door racks actually hold?
Most wire over-the-door racks are rated for 15 to 25 pounds total across all tiers, though this varies by brand and mounting hardware. Stick to lightweight items like spice packets and small jars rather than canned goods, and check the door hinge condition first, since a worn hinge will sag faster under added weight.
Are stackable bins worth it if I don’t buy in bulk?
Yes, though smaller households should choose smaller bin sizes rather than skipping the idea entirely. The main benefit isn’t capacity, it’s visual order and easier inventory tracking, which matters just as much in a small pantry with modest grocery volume.
Do lazy Susans work in shallow cabinets, or only deep corner ones?
They work best in deep cabinets, particularly blind corners, where reach is the actual problem. In shallow cabinets, a lazy Susan often wastes more space than it saves, so a simple shelf riser or bin system tends to work better there instead.
How often should pantry organizers be cleaned?
Wire and wood shelving benefits from a wipe-down every few weeks, especially near cooking areas where grease travels further than expected. Bins and canisters should be fully emptied and washed every few months, or immediately if any spill or moisture gets inside.
What’s the most budget-friendly upgrade on this list?
Adhesive hooks and magnetic spice tins are typically the cheapest options, often under the cost of a single dinner out, and both install in minutes without tools. They won’t solve major storage shortages, but they’re a low-risk way to test whether small changes make a noticeable difference.
Can renters use any of these ideas without violating a lease?
Most of them, yes. Rolling carts, adhesive hooks, over-the-door racks, and stackable bins require no drilling or permanent changes. Anything involving mounted shelving, toe kick drawers, or closet conversions should be checked against lease terms first, since those involve more permanent alterations.
How do I know if I’m overbuying organizers?
A good sign you’ve overbought is having empty or half-used bins sitting in storage themselves. Measure your actual pantry contents and buy for what you currently own, not for an idealized version of your groceries, and add pieces gradually as real gaps appear.
Is it better to prioritize looks or function in a small pantry?
Function first, always, especially in genuinely tight spaces where every inch counts. Style matters more once the basic storage problem is solved, and many of the ideas here — like uniform canisters or a matte wire grid — manage to deliver both without requiring a trade-off.