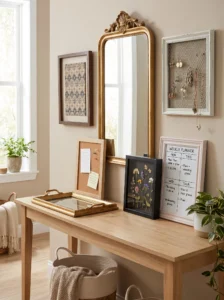
Most homes have a frame graveyard. It might be a closet shelf, a garage box, or the space under a bed where mismatched frames pile up after a move, a redecorating spree, or a photo that no longer suits the wall. They’re too nice to throw away and too dated to hang. So they sit there for years.
The mistake most people make is treating a frame as a container for a picture. Drop that assumption and a frame turns into something far more useful: a ready-made border, a flat tray, a shallow box, a mounting surface. The molding is already cut, mitered, and finished. All you have to decide is what goes inside.
Thrift stores, yard sales, and attic cleanouts make this a nearly free hobby. Even new frames from big-box stores cost much less than most finished decor pieces of the same size, which is why so many DIY projects start there.
Below are 16 creative ways to turn old frames into new decor, from a dry-erase planner and a jewelry holder to a serving tray and a small side table. Each idea covers where it works, which materials to use, and the mistakes that make projects flop. After the list you’ll find a comparison table, a buying guide for choosing the right frames, and answers to common questions. Grab the ugliest frame you own and start there.
1. Fabric or Wallpaper Scrap Art
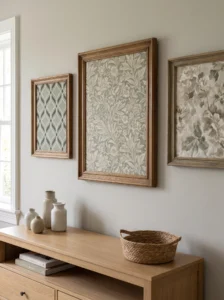
A leftover scrap of beautiful fabric or wallpaper turns a plain frame into instant wall art, and it costs close to nothing. This is the easiest project on the list, which makes it a safe place to begin.
Cut the material slightly larger than the opening, then mount it on cardboard or foam board with spray adhesive or double-sided tape. Iron fabric first. Wrinkles that seem minor on a table look dramatic on a wall.
Choose patterns that read from a distance: large florals, bold stripes, botanicals, or geometric prints. Tiny prints tend to blur into a flat color once they’re hung. Thin fabric can show the backing color through, so line it with plain white paper.
Hallways, nurseries, and spots above a console are good places for this. Group two or three frames in the same palette for a deliberate look, and keep them out of direct sunlight, which fades fabric over time.
One practical advantage: you can carry a sofa cushion print onto the wall, and the room suddenly looks coordinated without buying any new art.
2. Chalkboard Memo Frame
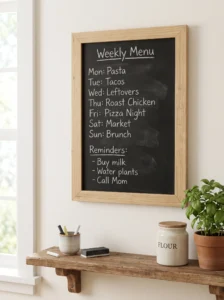
A chalkboard frame replaces the pile of sticky notes on your fridge, and it looks far better doing it. The frame does the styling, while the board handles the daily clutter of reminders and menus.
Remove the glass and paint the backing board with chalkboard paint, using two thin coats and letting each dry fully. Follow the cure time on the can before writing. Then rub the side of a chalk stick across the whole surface and wipe it off. This seasoning step prevents the first thing you write from ghosting forever.
Paint the frame in a contrasting color, such as sage around black or white around charcoal. Kitchens, entryways, and home offices are natural spots, hung at eye level near where people pass.
Avoid mounting it over a stove or sink, where steam and splatter smudge the surface. A shallow ledge or a small cup of chalk nearby keeps things within reach.
In daily use, a visible weekly menu cuts down on the usual “what’s for dinner” back-and-forth, which is a small win that adds up.
3. Jewelry Organizer With a Mesh Back
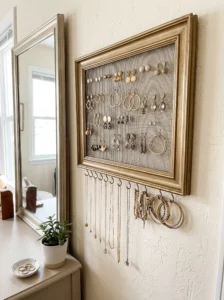
Earrings that vanish into drawers are a common frustration, and a frame with a mesh back fixes it neatly. Chicken wire, fine metal mesh, or even a piece of window screen works well, and each gives a slightly different look.
Remove the glass and backing, then staple the mesh tightly across the back of the frame. Hang earrings through the holes. Add small hooks along the bottom edge for necklaces and bracelets.
Choose a larger frame, around 16 by 20 inches, if you have a decent collection. Paint it in a metallic or neutral shade so the jewelry stands out. Gold or matte black frames pair well with most pieces.
Sharp wire ends are the main hazard. Fold the edges over and cover them with a thin strip of wood or strong tape, and wear work gloves while cutting.
Hang it inside a closet door or on a wall beside the mirror. Seeing everything at once means you actually wear the pieces you own, instead of reaching for the same three pairs.
4. Frame Serving Tray
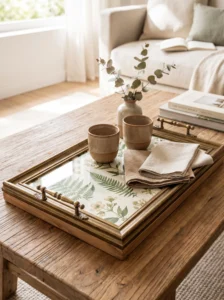
A frame with its glass intact makes a surprisingly good tray, and it takes less than an hour. The glass protects whatever you place beneath it, so you can swap the backing as often as you like.
Place fabric, wallpaper, a map, or sheet music behind the glass. Secure the sandwich with the frame’s original clips or points, and add a solid backer board. Screw cabinet handles into the short ends. Thin molding can crack under screws, so back each handle location with a small wood block glued inside.
Pick a frame at least 12 by 16 inches for a useful size. Wider, flatter frames hold more and stay steadier when carried.
Use it for breakfast in bed, a coffee table caddy, or a bar tray for glasses and bottles. Felt feet on the bottom keep it from scratching furniture.
Check glass edges for sharpness and replace cracked panes. For food service, place a washable liner on the glass, since cleaning around molding takes patience.
On a coffee table, a tray like this gathers remotes and coasters into one spot, which makes the whole surface look tidier.
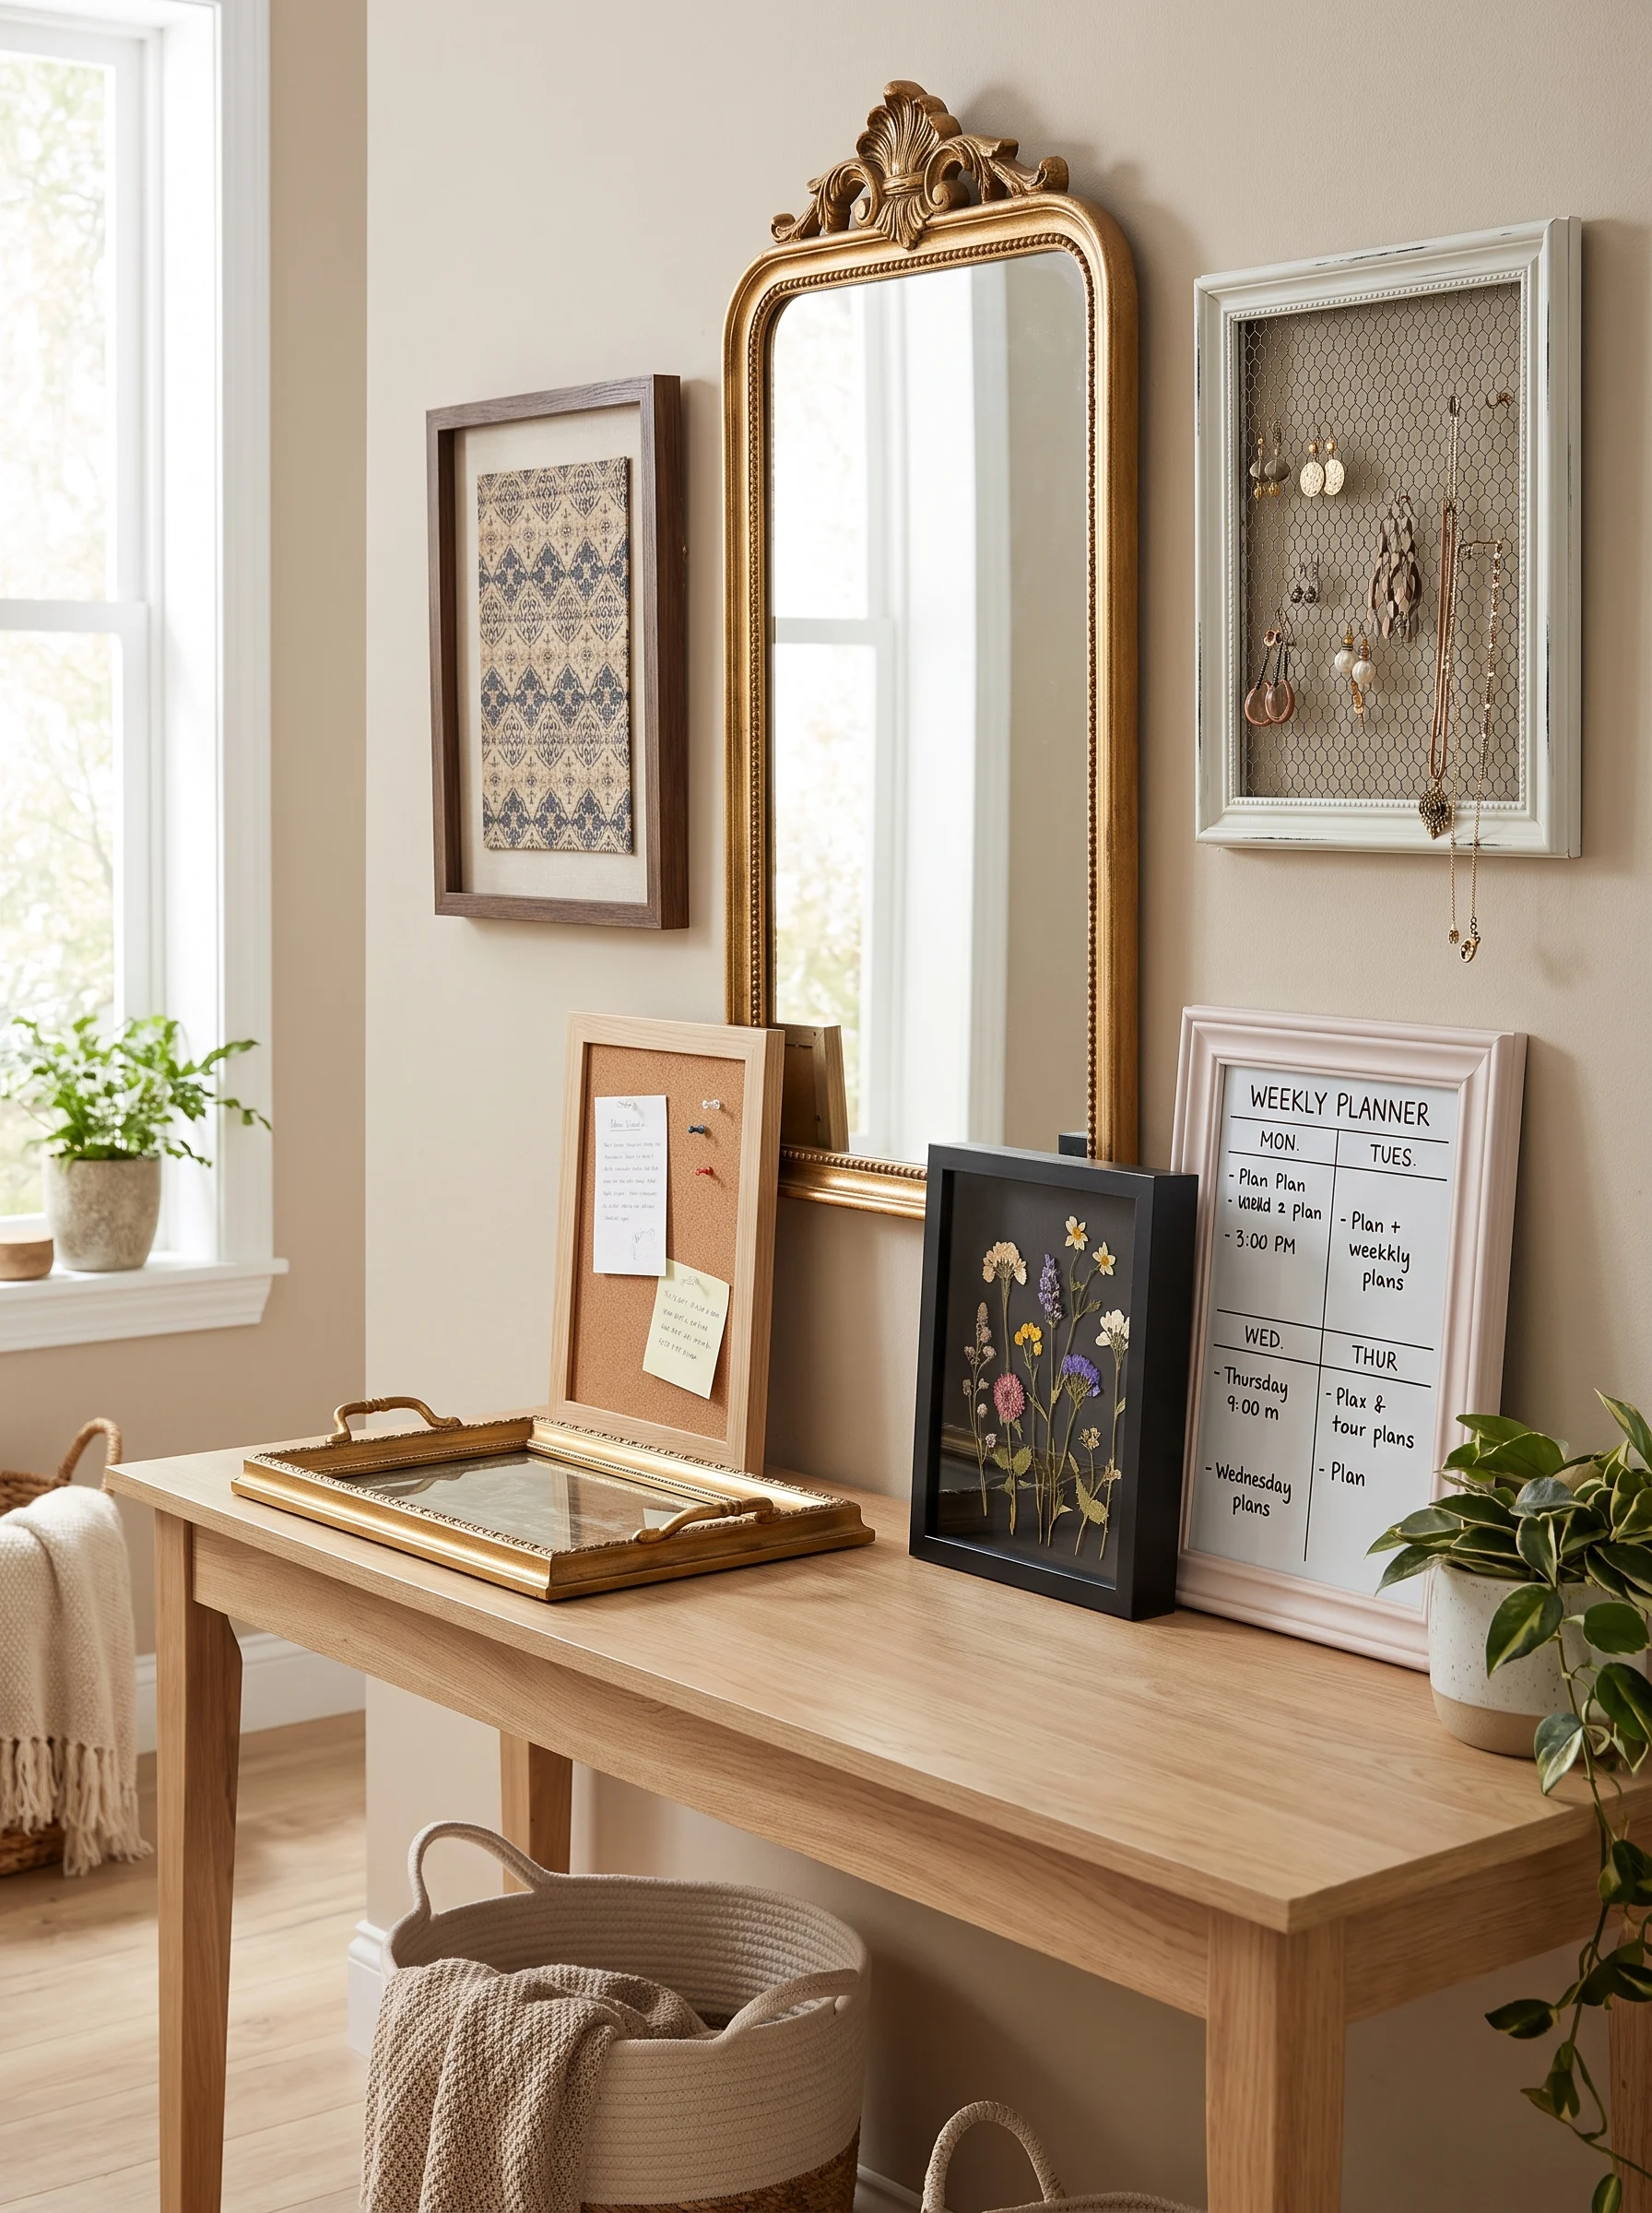
5. Dry-Erase Weekly Planner
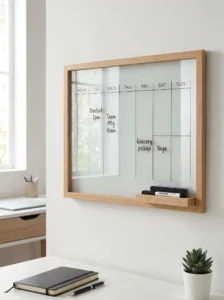
Glass is a good writing surface for dry-erase markers, so any frame with intact glass can double as a planner. Put a printed calendar, a patterned paper, or a fabric piece behind the glass, and write on top.
A weekly grid works better than a monthly one for most households, since the space is limited. Draw the grid lines with a fine permanent marker on the paper, not on the glass, so you can change layouts later.
Kitchens and home offices are the most useful locations. Hang the frame at eye level near where the family passes, and keep a marker on a small hook or in a cup beside it.
Wipe with a microfiber cloth soon after writing. Marker left on glass for weeks can ghost, particularly in sunny rooms.
Choose a frame that matches the room, such as warm wood in a farmhouse kitchen or slim black in a modern office. The planner then reads as decor, not clutter.
Families tend to check a wall planner without thinking about it, which cuts down on missed appointments and double-booked evenings.
6. Statement Mirror From an Ornate Frame
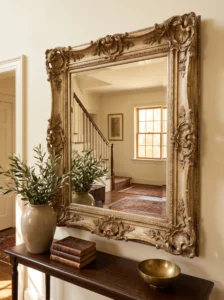
An ornate old frame holds a mirror better than almost anything new at the same price. The carved detail and gilded finish that look dated around a faded print look rich around a reflective surface.
Most glass shops cut mirror to custom sizes quickly, and the cost is usually modest. Measure the opening carefully, subtracting a tiny margin so the mirror fits without forcing. Secure it with the frame’s retaining tabs and a sturdy backing board.
Large frames work best, since a big mirror is where the effect lands. Hang one above a console, in an entryway, or opposite a window to bounce daylight deeper into the room.
Weight is the main concern. Mirror glass is heavy, so use proper wall anchors or hang from studs, and rated hardware, not a single nail. A thin frame can bow under the load, so add a rigid backing.
If the gilding looks too bright, a light wipe of dark wax in the crevices softens it and gives the frame a more natural, aged look.
7. One-Color Gallery Wall
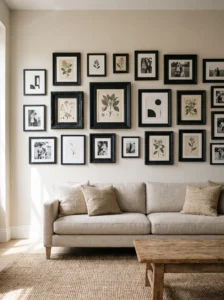
Mismatched frames look messy together, but painted a single color they read as one deliberate collection. This is the cheapest way to build a gallery wall from what you already own.
Remove the glass and artwork, clean the frames, and spray paint them in matte black, white, brass, or a deep color like forest green. Light coats, with the frames laid flat in a ventilated area, prevent drips. Let everything cure fully before handling.
Lay out the arrangement on the floor first, mixing sizes and shapes, and then trace each frame on paper to make templates. Tape the templates to the wall and adjust before putting a single nail in. Keep spacing around two to three inches between frames.
A sofa wall, a staircase, and a long hallway all suit this treatment. Choose art in a limited range of tones so the grouping holds together.
A common mistake is spraying frames with the glass left in. Remove it or mask it carefully.
Unified color gives permission to mix prints, photos, and objects without the wall feeling chaotic.
8. Pressed Flower Shadow Box
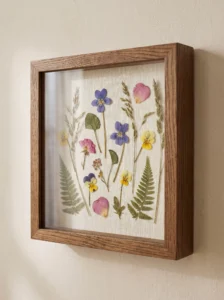
A bouquet that arrives once and fades can live on inside a frame. Pressed flowers on linen or heavy paper make soft, textured art that suits bedrooms, hallways, and small bathrooms.
Deep frames work best. If yours is shallow, add spacer strips of thin wood between the glass and backing so the flowers don’t get crushed.
Dry flowers completely before mounting. Pressing them in a heavy book for a few weeks prevents moisture from causing mold behind glass. Arrange the stems on a neutral background, and attach them with tiny dabs of clear glue or archival tape.
Neutral backgrounds like oatmeal linen or cream paper let the colors shine. Pair a single large bloom with a few smaller ones for a more natural composition instead of a perfect symmetrical layout.
Keep the frame out of direct sunlight. UV light fades flowers fast, and even a nice arrangement will dull within a season on a bright wall.
There’s also a personal angle: a pressed wedding bouquet or a garden’s first blooms become a memory you can actually see every day.
9. Entryway Key and Mail Organizer
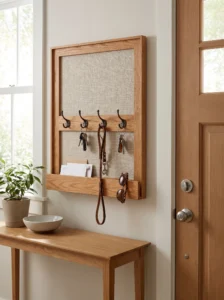
Dropping keys, mail, and sunglasses wherever there’s a flat surface is a habit that a frame can fix. Turned into a small organizer, it gives each item a spot near the door.
Swap the glass for a piece of cork, painted plywood, or a linen-covered board. Attach three to five hooks along the bottom for keys and leashes. Add a small wood ledge or a pocket for letters if the frame is large enough.
Hang it at about shoulder height beside the door, where it’s easy to reach. Paint the frame to match your trim or wall color so it blends with the entry.
Hooks need to match what they’ll carry. Small cup hooks suit keys, but bags and coats need sturdier ones screwed into studs.
Avoid overfilling it. A cluttered organizer is just clutter on a wall.
A visible home for keys means fewer frantic searches in the morning, which is the kind of daily friction that’s surprisingly easy to remove.
10. Frame With a Built-In Mini Shelf
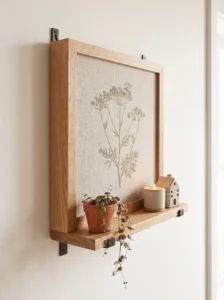
Add a small shelf along the bottom edge of a large frame and you get a styled vignette in one piece. The art or fabric behind acts as the backdrop, while the shelf holds a plant, candle, or small object.
Cut a one-by-four board to the frame’s width, or slightly narrower, and attach it with small L-brackets screwed into the frame’s lower rail. Reinforce the back with a wood strip so the weight is carried by the whole structure, not just the molding.
Place it in a hallway, above a desk, or beside a bed. Choose objects that are light, since a thin shelf shouldn’t carry heavy ceramics.
Mount the whole assembly into wall studs or use heavy-duty anchors. Frames alone aren’t made to carry extra load, and a shelf adds leverage that pulls on the hanging hardware.
Paint the shelf the same color as the frame for a built-in look, or use a contrasting wood for a layered effect.
Because the frame holds the visual weight, a few small items look intentional, even in a tight space.
11. String-and-Clip Photo Display
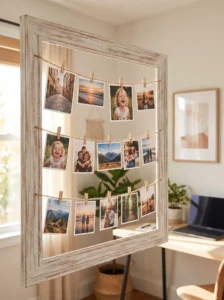
Stretched twine and mini clothespins turn an empty frame into a photo display that changes in seconds. Nothing gets sealed behind glass, and swapping pictures takes moments.
Remove the glass and backing. Screw small eye hooks into the inside of the frame on both sides, and thread twine or thin wire across, pulling it taut. Space three to five lines evenly, and clip photos along them.
Larger frames, around 24 by 36 inches, hold more and look more impressive. Paint or stain the frame to suit the room: whitewash for a light look, dark walnut for a classic one.
Nurseries, home offices, dorm rooms, and entryways all work. Hang it where people pause to look.
Loose lines sag and look sloppy. Tighten the twine with a few wraps around the hooks, and check it after a week since new twine stretches.
Because photos rotate easily, the display stays fresh through the seasons, with holiday cards in winter and travel prints in summer, no new frames needed.
12. Vanity Tray With a Mirror Bottom
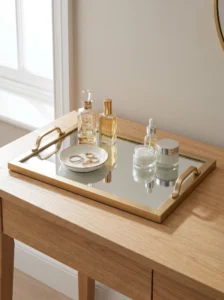
A frame with a mirror panel and two handles makes a tray that pulls a dresser or bathroom counter together. Perfume bottles, rings, and skincare look better grouped on a reflective surface.
Replace the glass with a mirror cut to size, or use mirrored acrylic for a lighter option. Attach handles to the short ends, reinforcing the molding with wood blocks if it’s thin.
Choose a frame with a raised edge, since a lip keeps bottles from sliding off when the tray is moved. Gold, black, and white frames suit most vanities.
Felt pads on the underside protect furniture. Skipping them leaves scratches, particularly on wood dressers.
In a bathroom, seal the wood with a water-resistant finish so steam doesn’t warp it. Wipe the mirror with glass cleaner regularly, since fingerprints show immediately.
Grouping products on one tray instead of scattered across the counter makes a small vanity look cleaner and takes seconds to tidy when guests arrive.
13. Empty Frames as Wall Molding
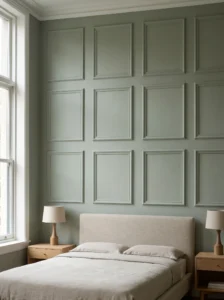
Hanging empty frames in a grid creates the look of picture-frame molding without carpentry. Painted the same color as the wall, they add architecture and shadow lines to a flat surface.
Remove glass and backing, and paint the frames and the wall in a single color. White feels classic, while deep green, navy, or charcoal makes a bolder statement. Matte paint hides the seams between frame and wall.
Dining rooms, entryways, and bedrooms suit this treatment, especially behind a bed or a sideboard. Use a level and a spacer block so gaps are equal, or the grid will look crooked immediately.
Lightweight frames can go up with removable adhesive strips, which makes the technique renter-friendly. Heavier ones need small nails.
A paper template taped to the wall helps plan the layout before committing to any hole.
The effect is subtle but noticeable. A plain wall suddenly looks tailored, and the room feels more finished even when the furniture hasn’t changed.
14. Living Succulent Frame
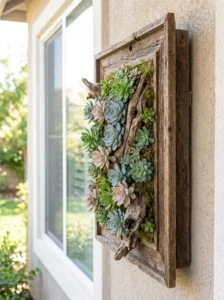
A shallow planter inside a frame creates living art that hangs on the wall. Succulents suit this treatment because they need little water and tolerate shallow soil.
The frame needs depth. Use one that’s at least two inches deep, or build it out with strips of wood. Line the back with a waterproof layer such as thick plastic, add wire mesh, then pack with cactus soil and sphagnum moss. Press succulent cuttings in tightly.
Lay the frame flat for three to four weeks so the cuttings root before hanging it. Hanging too early sends plants tumbling.
Choose a bright spot with indirect light, such as a sunny hallway or a kitchen wall near a window. Water sparingly, by misting or laying the frame flat and watering lightly, since too much moisture rots roots and stains walls.
Weight rises once the soil is damp, so use heavy-duty hanging hardware and anchors.
Day to day, a frame like this needs far less care than a houseplant on a shelf, yet it looks like a design feature rather than a plant in a pot.
15. Cork Pin Board Frame
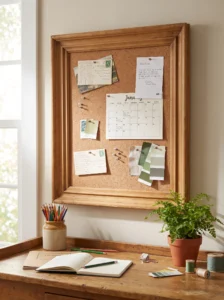
Cork is a practical filler for a frame, giving you a pin board that looks nicer than the standard office kind. Cork tiles or a roll cut to size are both easy to find and cheap.
Remove the glass, measure the opening, and cut cork to fit. Glue it to a sturdy backing and let it set under weight so it stays flat. Two layers give a thicker surface that holds pins better.
Paint or stain the frame to suit the room. A dark wood works in a study, while white or pastel colors suit a child’s room or craft nook.
Place it where information needs to be seen, such as above a desk, beside the kitchen door, or in a homework area.
Avoid very thin cork, which tears or crumbles when pins are moved. Thicker sheets last far longer.
A framed pin board also tames paper clutter. Invitations, receipts, and schedules have a defined home, and the frame makes it look planned instead of messy.
16. Small Side Table From a Large Frame
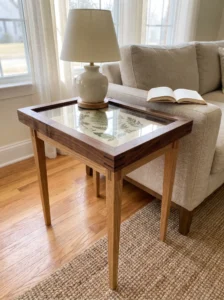
A big, sturdy frame with legs becomes an unusual side table, and glass on top protects whatever you display beneath it. A vintage map, fabric swatch, or sheet of botanical paper makes a surprising tabletop.
Attach a plywood panel to the back of the frame, at least three-quarters of an inch thick, since the frame itself can’t carry weight. Screw hairpin or tapered legs into the plywood, not the molding, using mounting plates for strength.
Frames around 24 by 36 inches give a good coffee-table height with legs at 14 to 16 inches, or choose a smaller frame with taller legs for a side table.
Put the display under the glass, secure it, and check that the glass is tempered or at least thick enough to withstand a set-down glass or book. Thin picture glass isn’t designed for this.
A sofa side, a bedside spot, or a plant stand all suit this piece. Test stability by pressing on each corner before putting anything on it.
Guests tend to notice a table like this, mostly because it doesn’t look like anything from a store.
Frame Projects at a Glance
| Type | Best Use | Material | Style/Vibe | Difficulty Level |
|---|---|---|---|---|
| Fabric or wallpaper art | Hallways, nurseries | Fabric, foam board | Soft, coordinated | Easy |
| Chalkboard memo frame | Kitchens, entryways | Chalkboard paint | Farmhouse, practical | Easy |
| Jewelry organizer | Bedrooms, closets | Wire mesh or screen | Boutique, organized | Medium |
| Serving tray | Coffee tables, bars | Glass, cabinet handles | Classic, versatile | Medium |
| Dry-erase planner | Kitchens, home offices | Glass, printed paper | Modern, functional | Easy |
| Empty-frame wall molding | Dining rooms, bedrooms | Painted wood frames | Tailored, architectural | Medium |
How to Choose Frames Worth Repurposing
Start with size, because it decides what a frame can become. Trays and planners need at least 12 by 16 inches to be useful. Mirrors, string photo displays, and wall molding grids look better with larger frames. Tabletops need something around 24 by 36 inches. Tiny frames are fine for fabric art or small hook boards, but they limit everything else.
Material matters more than most people expect. Solid wood frames are the sturdiest. They take paint and stain well, hold screws, and survive handles and brackets. Composite or MDF frames work for wall art, but they swell if they get damp and can split around screws. Plastic frames are light and cheap, and they paint well with a plastic-bonding primer, though they won’t carry weight. Thin metal frames suit mesh projects like jewelry holders.
Check the glass too. Real glass is right for trays, planners, and mirrors. Acrylic is lighter and safer in kids’ rooms or hallways, but it scratches more easily and doesn’t work well as a dry-erase surface.
Durability depends on the corners. Wiggle each corner before buying. Loose joints can be fixed with wood glue and a clamp, but warped, water-stained, or cracked frames usually aren’t worth the effort. Look at depth as well. A shadow box or a planter needs a deep rabbet, and many standard frames are too shallow without spacer strips.
Maintenance is light. Dust frames regularly, wipe glass with a mild cleaner, and add a clear sealer to painted frames that will be handled often, such as trays.
Budget-wise, thrift stores and yard sales are the best places to look, since frames are often priced low. Spend more on a solid wood frame when the project carries weight or moisture, and save on frames that will simply hang. Remember hidden costs: paint, hardware, cut mirror, and anchors can exceed the price of the frame.
The regrets are predictable. Buying a frame without measuring the depth. Using a single nail for a heavy mirror. Painting over a cracked corner. Carry a tape measure when you shop, and check the weight rating on any hanging hardware before you start.
Final Thoughts on Repurposing Old Frames
What these 16 projects have in common is that the frame does the hard part. The molding is already built, the corners are already joined, and the finish is either good enough to keep or easy to repaint. Your job is to decide what goes inside and how it will be used.
If you’re not sure where to begin, pick something low-risk. Fabric art, a chalkboard memo frame, or a cork board need almost no tools and teach you the basics of removing glass, painting backing, and hanging. Once those feel easy, try something with more structure, like a serving tray, a mirror, or a mini shelf.
A few habits make every project go better. Check the weight of the finished piece before hanging it, and use proper anchors. Handle old glass carefully and replace anything chipped. Test paint on the back of the frame first, since old finishes sometimes react badly. And let adhesive and paint cure fully before putting a piece to use.
It also helps to treat frames as a set. Painting several in one color, or repeating one material across a few projects, makes the results look planned instead of random.
Start with the frame you like least, since you have nothing to lose. A weekend afternoon, a can of paint, and a bit of patience can turn it into something people actually ask about.
Frequently Asked Questions
What can I do with old picture frames besides hanging pictures?
A lot. Old frames can become trays, mirrors, chalkboards, jewelry holders, planners, cork boards, and even side tables. Most projects only need a few basic supplies like paint, hardware, and a backing board. Pick one based on the size and depth of the frame you have.
Do I need to remove the glass first?
It depends on the project. Mirror, tray, and planner ideas use glass, while chalkboards, mesh organizers, and cork boards need it removed. Handle glass carefully, wear gloves, and wrap loose panes in newspaper or cardboard before disposing of them.
What paint works best on old frames?
Spray paint gives the smoothest finish on carved or ornate frames, while chalk-style paint covers wood easily and needs little prep. Sand lightly and clean first. For plastic frames, use a plastic-bonding primer so the paint doesn’t peel.
How do I hang a heavy frame project safely?
Use hardware rated well above the weight, such as D-rings, heavy-duty wire, and wall anchors or studs. Mirrors, shelves, and planters especially need solid support. A single small nail is not enough for anything heavy.
Can I use these projects in a rental?
Many of them, yes. Removable adhesive strips hold lightweight frames, and trays, planners, and table projects don’t need any wall damage. For heavier pieces, check with your landlord before drilling.
How much does it cost to repurpose a frame?
Usually very little. Thrifted frames are often cheap, and most projects need only paint, adhesive, and small hardware. Costs go up for cut mirrors, specialty legs, or deep frames you build out. Add up supplies before you start so there are no surprises.
Will old frames hold up over time?
Solid wood frames usually do, especially after repair and sealing. Composite frames can swell or split if they get damp. Check joints and corners before starting, and reinforce loose ones with glue and clamps.
What are the most common mistakes with frame projects?
Skipping the weight check, using shallow frames for deep projects, hanging with weak hardware, and painting without cleaning or sanding first. Taking measurements before you buy or begin prevents most of these.